
Itech VP02W
UNIC UC30 LED Mini Projector User Manual
Model: VP02W
Introduction
This manual provides detailed instructions for the setup, operation, and maintenance of your UNIC UC30 LED Mini Projector. Please read this manual thoroughly before using the projector to ensure proper functionality and to prevent damage.
Safety Information
- Do not block the ventilation openings. Ensure adequate space around the projector for proper airflow.
- Do not look directly into the projector lens when the lamp is on. The bright light can cause eye damage.
- Keep the projector away from water or other liquids. Do not operate in humid environments.
- Use only the power adapter supplied with the projector.
- Do not attempt to disassemble or repair the projector yourself. Refer all servicing to qualified personnel.
- Place the projector on a stable, level surface to prevent it from falling.
Package Contents
Please check the package contents upon opening. If any items are missing or damaged, contact your retailer.
- UNIC UC30 LED Mini Projector
- Power Adapter
- AV Cable
- Remote Control
- User Manual (this document)

Image: The UNIC UC30 projector, its power adapter, an AV cable, and the remote control, laid out to show the complete package contents.
Product Overview
Familiarize yourself with the various parts and connections of your projector.
Front and Side View

Image: A front-side view of the UNIC UC30 projector, highlighting the main projection lens and the ventilation grilles on the side.
- Projection Lens: Emits the image.
- Focus Ring: Adjusts image sharpness.
- Keystone Correction Dial: Corrects trapezoidal image distortion.
- Ventilation Grilles: Essential for heat dissipation. Do not block.
Rear and Side Ports
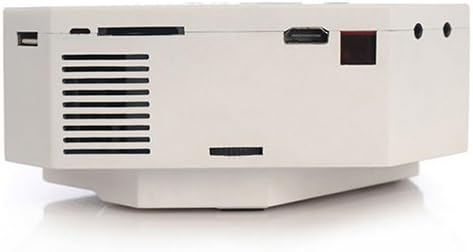
Image: A side view of the UNIC UC30 projector, clearly showing the USB port, SD card slot, HDMI port, and other audio/video input jacks.
- VGA Port: Connects to computers.
- HDMI Port: Connects to HDMI-enabled devices (laptops, gaming consoles, media players).
- USB Port: Connects USB storage devices for media playback.
- SD Card Slot: Inserts SD cards for media playback.
- AV Input: Connects to devices using the included AV cable (RCA composite).
- Headphone Jack: For external audio output.
- Power Input: Connects the power adapter.
Top Control Panel

Image: A top-down view of the UNIC UC30 projector, displaying the integrated control panel with navigation buttons and source selection keys.
- Power Button: Turns the projector on/off.
- Source Button: Selects input source (HDMI, VGA, AV, USB, SD).
- Menu Button: Accesses projector settings.
- Navigation Buttons (Up/Down/Left/Right): Navigates menus and adjusts settings.
- OK/Enter Button: Confirms selections.
- Return/Exit Button: Goes back or exits menus.
Setup
1. Placement
Place the projector on a stable, flat surface. Ensure there is sufficient space around the projector for ventilation. The ideal projection distance is between 1 to 3.5 meters, yielding a picture size of 30 to 120 inches.
Image: The UNIC UC30 projector positioned on a flat surface, illustrating a typical setup scenario.
2. Power Connection
- Connect the power adapter to the "Power Input" port on the projector.
- Plug the other end of the power adapter into a wall outlet.
- The power indicator light on the projector should illuminate.
3. Connecting Devices
The projector supports multiple input sources:
- HDMI: Connect an HDMI cable from your device (e.g., laptop, DVD player, game console) to the projector's HDMI port.
- VGA: Connect a VGA cable from your computer to the projector's VGA port.
- AV: Use the provided AV cable to connect to devices with RCA composite outputs (e.g., older DVD players, set-top boxes).
- USB: Insert a USB flash drive into the USB port for direct media playback.
- SD Card: Insert an SD card into the SD card slot for direct media playback.
Operating Instructions
1. Powering On/Off
- To Power On: Press the Power button on the projector's top panel or the remote control. The projector will start up.
- To Power Off: Press the Power button again. Confirm shutdown if prompted.
2. Adjusting Focus and Keystone
- Focus: Rotate the focus ring around the lens until the projected image is clear and sharp.
- Keystone Correction: If the image appears trapezoidal (wider at the top or bottom), adjust the keystone correction dial until the image is rectangular.
3. Selecting Input Source
Press the Source button on the projector or remote control to cycle through available input sources (HDMI, VGA, AV, USB, SD). Select the source corresponding to your connected device.
4. Media Playback (USB/SD)
When a USB drive or SD card is inserted, the projector will typically prompt you to select the media type (Photo, Music, Movie, Text). Navigate using the arrow keys and press OK to select.
Supported File Formats:
- Encoding Formats: MPEG1/MPEG2/MPEG4/DivX/Xvid
- Video Formats: AVI/MOV/VOB/DAT/MPEG/MPG/RM/RMVB
- Audio Formats: MP3/WMA/WAV
- Image Formats: JPEG/BMP/GIF/PNG
- E-book Format: TXT
Maintenance
- Lens Cleaning: Use a soft, lint-free cloth specifically designed for optical lenses to gently wipe the projector lens. Do not use abrasive cleaners or excessive force.
- Ventilation: Regularly check that the ventilation grilles are free from dust and debris. Use a soft brush or compressed air to clean them. Never block the vents during operation.
- Storage: When not in use for extended periods, store the projector in a cool, dry place, protected from dust.
Troubleshooting
| Problem | Possible Solution |
|---|---|
| No image projected. |
|
| Image is blurry. |
|
| Image is trapezoidal. | Adjust the keystone correction dial on the projector. |
| No sound. |
|
| Remote control not working. |
|
Specifications
| Feature | Detail |
|---|---|
| Brand | Itech |
| Model Name | UC30 |
| Model Number | VP02W |
| Display Technology | LCD |
| Native Resolution | 480 x 320 Pixels |
| Brightness | 150 LUX |
| Contrast Ratio | 300:1 |
| Picture Size | 30-120 inches |
| Projection Distance | 1-3.5 meters |
| Projection Model | Front/Rear projection |
| Hardware Interface | VGA, USB, HDMI |
| Speaker | 2.0W *2 |
| Wattage | 60 watts |
| Special Features | Portable, Keystone Correction |
| Mounting Type | Tabletop Mount |
Warranty and Support
For warranty information and technical support, please refer to the documentation provided at the time of purchase or contact your retailer. Keep your purchase receipt as proof of purchase.
Ask a question about this manual
Ask about setup, troubleshooting, compatibility, parts, safety, or missing instructions. Manuals+ will review the question and use this page’s manual context to help answer it.