
PRO 12 Pro12 (Model CT9223W97 DK)
PRO 12 Pro12 (Model CT9223W97 DK) User Manual
2-in-1 Touchscreen Tablet PC Featuring Android 6.0 (Marshmallow)
1. Introduction
This user manual provides comprehensive instructions for the operation, maintenance, and troubleshooting of your PRO 12 Pro12 2-in-1 Touchscreen Tablet PC. The Pro12 is designed to offer a versatile computing experience, combining the portability of a tablet with the functionality of a laptop through its detachable keyboard. Featuring a 12.2-inch Full HD IPS display and powered by Android 6.0 (Marshmallow), this device is equipped with a quad-core processor and 64GB of expandable flash storage. Please read this manual thoroughly to ensure proper use and to maximize the lifespan of your device.
2. Product Overview and Features
The PRO 12 Pro12 offers a range of features designed for productivity and entertainment:
- Display: 12.2-inch Full HD IPS touchscreen with a resolution of 1920 x 1200 pixels.
- Processor: 1.3 GHz Quad Core CPU for efficient performance.
- Memory & Storage: 2GB RAM and 64GB internal flash storage, expandable via microSD card up to 128GB (card not included).
- Operating System: Android 6.0 (Marshmallow).
- Cameras: Front-facing 2MP webcam and rear-facing 8MP webcam.
- Connectivity: Wi-Fi, Bluetooth 4.0, USB 2.0 port, miniHDMI output, and 3.5mm headphone jack.
- Keyboard: Full-width detachable keyboard with a proprietary Magnalink connection for secure docking and an enhanced typing experience.
- Battery Life: Up to 8 hours of battery life.
- Weight: Approximately 2.78 lbs (tablet with keyboard).

Figure 2.1: Key features of the PRO 12 Pro12 Tablet PC.
3. Components and Ports
Familiarize yourself with the physical components and connection ports of your Pro12 tablet.

Figure 3.1: PRO 12 Pro12 Tablet PC with Keyboard.

Figure 3.2: PRO 12 Pro12 Tablet (without keyboard).
3.1. Port Layout
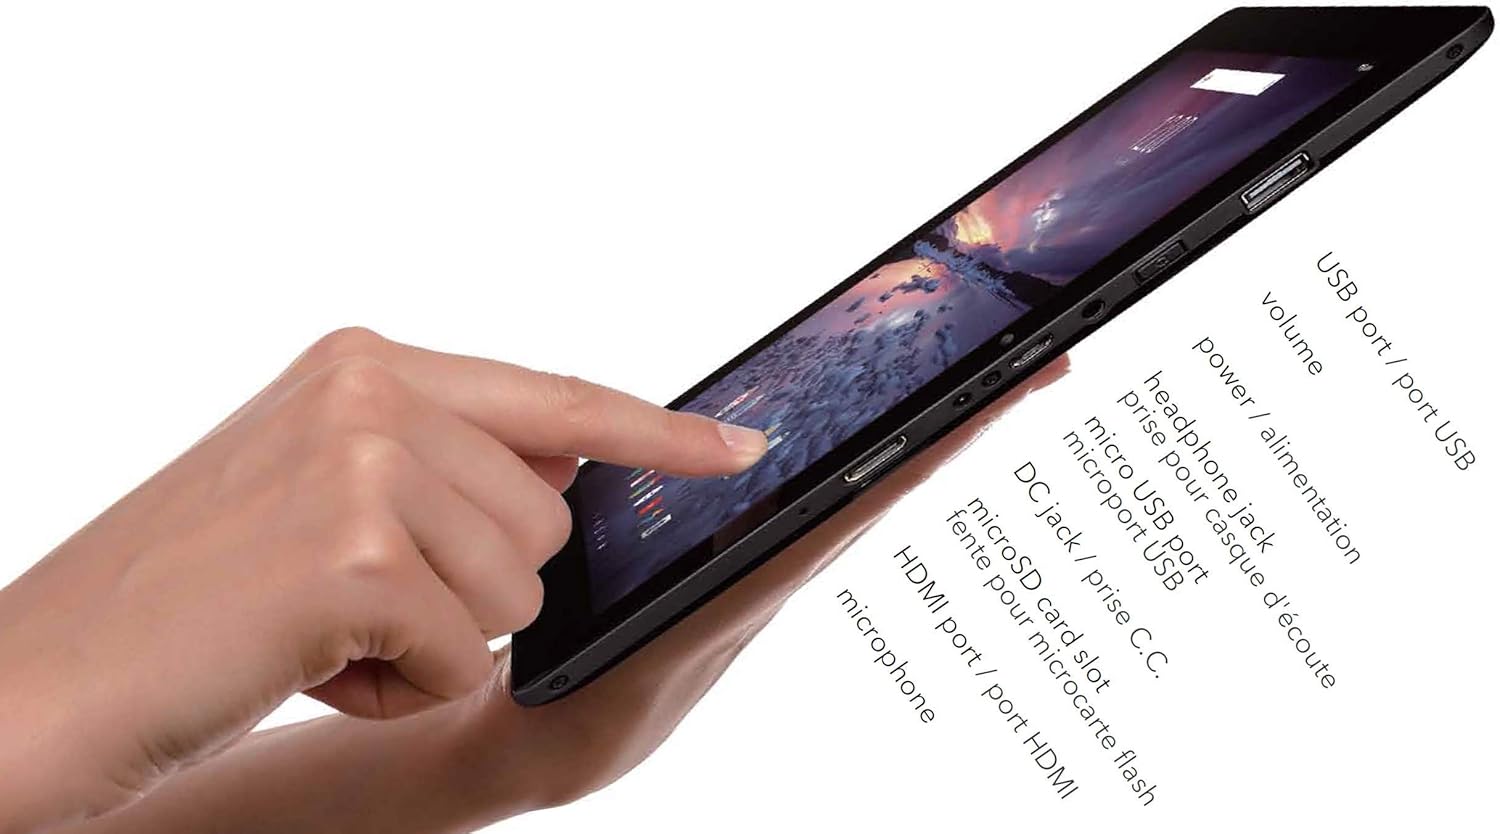
Figure 3.3: Side view of the Pro12 Tablet showing ports.
- USB Port (USB 2.0): For connecting external USB devices.
- Volume Buttons: Adjust audio output level.
- Power Button: Turns the device on/off or puts it to sleep/wakes it up.
- Headphone Jack (3.5mm): For connecting headphones or external speakers.
- Micro USB Port: Alternative charging port and for data transfer.
- DC Charging Port: Primary charging port for faster charging.
- MicroSD Card Slot: For expanding storage capacity.
- MiniHDMI Out: For connecting to external displays.
- Microphone: For audio input.
4. Setup
4.1. Initial Charging
Before first use, fully charge your Pro12 tablet. Connect the provided power adapter to the DC Charging Port on the tablet and plug it into a wall outlet. The charging indicator light will illuminate. A full charge may take several hours. You can also use the Micro USB port for charging, though it may be slower.
4.2. Attaching and Detaching the Keyboard
The Pro12 features a proprietary Magnalink connection for its detachable keyboard.
- Attaching: Align the tablet's bottom edge with the keyboard's docking connector. The magnetic connection will guide the tablet into place, securing it firmly.
- Detaching: Gently pull the tablet upwards from the keyboard. Avoid excessive force to prevent damage to the connectors.

Figure 4.1: Pro12 Tablet with keyboard attached.
4.3. Powering On/Off
- To Power On: Press and hold the Power Button until the screen illuminates.
- To Power Off: Press and hold the Power Button until a power-off menu appears on the screen. Select "Power off" and confirm.
- Sleep/Wake: Briefly press the Power Button to put the tablet to sleep or wake it up.
4.4. Initial Android Setup
Upon first power-on, you will be guided through the Android 6.0 (Marshmallow) setup wizard. Follow the on-screen prompts to:
- Select your language.
- Connect to a Wi-Fi network.
- Sign in with your Google Account or create a new one. This is essential for accessing the Google Play Store and other Google services.
- Set up screen lock options (PIN, pattern, password).
- Review and accept terms and conditions.
5. Operating Instructions
5.1. Touchscreen Navigation
The 12.2-inch touchscreen supports standard Android gestures:
- Tap: To select an item or open an application.
- Tap & Hold: To access contextual menus or move icons.
- Swipe: To scroll through lists or switch between home screens.
- Pinch-to-Zoom: To zoom in or out on images and web pages.
5.2. Connecting to Wi-Fi
To connect to a wireless network:
- Go to Settings > Wi-Fi.
- Ensure Wi-Fi is turned On.
- Select your desired network from the list.
- If prompted, enter the network password and tap Connect.
5.3. Using Cameras
The Pro12 is equipped with a 2MP front camera and an 8MP rear camera. Open the Camera application to take photos or record videos. You can switch between front and rear cameras within the app interface.
5.4. Storage Management
Your tablet has 64GB of internal storage. To expand storage:
- Insert a microSD card (up to 128GB, not included) into the microSD card slot.
- The tablet will recognize the card, and you can use it for storing photos, videos, and other files.
- Manage storage by going to Settings > Storage & USB.
5.5. Connecting Peripherals
- USB Devices: Connect USB flash drives, external hard drives, or other USB peripherals to the full-size USB 2.0 port.
- Bluetooth Devices: Pair Bluetooth headphones, speakers, or other accessories via Settings > Bluetooth.
- External Display (miniHDMI): Use a miniHDMI to HDMI cable (not included) to connect your tablet to a TV or monitor. The tablet screen content will be mirrored on the external display.
6. Maintenance
6.1. Cleaning
Use a soft, lint-free cloth to clean the screen and body of the tablet. For stubborn smudges, slightly dampen the cloth with water or a screen cleaner solution. Avoid using harsh chemicals or abrasive materials.
6.2. Battery Care
- Avoid fully discharging the battery frequently.
- Do not expose the tablet to extreme temperatures.
- Use only the provided charger or a compatible micro USB charger.
6.3. Software Updates
Periodically check for system updates to ensure optimal performance and security. Go to Settings > About tablet > System updates.
7. Troubleshooting
This section addresses common issues you might encounter with your Pro12 tablet.
| Problem | Possible Cause / Solution |
|---|---|
| Tablet does not turn on. | Battery may be completely drained. Connect to charger and wait a few minutes before attempting to power on. |
| Slow performance or apps freezing. | Too many applications running in the background. Close unused apps. Clear cache from Settings > Storage & USB. Restart the tablet. |
| Cannot connect to Wi-Fi. | Ensure Wi-Fi is enabled. Check Wi-Fi password. Restart your router. Move closer to the Wi-Fi router as the tablet's Wi-Fi antenna may have limited range. |
| Battery drains quickly. | Screen brightness too high. Too many apps running. Background sync enabled. Adjust settings to conserve battery. Note that charging time can be long, and battery life may vary with usage. |
| Touchscreen unresponsive or inaccurate. | Clean the screen. Restart the tablet. If issues persist, a mouse can be connected via the USB port for navigation. |
| Keyboard not recognized. | Ensure the Magnalink connection is clean and securely docked. Detach and reattach the keyboard. Restart the tablet. |
7.1. Factory Reset
If you experience persistent software issues, a factory reset can resolve them by restoring the tablet to its original settings. Warning: This will erase all data on your tablet. Back up important files before proceeding.
- Go to Settings > Backup & reset.
- Tap Factory data reset.
- Tap Reset tablet, then Erase everything to confirm.
8. Specifications
| Feature | Detail |
|---|---|
| Model Name | Pro12 (CT9223W97 DK) |
| Brand | PRO 12 |
| Operating System | Android 6.0 (Marshmallow) |
| Screen Size | 12.2 Inches |
| Screen Resolution | 1920 x 1200 (Full HD IPS) |
| Processor | 1.3 GHz Quad Core (VIA Chipset) |
| RAM | 2 GB (DDR3 SDRAM) |
| Internal Storage | 64 GB Flash Memory |
| Expandable Storage | MicroSD card slot (up to 128GB) |
| Front Camera | 2 MP |
| Rear Camera | 8 MP |
| Wireless Connectivity | Wi-Fi, Bluetooth 4.0 |
| Ports | USB 2.0, Micro USB, 3.5mm Headphone Jack, MiniHDMI Out, DC Charging Port |
| Battery Life | Up to 8 hours (Average) |
| Item Weight | 3.08 pounds |
| Product Dimensions | 17 x 3 x 11 inches |
| Color | Black |
9. Safety Information
- Do not expose the device to extreme temperatures, direct sunlight, or high humidity.
- Avoid dropping or subjecting the device to strong impacts.
- Keep the device away from water and other liquids.
- Do not attempt to disassemble or repair the device yourself. Refer to qualified service personnel.
- Use only manufacturer-approved accessories.
- Dispose of the device and its battery responsibly according to local regulations.
10. Warranty and Support
Specific warranty details are not provided in the product information. For warranty claims or technical support, please refer to the documentation included with your purchase or contact the PRO 12 customer service directly. You may also visit the official PRO 12 website for support resources.
Ask a question about this manual
Ask about setup, troubleshooting, compatibility, parts, safety, or missing instructions. Manuals+ will review the question and use this page’s manual context to help answer it.