
GODOX V860IIS
Contents
Godox Ving V860II-S Camera Flash Speedlite User Manual
Model: V860IIS
Introduction
This manual provides detailed instructions for the operation and maintenance of your Godox Ving V860II-S Camera Flash Speedlite. This flash unit is designed for Sony cameras and features a built-in 2.4G wireless X system, High-Speed Sync (HSS), and TTL auto flash capabilities. Please read this manual thoroughly before use to ensure proper function and to maximize your photographic experience.

Image: Multiple Godox V860II-S flash units, illustrating the product line.
What's in the Box
Upon opening your product packaging, verify that all the following items are included:
- 1 x Godox V860II-S Camera Flash
- 1 x Li-ion Battery and Charger
- 1 x Protection Case
- 1 x Mini Stand
- 1 x Color Filters Kit
- 1 x Diffuser
- 1 x LeaTure Lens Cloth

Image: All components included in the Godox V860II-S product package.
Key Features
- Compatibility: Specifically designed for Sony cameras (A7, A7R, A7S, A7II, A7RII, A58, A99, A6000, A6300, etc.).
- TTL Functions: Supports TTL auto flash, manual flash, 1/8000 high-speed sync (HSS), flash exposure compensation (FEC), and second curtain sync.
- Wireless System: Integrated Godox 2.4G wireless X system for all-in-one functions and up to 100 meters transmission distance.
- Master/Slave Capability: Functions as both a master unit to control other Sony camera flashes and a slave unit under control of Sony camera flashes.
- Power & Recycle Time: Features a 2000mAh lithium battery, providing a maximum 1.5s recycle time and approximately 650 full power flashes.

Image: Godox lithium-ion battery, highlighting its fast recycle time and high flash capacity.
Setup
1. Battery Installation
- Open the battery compartment cover located on the side of the flash unit.
- Insert the provided 2000mAh Li-ion battery (VB18) into the compartment, ensuring correct polarity as indicated inside the compartment.
- Close the battery compartment cover securely.

Image: Proper insertion of the lithium-ion battery into the flash unit.
2. Mounting the Flash to Your Camera
- Slide the flash's hot shoe into your camera's hot shoe mount.
- Rotate the lock ring clockwise until it is securely tightened, ensuring the flash is firmly attached to the camera.
Operating Modes
The Godox V860II-S offers various operating modes to suit different photographic needs. Use the "MODE" button to cycle through the available modes.

Image: Overview of the Godox V860II-S flash operating modes and features.
- TTL Auto Flash: Automatically adjusts flash output for correct exposure.
- Manual Flash (M): Allows manual control over flash output from 1/1 to 1/128 power.
- Multi Flash (Stroboscopic): Fires a series of rapid flashes during a single exposure to capture multiple movements.
- High-Speed Sync (HSS): Enables flash synchronization with shutter speeds up to 1/8000s, useful for freezing fast motion or using wide apertures in bright conditions.
- Master/Slave Function:
- Master: Controls other compatible Godox flash units wirelessly.
- Slave: Triggered by another master flash unit or optical trigger.
- S1/S2 Optical Slave Modes:
- S1: Triggers the flash upon sensing the main flash.
- S2: Ignores the pre-flash of a TTL system and triggers on the second flash.
- Zoom Function: Adjusts the flash coverage from 20mm to 200mm, either automatically (Auto Zoom) or manually, to match the lens focal length.
Controls and Display
The V860II-S features an intuitive control panel and a clear LCD screen for easy operation and setting adjustments.

Image: Detailed view of the Godox V860II-S flash unit's components and control panel.
Control Panel Layout:
- ON/OFF Power Switch: Located on the side, used to power the unit on or off.
- Mode Button: Cycles through TTL, Manual, and Multi flash modes.
- SET Button: Confirms selections and enters menu options.
- Select Dial: Used to navigate menus and adjust values.
- Function Buttons (1-4): Context-sensitive buttons whose functions are displayed on the LCD screen.
- Test Button/Flash Ready Indicator: Fires a test flash and illuminates when the flash is ready to fire.
LCD Screen:
The LCD screen displays current settings, including flash mode, zoom position, battery level, and wireless channel/group information.

Image: The LCD screen displaying operational parameters.
Technical Specifications
| Feature | Specification |
|---|---|
| Model | V860II-S |
| Compatible Mountings | Sony |
| Guide No. (1/1 output @ 200mm) | 60 (m ISO 100) / 190 (feet ISO 100) |
| Flash Coverage | 20 to 200mm (14mm with wide panel) |
| Auto Zoom | Flash coverage set automatically to match the lens focal length and image size. |
| Manual Zoom | Supported |
| Swinging/Tilting Flash Head | 0 to 360° horizontally, -7° to 90° vertically |
| Flash Duration | 1/300 to 1/20000 seconds |
| Flash Sync Speed | Up to 1/8000s (HSS) |
| Recycle Time | Approx. 1.5 seconds (at full power) |
| Full Power Flashes | Approx. 650 |
| Battery | 11.1V 2000mAh Li-ion Battery (VB18) |
| Product Dimensions | 2.52 x 2.99 x 7.48 inches |
| Item Weight | 1.65 pounds |
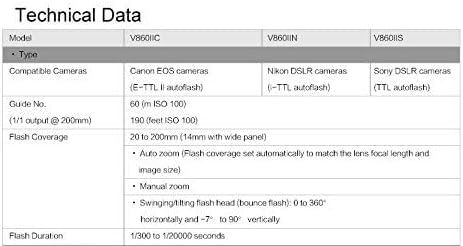
Image: Technical specifications table for the V860II series.
Maintenance
- Cleaning: Use a soft, dry cloth to clean the flash unit. For stubborn dirt, a slightly damp cloth can be used, followed by immediate drying. Avoid harsh chemicals or abrasive materials.
- Storage: When not in use for extended periods, remove the battery and store the flash in a cool, dry place, away from direct sunlight and extreme temperatures.
- Battery Care: Recharge the Li-ion battery regularly, even if not in use, to maintain its lifespan. Avoid fully discharging the battery.
- Avoid Impact: Protect the flash from drops and impacts, which can damage internal components.
Troubleshooting
If you encounter issues with your Godox V860II-S flash, refer to the following common troubleshooting steps:
- Flash Not Firing:
- Ensure the flash is powered on and securely mounted to the camera's hot shoe.
- Check the battery level. Recharge or replace the battery if low.
- Verify that the camera's flash settings are correctly configured.
- If using wireless mode, ensure the master and slave units are on the same channel and group.
- Incorrect Exposure:
- In TTL mode, check the Flash Exposure Compensation (FEC) settings on both the flash and camera.
- In Manual mode, adjust the flash power output.
- Ensure the flash head zoom matches the lens focal length or is set appropriately.
- Slow Recycle Time:
- This typically indicates a low battery. Recharge the Li-ion battery.
- Continuous full-power flashes will naturally increase recycle time due to heat and battery drain. Allow the unit to cool down.
- Flash Overheating:
- Excessive rapid firing can cause the flash to overheat. Allow the unit to cool down for several minutes.
- The flash may have a built-in thermal protection system that temporarily disables firing until it cools.
Warranty and Support
For warranty information and technical support, please refer to the official Godox website or contact your authorized dealer. Keep your purchase receipt as proof of purchase for warranty claims.
Manufacturer: Godox
Website: www.godox.com (This is a placeholder link, please verify the official website for support.)
Ask a question about this manual
Ask about setup, troubleshooting, compatibility, parts, safety, or missing instructions. Manuals+ will review the question and use this page’s manual context to help answer it.