1. Introduction to micro:bit go
The micro:bit is a compact, programmable computer designed to make learning coding accessible and engaging. It allows users to program on a computer or mobile device and then transfer the program to the micro:bit. This device supports various programming languages, including Scratch, Microsoft MakeCode, Python, and Swift Playgrounds, catering to a wide range of skill levels.
The micro:bit go kit provides everything needed to begin exploring digital creativity and programming concepts.
2. Package Contents
The micro:bit go package includes the following items:
- 1 x micro:bit board
- 1 x USB cable (for connecting to a computer and power)
- 1 x Battery holder
- 2 x AAA batteries

Image: Contents of the micro:bit go kit, showing the micro:bit board, USB cable, battery holder, and two AAA batteries.

Image: A diagram visually representing the micro:bit board, micro USB cable, 2x AAA batteries, and the 5x5 LED matrix.
3. Setup
Follow these steps to set up your micro:bit go:
- Powering the micro:bit: You have two options for powering your micro:bit:
- USB Power: Connect the small end of the provided USB cable to the micro USB port on the micro:bit board. Connect the larger end of the USB cable to a USB port on your computer or a USB power adapter.
- Battery Power: Insert the two AAA batteries into the battery holder, ensuring correct polarity. Connect the battery holder's connector to the white battery connector port on the micro:bit board.
- Connecting to a Computer: For programming, connect the micro:bit to your computer using the USB cable. Your computer should recognize the micro:bit as a removable drive named 'MICROBIT'.
- First Program: Visit the official micro:bit website (e.g., microbit.org) to access online editors like MakeCode or Python. You can write your first program, compile it, and download it as a .hex file. Drag and drop this .hex file onto the 'MICROBIT' drive. The micro:bit will automatically flash the program and restart.

Image: The reverse side of the micro:bit board, highlighting the micro USB port for data and power, and the battery connector.
4. Operating the micro:bit go
The micro:bit is equipped with several built-in features that facilitate interactive projects and learning:
- 25 LEDs: A 5x5 grid of red LEDs on the front of the board for displaying text, images, and animations.
- 2 Programmable Buttons (A and B): Located below the LED matrix, these buttons can be programmed to trigger actions.
- Motion Sensor (Accelerometer): Detects movement, tilt, and freefall.
- Compass (Magnetometer): Detects magnetic fields, allowing the micro:bit to act as a compass.
- Temperature Sensor: Measures the ambient temperature.
- Light Sensor: Uses the LED matrix to detect ambient light levels.
- Radio: Enables wireless communication between multiple micro:bits.
- Bluetooth Low Energy (BLE): Allows the micro:bit to communicate with other Bluetooth-enabled devices, such as smartphones or tablets.
- Edge Connector: Provides access to additional pins for connecting external components, sensors, and accessories (sold separately).
To operate, simply power on the micro:bit after uploading a program. The program will execute automatically. You can interact with it using the buttons, by moving the device, or through wireless communication, depending on your code.
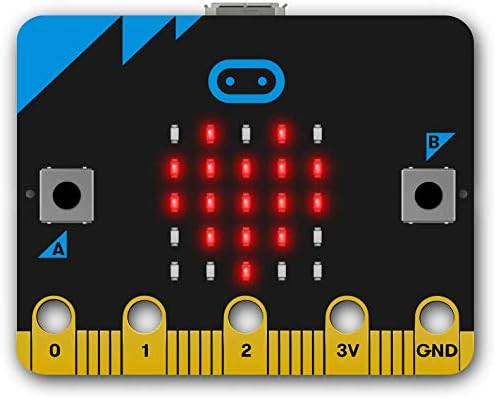
Image: The front of the micro:bit board, displaying its 5x5 LED matrix, which can be programmed to show various patterns and text.

Image: A detailed view of the micro:bit's front face, highlighting the 25 programmable LEDs and the 'A' and 'B' input buttons.
For project ideas and detailed programming guides, refer to the free tutorials available on the official micro:bit website.
5. Maintenance
To ensure the longevity and proper functioning of your micro:bit go, observe the following maintenance guidelines:
- Handle with Care: The micro:bit is a circuit board. Avoid bending it or applying excessive force.
- Keep Dry: Protect the micro:bit from liquids and moisture, as water can damage electronic components.
- Clean Gently: If necessary, clean the board with a soft, dry cloth. Avoid using harsh chemicals or abrasive materials.
- Battery Safety: When using the battery holder, ensure batteries are inserted correctly. Remove batteries if the micro:bit will not be used for an extended period to prevent leakage.
- Storage: Store the micro:bit in a safe, dry place away from extreme temperatures.
6. Troubleshooting
If you encounter issues with your micro:bit go, consider the following troubleshooting steps:
- micro:bit Not Powering On:
- Check USB cable connection to both the micro:bit and the power source/computer.
- If using batteries, ensure they are correctly inserted and not depleted. Try fresh batteries.
- Program Not Running:
- Ensure the .hex file was successfully dragged and dropped onto the 'MICROBIT' drive. The drive should disappear and reappear after a successful transfer.
- Verify your code for errors in the programming environment.
- Press the reset button on the back of the micro:bit (small button next to the micro USB port) to restart the current program.
- 'MICROBIT' Drive Not Appearing:
- Try a different USB port on your computer.
- Try a different USB cable.
- Ensure your computer's operating system drivers are up to date.
- LEDs Not Lighting Up:
- Check if the micro:bit is powered on.
- Ensure your program is designed to use the LEDs.
For more detailed troubleshooting and community support, visit the official micro:bit website.
7. Specifications
Key technical specifications for the micro:bit go (Model: BBC2546862):
| Feature | Detail |
|---|---|
| Brand | MICROBIT |
| Model Number | BBC2546862 |
| Dimensions (LxWxH) | 6.42 x 4.72 x 1.1 inches |
| Item Weight | 0.353 ounces |
| Processor Brand | Microsoft |
| Memory (RAM) | 128 MB |
| Memory Storage Capacity | 32 GB (likely referring to flash storage for programs) |
| Wireless Type | Bluetooth, Radio |
| Screen Resolution | 5x5 LED matrix |
| Sensors | Motion sensor (Accelerometer), Compass (Magnetometer), Temperature sensor, Light sensor |
| Power Source | USB (12 Volts), 2x AAA batteries |
| Operating System Compatibility | Windows 10 (and other major OS via web editors) |
8. Warranty and Support
Warranty information for the micro:bit go is typically provided at the point of purchase or can be found on the official micro:bit website. Please retain your proof of purchase for any warranty claims.
For further assistance, technical support, or to explore additional resources, please visit the official micro:bit website: microbit.org. The website offers extensive documentation, tutorials, and a community forum.


