1. Product Overview
The Ergotron LX Monitor Arm is a versatile single monitor desk mount designed to enhance your workspace ergonomics and free up valuable desk space. It supports flat, curved, and ultrawide computer monitors up to 34 inches diagonal and weighing between 7 to 25 lbs. The arm features extensive adjustability for optimal viewing comfort and includes integrated cable management for a clean setup.

Figure 1: Ergotron LX Monitor Arm (5-Inch Pole, White)
2. Important Safety Information
Please read this manual thoroughly before installation and use. Failure to follow these instructions could result in property damage or personal injury. Keep this manual for future reference.
- Ensure your desk surface is strong enough to support the combined weight of the monitor arm and your monitor.
- Do not exceed the maximum weight capacity of 25 lbs (11.3 kg).
- Always install the monitor onto the arm before adjusting the monitor pivot or tension.
- Use appropriate tools and hardware as specified in the installation steps.
- Keep children and pets away from the installation area.
3. What's in the Box
The Ergotron LX Monitor Arm Kit includes the following components:
- LX Monitor Arm Assembly (5-Inch Pole, White)
- Two-piece Desk Clamp
- Mounting Hardware (screws, washers, Allen wrenches)
- Instruction Manual

Figure 2: Contents of the Ergotron LX Monitor Arm Kit.
4. Setup and Installation
The LX Monitor Arm offers versatile mounting options, including a desk clamp and an optional grommet mount (sold separately). Follow the steps below for installation.
4.1 Desk Clamp Installation
- Attach Desk Clamp: Secure the two-piece desk clamp to your desk. The clamp accommodates desk thicknesses from 0.4 to 2.4 inches (1 to 6.1 cm). Tighten the clamp securely using the provided knob.
- Insert Pole: Place the monitor arm pole into the secured desk clamp.
- Attach Arm: Slide the arm assembly onto the pole.
- Mount Monitor: Attach your VESA-compatible monitor (75x75mm or 100x100mm) to the arm's mounting plate using the provided screws. Ensure the monitor is securely fastened.

Figure 3: Desk clamp attachment, showing compatibility with various desk thicknesses.
Video 1: Detailed guide on how to install and adjust the Ergotron LX Monitor Arm.
4.2 Grommet Mount Installation (Optional)
If using a grommet mount (sold separately), ensure your desk has a suitable hole (0.31" - 2" diameter) and the desk thickness is less than 2.25" (57 mm). Follow the grommet mount instructions provided with the accessory.
5. Operating the Monitor Arm
The Ergotron LX Monitor Arm allows for effortless adjustment to achieve your ideal viewing position. Always ensure your monitor is securely attached before making adjustments.
5.1 Adjusting Height and Extension
- Height Adjustment: Gently lift or lower the monitor to your desired height. The arm provides up to 17.3 inches (44 cm) of vertical lift.
- Extension/Retraction: Push or pull the monitor to extend or retract it from your viewing position. The arm offers up to 25.6 inches (65 cm) of extension.

Figure 4: Monitor mounted on the LX arm, demonstrating side-to-side movement.

Figure 5: Visual representation of the arm's extension capabilities.
Video 2: Demonstration of the LX Monitor Arm's full range of motion.
5.2 Tilt and Rotation
- Tilt: Adjust the monitor's tilt up to 75 degrees (70° back, 5° forward) to reduce glare and optimize viewing angles.
- Rotation: Rotate the monitor 360 degrees for portrait or landscape viewing.
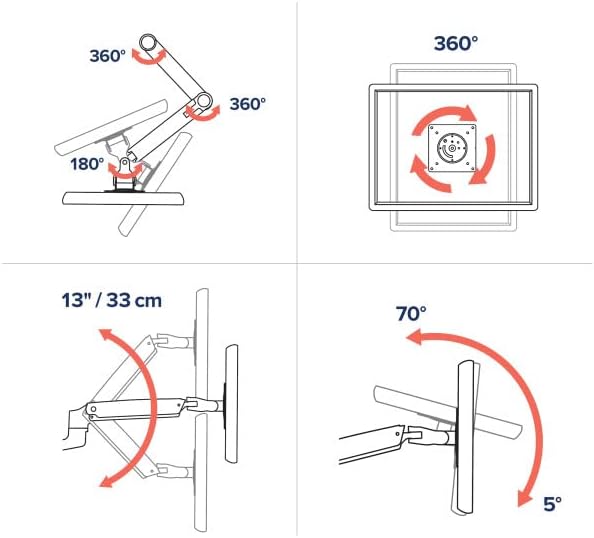
Figure 6: Illustrates 360° rotation, 13" (33cm) lift, and 75° tilt capabilities.

Figure 7: Monitor displayed in portrait orientation using the LX arm.
5.3 Cable Management
Route cables through the integrated cable management channels along the arm to maintain a clean and organized workspace.
6. Maintenance
- Cleaning: Wipe the arm and monitor with a soft, damp cloth. Avoid harsh chemicals or abrasive cleaners.
- Periodic Checks: Periodically check all screws and connections to ensure they are tight and secure.
- Tension Adjustment: If the monitor sags or is difficult to move, adjust the tension using the provided Allen wrench. Refer to the installation video for guidance.
7. Troubleshooting
- Monitor Sags/Drifts: The arm tension may be too low for your monitor's weight. Increase the tension using the appropriate Allen wrench.
- Monitor is Difficult to Move: The arm tension may be too high. Decrease the tension using the appropriate Allen wrench.
- Wobbling: Ensure all mounting screws and clamp connections are securely tightened. A stable desk surface is also crucial.
8. Specifications
| Feature | Detail |
|---|---|
| Brand | Ergotron |
| Model | LX Monitor Arm Kit (5-Inch Pole, White) |
| Mounting Type | Tabletop Mount (Desk Clamp included, Grommet Mount optional) |
| Movement Type | Articulating |
| Material | Metal |
| Color | White |
| Compatible Devices | Monitors up to 34 inches diagonal |
| Weight Capacity | 7 to 25 lbs (3.2 to 11.3 kg) |
| VESA Compatibility | 75x75mm, 100x100mm |
| Vertical Lift | Up to 17.3 inches (44 cm) |
| Extension | Up to 25.6 inches (65 cm) |
| Tilt Angle | 75 Degrees (70° back, 5° forward) |
| Rotation | 360 Degrees (Portrait to Landscape) |
| Desk Clamp Thickness | 0.4 to 2.4 inches (1 to 6.1 cm) |
9. Warranty and Support
9.1 Warranty Information
The Ergotron LX Monitor Arm is backed by a 10-year limited warranty, ensuring quality and durability. This warranty covers defects in materials and workmanship under normal use.
9.2 Customer Support
For technical assistance, troubleshooting, or warranty claims, please visit the official Ergotron website or contact their customer support team. You can find more information and resources at the Ergotron Store on Amazon.