1. Product Overview
The Stanley FMHT75077 FatMax 6 piece Punch Set is engineered for durability and precision. Each punch is crafted from a single piece of tempered tool steel, ensuring exceptional strength and a long operational life. The set features a high-visibility powder coat finish, making the tools easy to locate and identify in any workspace.
This versatile set is commonly used for tasks such as marking, starting holes, or driving out pins. It includes a comprehensive range of sizes to suit various applications.
Key Features:
- One-piece construction forged from tempered tool steel for strength.
- Hardened and tempered for long life.
- High visibility powder coat finish.
- Limited Lifetime warranty.
2. Components
The Stanley FMHT75077 FatMax Punch Set includes the following six punches:
- 1/16-Inch (1.5mm) Punch
- 5/32-Inch (4mm) Punch
- 5/16-Inch (8mm) Punch
- 1/4-Inch (6mm) Punch
- 3/16-Inch (5mm) Punch
- 1/8-Inch (3mm) Punch

Image 1: The complete Stanley FatMax 6-piece punch set.
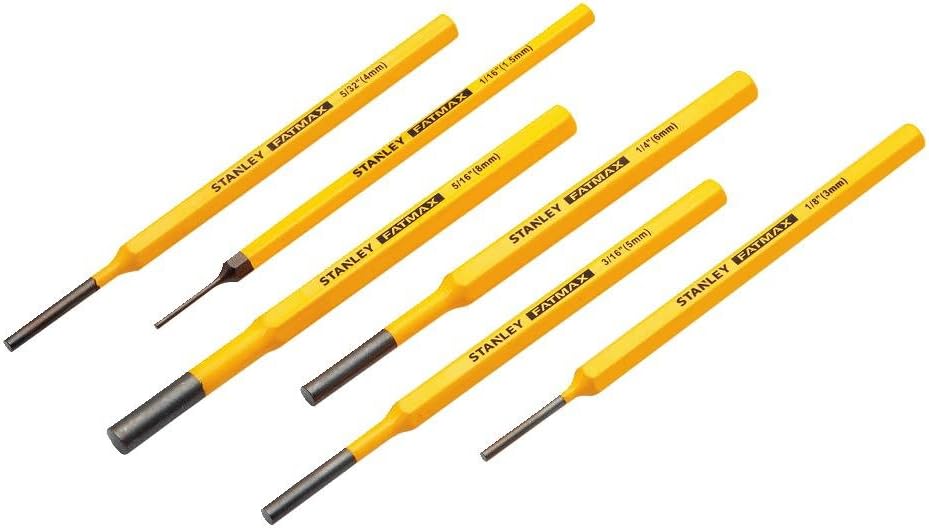
Image 2: An angled view of the Stanley FatMax punch set, highlighting the different punch tips.
3. Safety Information
Always prioritize safety when using hand tools. Failure to follow safety guidelines can result in injury.
- Wear Eye Protection: Always wear ANSI-approved safety glasses or goggles to protect against flying debris.
- Wear Hand Protection: Use appropriate gloves to protect hands from impact or sharp edges.
- Use Correct Punch for the Job: Select the appropriate punch size and type for the material and task to prevent damage to the punch or workpiece.
- Secure Workpiece: Ensure the material being worked on is stable and securely clamped to prevent movement during punching.
- Use a Proper Striking Tool: Always use a hammer or mallet of appropriate weight and material for striking the punch. Avoid using hardened hammers on hardened punches.
- Inspect Tools: Before each use, inspect punches for any signs of damage, such as mushroomed heads, cracks, or bent shafts. Do not use damaged tools.
- Avoid Over-Striking: Do not strike the punch with excessive force, which can cause the punch to break or deform.
- Keep Clear: Ensure hands and other body parts are clear of the striking area.
- Store Properly: Store punches in a dry, secure location to prevent rust and damage.
WARNING: This product can expose you to chemicals including lead, which is known to the State of California to cause cancer and birth defects or other reproductive harm. For more information go to www.P65Warnings.ca.gov.
4. Setup
Setting up for using the Stanley FatMax Punch Set is straightforward:
- Clear Work Area: Ensure your workspace is clean, well-lit, and free of obstructions.
- Gather Tools: Have your selected punch, a suitable hammer or mallet, and the workpiece ready.
- Secure Workpiece: Place the workpiece on a stable, flat surface. For best results and to prevent damage to your work surface or the punch, use a sacrificial block of wood, plastic, or a dedicated anvil underneath the workpiece.
- Wear Personal Protective Equipment (PPE): Always put on your safety glasses and gloves before beginning work.
5. Operating Instructions
Follow these steps for effective and safe use of your punch set:
General Punch Use:
- Select Punch: Choose the punch with the correct tip size and shape for your specific task (e.g., a center punch for marking, a pin punch for driving out pins).
- Position Punch: Place the tip of the punch precisely on the desired spot on your workpiece. Hold the punch firmly and vertically with one hand.
- Strike Punch: With your other hand, strike the head of the punch squarely with a hammer or mallet. Use controlled, firm blows. For marking, a single sharp tap may suffice. For driving pins, multiple controlled strikes may be necessary.
- Check Progress: After each strike, check the progress. Adjust the punch position if necessary.
- Remove Punch: Once the task is complete, carefully remove the punch from the workpiece.
Specific Applications:
- Marking: Use a center punch (like the 1/16-inch punch) to create a small indentation before drilling, preventing the drill bit from wandering.
- Driving Pins: Use a pin punch (e.g., 1/8-inch, 3/16-inch, 1/4-inch, 5/16-inch) to drive out or insert roll pins, dowel pins, or other fasteners. Ensure the punch tip is slightly smaller than the pin diameter.
- Aligning Holes: Punches can be used to align holes in mating parts before inserting fasteners.
6. Maintenance
Proper maintenance will extend the life of your Stanley FatMax Punch Set:
- Cleaning: After each use, wipe down the punches with a clean, dry cloth to remove any dirt, debris, or moisture.
- Lubrication: Periodically apply a light coat of rust-preventative oil to the metal surfaces, especially if storing in a humid environment.
- Inspection: Regularly inspect the punch tips and striking ends for wear, mushrooming, or cracks. A mushroomed head should be ground down to prevent chipping. If a punch is cracked, it should be replaced immediately.
- Storage: Store the punches in their original packaging, a tool roll, or a dedicated toolbox to protect them from damage and corrosion. Keep them in a dry place.
7. Troubleshooting
While punch sets are generally simple tools, here are a few common issues and their solutions:
- Punch Tip Bending/Breaking:
- Cause: Using the wrong size punch for the task, striking too hard, or using on material that is too hard for the punch.
- Solution: Ensure you are using the correct punch for the material and application. Do not use excessive force. Replace damaged punches.
- Punch Head Mushrooming/Chipping:
- Cause: Repeated striking with a hammer that is too hard or heavy, or improper striking angle.
- Solution: Use a hammer of appropriate weight and material. Strike the punch head squarely. If mushroomed, carefully grind the head to remove the mushroomed edge. If chipped, replace the punch.
- Punch Slipping:
- Cause: Improper positioning, slick surface, or worn punch tip.
- Solution: Ensure the punch tip is firmly seated before striking. Clean the workpiece surface. If the tip is worn, consider replacing the punch.
8. Specifications
| Manufacturer | Stanley |
| Part Number | FMHT75077 |
| Item Weight | 14.4 ounces |
| Product Dimensions | 7.75 x 2.95 x 0.95 inches |
| Item Model Number | FMHT75077 |
| Size | One Size |
| Color | Multi |
| Material | Blend |
| Item Package Quantity | 1 |
| Included Components | 1) 6pc Punch Set |
| Warranty Description | Limited lifetime warranty |
| Date First Available | May 16, 2016 |
9. Warranty and Support
The Stanley FMHT75077 FatMax Punch Set is backed by Stanley's Limited Lifetime Warranty. This warranty covers defects in material and workmanship for the life of the product.
For warranty claims, technical support, or general inquiries, please contact Stanley customer service directly. Refer to the official Stanley website or product packaging for the most current contact information and detailed warranty terms.
You can visit the official STANLEY Store on Amazon for more information and products: STANLEY Store