1. Important Safety Instructions
Please read this entire instruction manual before using your Alera Mini Tower Ceramic Heater. Failure to follow these instructions may result in fire, electric shock, injury, or property damage. Keep this manual for future reference.
- Electrical Safety: Always plug the heater directly into a 120V wall outlet. Do not use with extension cords, power strips, or surge protectors. Ensure the outlet is not overloaded.
- Placement: Place the heater on a firm, level surface. Maintain a minimum distance of 3 feet (0.9 meters) from walls, furniture, curtains, and other combustible materials. Do not block air intake or exhaust openings.
- Do Not Cover: Never cover the heater, as this can lead to overheating and fire. The unit is marked with a 'DO NOT COVER' warning.
- Moisture: Do not use the heater in wet or moist locations, such as bathrooms, laundry areas, or near sinks. Keep away from water.
- Supervision: Close supervision is necessary when the heater is used by or near children or individuals with reduced physical, sensory, or mental capabilities.
- Unplug When Not In Use: Always unplug the heater when not in use or before cleaning or servicing.
- Tip-Over Protection: This heater is equipped with a safety tip-over switch that automatically shuts off the unit if it is accidentally knocked over.
- Overheat Protection: The heater features an automatic overheat protection system that turns off the unit if it reaches an unsafe temperature. If this occurs, unplug the heater, wait 30 minutes for it to cool, and then plug it back in.
2. Product Overview
The Alera Mini Tower Ceramic Heater is designed to provide supplemental warmth for small to medium-sized rooms. It features a ceramic heating element, adjustable thermostat, and an oscillation function for wider heat distribution.

Figure 2.1: Front view of the Alera Mini Tower Ceramic Heater, showing the sleek black design and control panel at the top.
Components:
- Control Panel: Located on the top of the unit, featuring a thermostat knob and a function knob.
- Air Outlet Grille: Front grille where warm air is expelled.
- Air Intake: Rear grille for air circulation.
- Power Cord: For connecting to an electrical outlet.
- Base: Provides stability and houses the oscillation mechanism.
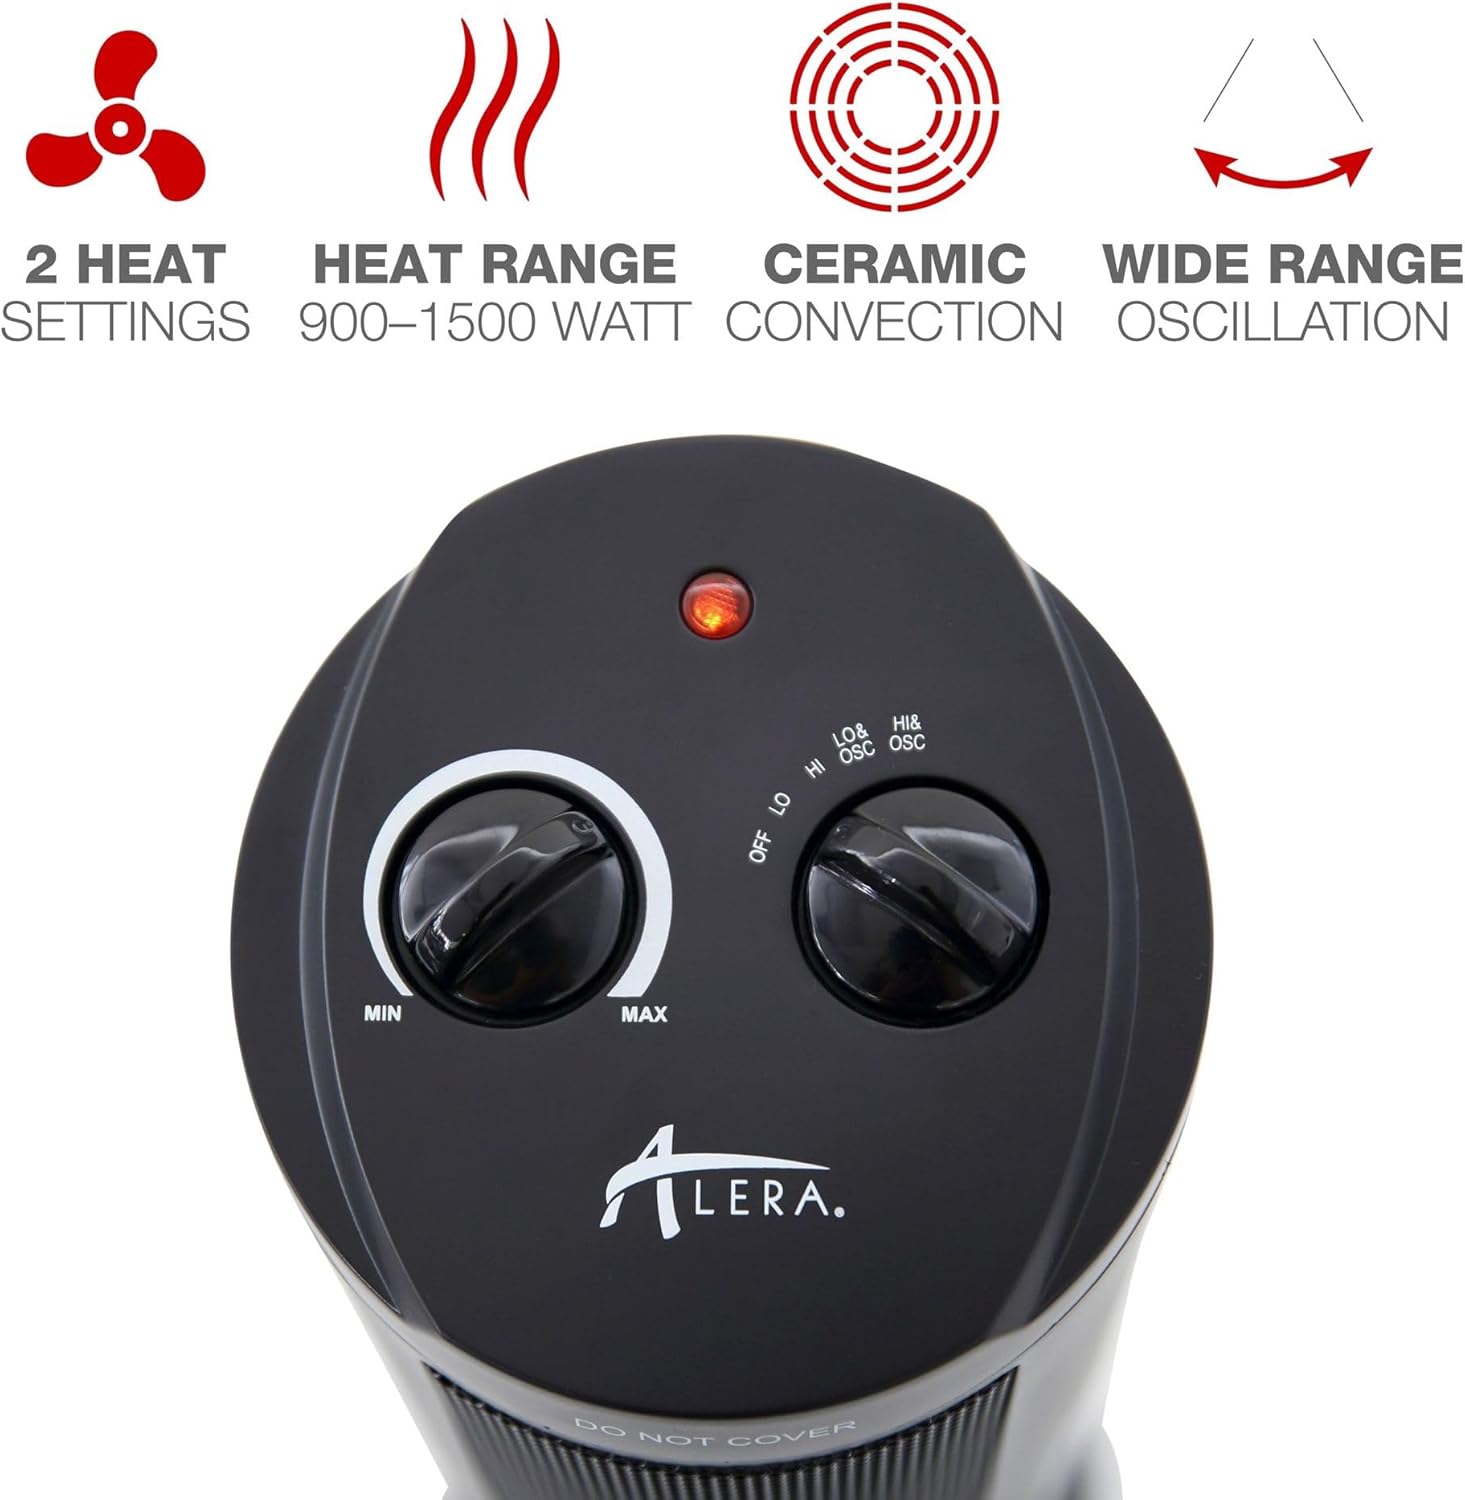
Figure 2.2: Detailed view of the control panel, showing the thermostat knob (MIN to MAX) and the function knob (OFF, LO, HI, LO&OSC, HI&OSC).
3. Setup
- Unpack: Carefully remove the heater from its packaging. Retain packaging for off-season storage.
- Inspect: Check the heater for any signs of damage. Do not operate if damaged.
- Placement: Place the heater upright on a stable, level, and heat-resistant surface. Ensure there is at least 3 feet (0.9 meters) of clear space around the heater from all sides, including the top. Avoid placing it on thick carpets that might block the air intake.
- Power Connection: Plug the power cord directly into a standard 120V AC, 60Hz electrical outlet. Ensure the outlet is in good condition and not shared with other high-wattage appliances.

Figure 3.1: The heater positioned in a room, demonstrating appropriate clearance from walls and furniture.
4. Operating Instructions
Familiarize yourself with the control panel before operation.
Control Panel Functions:
- Thermostat Knob (Left): Adjusts the desired room temperature. Turn clockwise from MIN to MAX. The heater will cycle on and off to maintain the set temperature.
- Function Knob (Right): Selects the operating mode.
Operating Steps:
- Power On: Turn the Function Knob to your desired setting:
- LO: Low heat setting (approximately 900W).
- HI: High heat setting (approximately 1500W).
- LO & OSC: Low heat with oscillation.
- HI & OSC: High heat with oscillation.
- Set Thermostat: Turn the Thermostat Knob clockwise to the MAX position. Once the room reaches a comfortable temperature, slowly turn the Thermostat Knob counter-clockwise until the heater turns off. The heater will now cycle on and off to maintain this temperature.
- Oscillation: If you select a setting with 'OSC', the heater will slowly rotate from side to side to distribute heat more evenly across the room.
- Power Off: To turn off the heater, turn the Function Knob to the 'OFF' position. Unplug the heater from the wall outlet when not in use for extended periods.
5. Maintenance
Regular cleaning and proper storage will help ensure the longevity and efficient operation of your heater.
Cleaning:
- Disconnect Power: Always unplug the heater and allow it to cool completely before cleaning.
- Exterior Cleaning: Wipe the exterior surfaces of the heater with a soft, damp cloth. Do not use abrasive cleaners or solvents, as these may damage the finish.
- Air Intake/Outlet: Use a vacuum cleaner with a brush attachment to gently remove dust and lint from the air intake and outlet grilles. Do not insert any objects into the grilles.
- Drying: Ensure the heater is completely dry before plugging it back in and operating.
Storage:
When storing the heater, keep it in its original packaging in a cool, dry place, away from direct sunlight and extreme temperatures.
6. Troubleshooting
If your heater is not operating correctly, consult the following troubleshooting guide. Do not attempt to repair the heater yourself.
| Problem | Possible Cause | Solution |
|---|---|---|
| Heater does not turn on. | No power to the unit. Tip-over switch activated. Overheat protection activated. Function knob is OFF. | Ensure power cord is securely plugged into a working 120V outlet. Place heater on a firm, level surface. Unplug, wait 30 minutes, then plug back in. Turn Function Knob to LO, HI, LO&OSC, or HI&OSC. |
| Heater turns off unexpectedly. | Overheat protection activated. Tip-over switch activated. | Unplug, wait 30 minutes, then plug back in. Ensure air intake/outlet are not blocked. Ensure heater is on a stable, level surface. |
| No heat output. | Thermostat set too low. Function knob not on a heat setting. | Turn Thermostat Knob clockwise towards MAX. Ensure Function Knob is set to LO, HI, LO&OSC, or HI&OSC. |
| Heater makes unusual noise or smell. | Dust accumulation or internal issue. | Unplug immediately. Clean air grilles. If problem persists, discontinue use and contact customer support. |
7. Specifications
- Model: ALE-HECT17
- Brand: Alera
- Type: Mini Tower Ceramic Heater
- Power Output: 900W (Low), 1500W (High)
- Voltage: 120V AC, 60Hz
- Dimensions (D x W x H): 7.37" x 7.37" x 17.37" (18.72 cm x 18.72 cm x 44.12 cm)
- Weight: 5.38 pounds (2.44 kg)
- Features: Adjustable Thermostat, Oscillation Function, Ceramic Heating Element, Cool-Touch Housing, Tip-Over Safety Switch, Overheat Auto-Shut Off Protection.
- Indoor/Outdoor Usage: Indoor Only
- Color: Black

Figure 7.1: Diagram showing the dimensions of the Alera Mini Tower Ceramic Heater.
8. Warranty and Customer Support
For information regarding the product warranty, please refer to the warranty card included with your purchase or visit the official Alera website. If you have any questions, require technical assistance, or need to report an issue, please contact Alera customer support through their official channels.
Please have your model number (ALE-HECT17) and purchase date available when contacting support.