Introduction
This manual provides comprehensive instructions for the setup, operation, maintenance, and troubleshooting of your iHome iPL24 Dual Alarm FM Clock Radio. Please read this manual thoroughly before using the device to ensure proper functionality and to maximize your user experience.
Setup
1. Power Connection
Connect the included AC adapter to the DC 9V 2.7A jack located on the back of the unit. Plug the other end into a standard wall outlet. The unit will power on automatically.

Image Description: A black AC power adapter with a cord, used to power the iHome iPL24 unit. The adapter has a standard US two-prong plug.
2. FM Antenna Connection
For optimal FM radio reception, connect the included FM antenna wire to the "fm antenna" jack on the back of the unit. Extend the wire fully and position it for best reception.
3. Battery Backup Installation
The iPL24 requires 1 Lithium Metal battery (CR2450, not included) for backup power. This battery maintains time and alarm settings during a power outage. Open the battery compartment on the bottom of the unit, insert the battery with the correct polarity, and close the compartment.
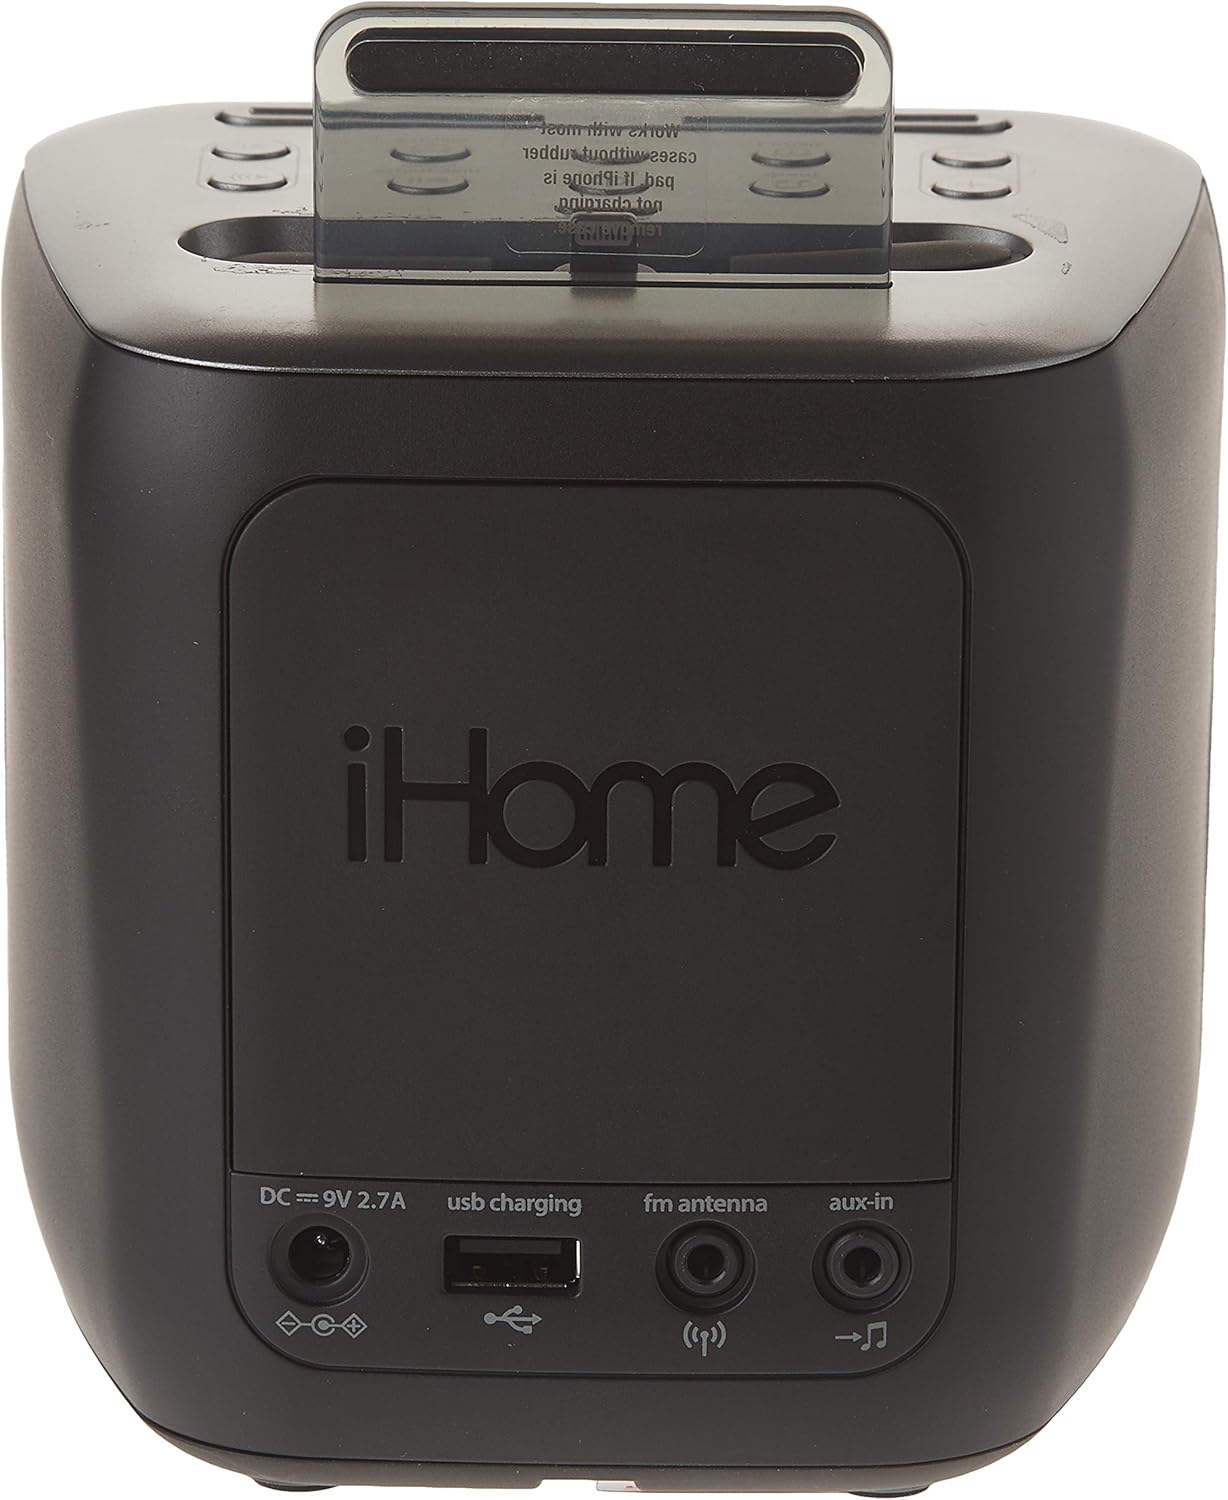
Image Description: The back panel of the iHome iPL24, showing the DC power input, USB charging port, FM antenna jack, and Aux-in port. The iHome logo is prominently displayed.
4. Time Synchronization (with iPhone)
When an iPhone is docked, the iPL24 can automatically synchronize its time with the iPhone's time. Ensure your iPhone's time settings are accurate.
Operating Instructions
Controls Overview

Image Description: Top view of the iHome iPL24 showing the control buttons and the Lightning dock. Buttons include Power, Mode, Volume, Alarm 1, Alarm 2, Sleep, Play/Pause, and Display Dimmer.
- Power Button: Turns the unit on or off.
- Mode Button: Cycles through FM radio, Aux-in, and docked device audio.
- Volume Buttons (+/-): Adjusts audio volume.
- Alarm 1 / Alarm 2 Buttons: Activates and sets Alarm 1 or Alarm 2.
- Sleep Button: Activates the sleep timer.
- Play/Pause Button: Controls playback for docked devices. Also used for setting FM presets.
- Zzz / Display Dimmer Button: Snoozes an active alarm; press and hold to adjust display brightness.
1. Setting the Time
If not synchronized with an iPhone, press and hold the "Time Sync" button (located near the dock) until the time flashes. Use the Volume +/- buttons to adjust hours and minutes, then press "Time Sync" again to confirm.
2. Setting Alarms
- Press and hold either the Alarm 1 or Alarm 2 button until the alarm time flashes.
- Use the Volume +/- buttons to adjust the alarm hour, then press the respective Alarm button to confirm.
- Use the Volume +/- buttons to adjust the alarm minute, then press the respective Alarm button to confirm.
- Select the alarm source (Buzzer, FM Radio, or Docked Device) using the Volume +/- buttons, then press the Alarm button to confirm.
- The alarm indicator will illuminate on the display, indicating the alarm is active.
To turn off an active alarm, press the corresponding Alarm 1 or Alarm 2 button. To snooze, press the Zzz button.
3. FM Radio Operation
- Press the Mode button until "FM" appears on the display.
- Use the Volume +/- buttons to manually tune to a station.
- To auto-scan for the next available station, press and hold the Volume +/- buttons.
- Setting Presets: Tune to the desired station. Press and hold the Play/Pause button until a preset number flashes. Use Volume +/- to select a preset number (1-6), then press Play/Pause again to save.
- Recalling Presets: Briefly press the Play/Pause button to cycle through saved presets.
4. Docking and Charging Devices
Carefully place your Lightning-compatible iPhone onto the Lightning connector in the dock. Ensure it is seated properly for charging and audio playback. The unit also features a USB charging port on the back for charging other USB-powered devices (cable not included).

Image Description: A front-angle view of the iHome iPL24, showcasing its compact design, fabric speaker grille, digital display, and the prominent Lightning dock connector at the top.
Note: Some thicker phone cases may need to be removed for proper docking. The dock connector is designed with some flexibility to accommodate various devices.
5. Aux-in Connection
Connect an external audio device (e.g., MP3 player) to the "aux-in" jack on the back of the unit using a 3.5mm audio cable (not included). Press the Mode button until "AUX" appears on the display to play audio from the connected device.
Maintenance
Cleaning
Wipe the unit with a soft, dry cloth. Do not use liquid cleaners or abrasive materials. Ensure the unit is unplugged before cleaning.
Battery Replacement
If the backup battery is depleted, the time and alarm settings may be lost during a power outage. Replace the CR2450 Lithium Metal battery as described in the Setup section.
Troubleshooting
| Problem | Solution |
|---|---|
| Unit does not power on. | Ensure the AC adapter is securely connected to both the unit and a working wall outlet. |
| Alarm does not sound. | Verify that the alarm is set and activated (indicator light on). Check alarm volume. Ensure the alarm source is correctly selected. |
| Poor FM radio reception. | Extend and reposition the FM antenna. Try moving the unit to a different location. |
| iPhone not charging/playing audio. | Ensure the iPhone is properly seated on the Lightning connector. Remove any thick cases if necessary. Check the USB cable if using the USB charging port. |
| Time/settings lost after power outage. | Replace the CR2450 backup battery. |
Specifications
- Model: iPL24
- Power Source: Corded Electric (AC Adapter: DC 9V 2.7A)
- Backup Battery: 1 x CR2450 Lithium Metal (not included)
- Connectivity: Lightning Connector, USB Charging Port, 3.5mm Aux-in
- Radio Bands: FM
- Product Dimensions: 9 x 5 x 7 inches
- Item Weight: 1.48 pounds
- Manufacturer: iHome
Warranty and Support
For warranty information and technical support, please refer to the documentation included with your purchase or visit the official iHome website. Contact information for customer service is typically available on the manufacturer's support pages.


