
1. Introduction
The MikroTik RB3011UiAS-RM is a high-performance multi-port router designed for advanced networking environments. It features an ARM architecture CPU, ten Gigabit Ethernet ports (divided into two switch groups), an SFP cage, and a SuperSpeed USB 3.0 port. This device is housed in a 1U rackmount enclosure and includes a touchscreen LCD panel, a serial console port, and Power over Ethernet (PoE) output functionality on the last Ethernet port. This manual provides detailed instructions for the installation, configuration, and operation of your RB3011UiAS-RM RouterBOARD.
2. Package Contents
Verify that all items are present in your package before proceeding with installation.
- MikroTik RB3011UiAS-RM RouterBOARD Unit
- Power Adapter
- Rackmount Ears (2)
- Mounting Screws and Accessories

Figure 2.1: Front view of the MikroTik RB3011UiAS-RM RouterBOARD, showing the 10 Gigabit Ethernet ports, SFP cage, USB 3.0 port, and LCD panel.

Figure 2.2: Included power adapter for the RB3011UiAS-RM RouterBOARD.

Figure 2.3: Various mounting screws and accessories for the RouterBOARD.
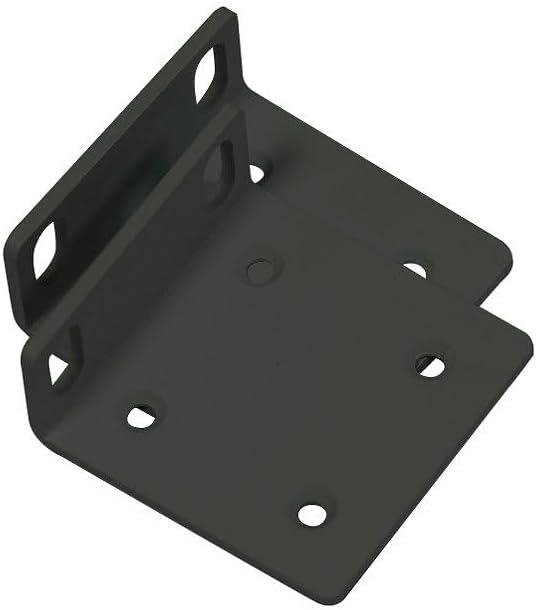
Figure 2.4: Rackmount ears for installing the RB3011UiAS-RM into a standard 1U rack.
3. Hardware Overview
The RB3011UiAS-RM is equipped with a range of ports and indicators for versatile networking applications.
3.1 Front Panel
- Ethernet Ports (1-10): Ten 10/100/1000 Gigabit Ethernet ports. Ports 1-5 form one switch group, and ports 6-10 form another. Port 10 supports PoE output.
- SFP Cage: One SFP port for fiber optic connections.
- USB 3.0 Port: One SuperSpeed USB 3.0 Type A port for external storage or 3G/4G modems.
- LCD Panel: A touchscreen LCD for device status monitoring and basic configuration.
- Reset Button: Used for resetting the device to factory defaults or entering RouterBOOT mode.
- Power LED: Indicates power status.
- User LED: Programmable LED for custom indications.
3.2 Rear Panel
- Power Jack: For connecting the included power adapter.
- Serial Console Port: RJ45 serial port for console access.
- Grounding Screw: For connecting a grounding wire.
4. Setup
4.1 Physical Installation
- Rackmount Installation:
- Attach the two rackmount ears to the sides of the device using the provided screws.
- Secure the device into a standard 1U rack using appropriate rack screws.
- Desktop Installation:
- Place the device on a flat, stable surface. Ensure adequate ventilation around the unit.
4.2 Power Connection
- Connect the included power adapter to the power jack on the rear panel of the RB3011UiAS-RM.
- Plug the power adapter into a suitable power outlet.
- The Power LED on the front panel should illuminate, indicating the device is receiving power.
4.3 Initial Configuration
- Connect to a PC: Connect an Ethernet cable from your computer to any of the Gigabit Ethernet ports (e.g., Ether2) on the RB3011UiAS-RM.
- Access RouterOS:
- Open a web browser and navigate to the default IP address (usually http://192.168.88.1).
- Alternatively, use the MikroTik WinBox utility for a graphical interface.
- The default username is admin with no password. It is highly recommended to set a strong password immediately after initial login.
- Basic Configuration: Follow the on-screen prompts or refer to the RouterOS documentation for initial network setup, including WAN and LAN configurations.
5. Operating the RouterBOARD
5.1 Network Configuration
The RB3011UiAS-RM runs MikroTik's RouterOS, offering extensive configuration options. Access RouterOS via WinBox or web browser (WebFig) to manage network settings.
- WAN Setup: Configure your internet connection on the designated WAN port (e.g., Ether1). This typically involves setting up DHCP client, static IP, or PPPoE.
- LAN Setup: Configure IP addresses, DHCP server, and other local network settings for the LAN ports.
- Firewall: Implement firewall rules to secure your network.
- Routing: Configure static or dynamic routing protocols as needed.
5.2 USB 3.0 Port Usage
The USB 3.0 port can be used for:
- External Storage: Connect a USB drive for network storage (NAS functionality) or for storing RouterOS backups and logs.
- 3G/4G Modem: Connect a compatible USB 3G/4G modem to provide cellular internet connectivity.
5.3 SFP Port Usage
The SFP cage supports various SFP modules for fiber optic connections, allowing for high-speed uplinks or connections to other fiber-enabled devices.
5.4 PoE Output
Ethernet port 10 supports Passive PoE output, which can power other PoE-compatible devices such as IP cameras or wireless access points, provided they operate within the supported voltage range.
5.5 LCD Panel
The touchscreen LCD panel displays real-time device status, including CPU load, memory usage, and port activity. It also allows for basic configuration adjustments directly from the device.
6. Maintenance
6.1 Firmware Updates
Regularly update RouterOS firmware to ensure optimal performance, security, and access to new features. Download the latest firmware from the official MikroTik website and follow the update instructions provided in RouterOS documentation.
6.2 Configuration Backup and Restore
It is recommended to regularly back up your device configuration. This can be done through WinBox or WebFig. Backups can be saved to your computer or an attached USB storage device. In case of configuration loss or device replacement, you can restore your settings from a saved backup file.
6.3 Cleaning
Keep the device clean and free from dust to ensure proper ventilation and prevent overheating. Use a soft, dry cloth for cleaning. Do not use liquid cleaners or aerosols.
7. Troubleshooting
This section addresses common issues you might encounter with your RB3011UiAS-RM.
- No Power:
- Ensure the power adapter is securely connected to both the device and a working power outlet.
- Verify the power adapter is functioning correctly.
- No Network Connectivity:
- Check Ethernet cable connections to ensure they are secure and functional.
- Verify IP address settings on your computer and the router.
- Check firewall rules in RouterOS that might be blocking traffic.
- Ensure the WAN connection is active and configured correctly.
- Slow Network Speeds:
- Check for high CPU or memory usage on the router via RouterOS.
- Ensure all connected devices are operating at their expected speeds (e.g., Gigabit connections).
- Inspect for network loops or misconfigurations.
- Device Not Responding:
- Try restarting the device by disconnecting and reconnecting power.
- If the device remains unresponsive, consider performing a factory reset (see below).
7.1 Factory Reset
To reset the device to factory default settings:
- Ensure the device is powered off.
- Press and hold the reset button.
- While holding the reset button, power on the device.
- Continue holding the button until the user LED starts flashing.
- Release the button. The device will now boot with factory default settings.
Warning: Performing a factory reset will erase all custom configurations.
8. Specifications
| Feature | Detail |
|---|---|
| Model | RB3011UiAS-RM |
| CPU Architecture | ARM |
| Ethernet Ports | 10 x 10/100/1000 Gigabit Ethernet |
| SFP Ports | 1 |
| USB Ports | 1 x USB 3.0 Type A |
| RAM | 1 GB |
| Storage Size | 128 MB |
| PoE In | Passive PoE |
| PoE Out Ports | Ether10 (Passive PoE) |
| Operating System | RouterOS |
| Dimensions | 443 x 92 x 44 mm (17.44 x 3.62 x 1.73 inches) |
| Weight | 850 Grams (1.87 pounds) |
| Enclosure | 1U Rackmount |
| Special Features | Touchscreen LCD, Serial Console Port |
9. Warranty and Support
For warranty information and technical support, please refer to the official MikroTik website or contact your authorized MikroTik reseller. Keep your proof of purchase for warranty claims.


