
1. Introduction
Thank you for choosing the Ingco RH15008 Rotary Hammer. This manual provides essential information for the safe and efficient operation, maintenance, and troubleshooting of your tool. Please read this manual thoroughly before using the product and keep it for future reference. This powerful 1500W rotary hammer is designed for drilling in concrete, wood, and steel, as well as light demolition tasks.
2. Safety Instructions
Always follow basic safety precautions to reduce the risk of fire, electric shock, and personal injury.
- Work Area Safety: Keep the work area clean and well-lit. Cluttered or dark areas invite accidents. Do not operate power tools in explosive atmospheres, such as in the presence of flammable liquids, gases, or dust.
- Electrical Safety: Power tool plugs must match the outlet. Never modify the plug in any way. Avoid body contact with earthed or grounded surfaces such as pipes, radiators, ranges, and refrigerators.
- Personal Safety: Always wear eye protection. Use hearing protection when operating the tool for extended periods. Wear a dust mask if working in dusty conditions. Dress properly; do not wear loose clothing or jewelry.
- Tool Use and Care: Do not force the power tool. Use the correct power tool for your application. Disconnect the plug from the power source before making any adjustments, changing accessories, or storing power tools.
- Service: Have your power tool serviced by a qualified repair person using only identical replacement parts. This will ensure that the safety of the power tool is maintained.
3. Product Overview
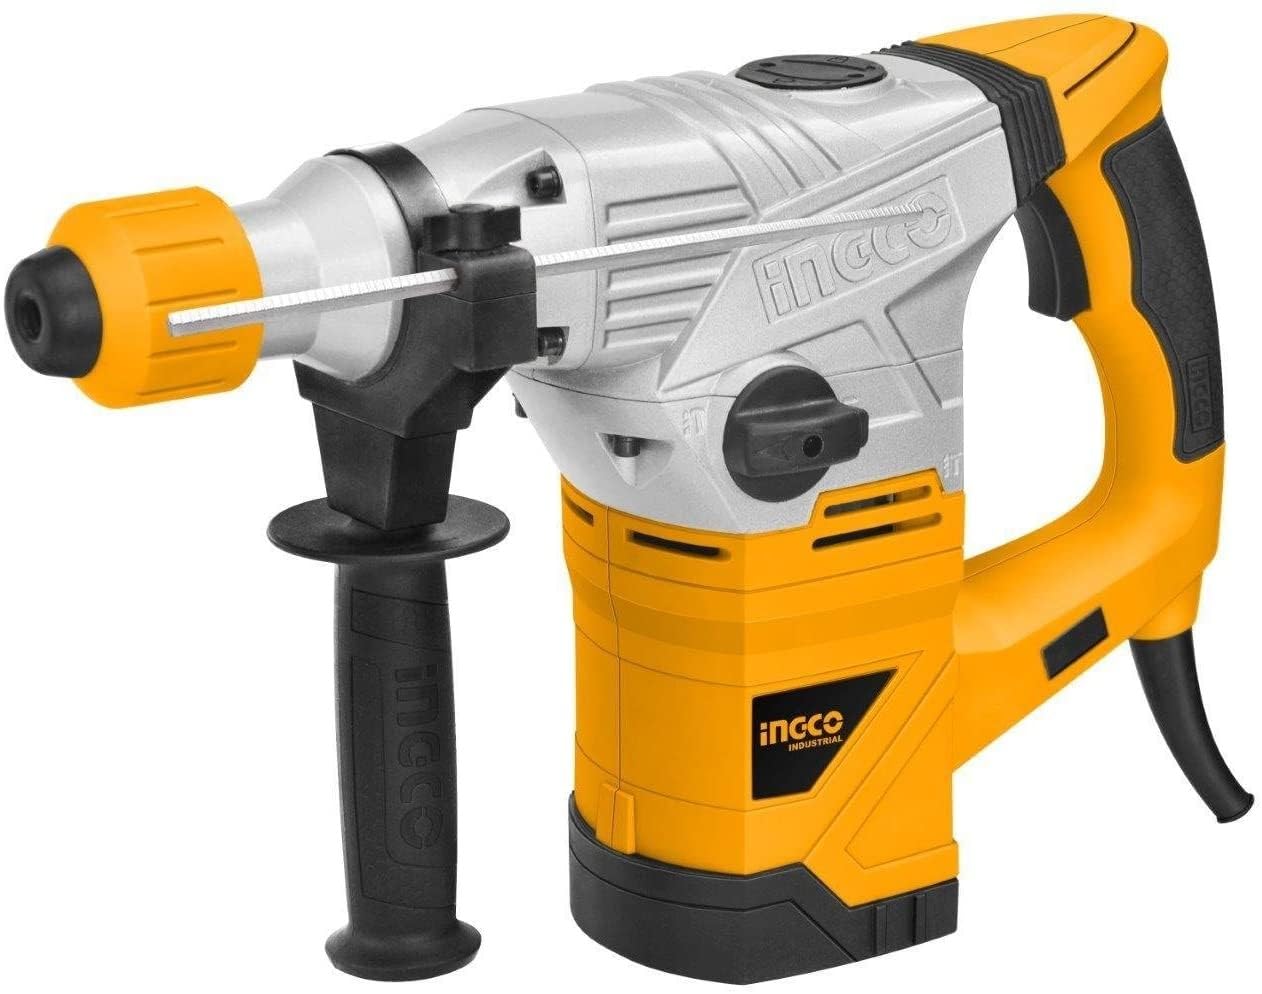
Figure 1: Ingco RH15008 Rotary Hammer. This image displays the main unit of the rotary hammer, an auxiliary handle, and a depth gauge. To the left, a black carrying case with the Ingco logo is shown. Below the main product, there are icons indicating key specifications: 1500W power, 220-240V~50-60Hz voltage, 750 RPM no-load speed, 3000 BPM impact rate, 36mm concrete drilling capacity, and a BMC (Blow Molded Case) icon.
The Ingco RH15008 is a robust rotary hammer designed for demanding drilling and chiseling applications. It features an SDS Plus chuck system for quick and secure bit changes. The tool comes with an auxiliary handle for improved control and a depth gauge for precise drilling.
Key Components:
- SDS Plus Chuck: For quick and easy bit insertion and removal.
- Mode Selector Switch: To switch between drilling, hammer drilling, and chiseling modes.
- Auxiliary Handle: Provides additional grip and control during operation.
- Depth Gauge: For setting precise drilling depths.
- Trigger Switch: For activating the tool.
- Lock-on Button: For continuous operation.
4. Setup
4.1 Attaching the Auxiliary Handle and Depth Gauge
- Loosen the auxiliary handle by rotating it counter-clockwise.
- Slide the handle over the chuck and position it to your desired angle.
- Insert the depth gauge into the hole on the auxiliary handle.
- Tighten the auxiliary handle by rotating it clockwise until secure.
4.2 Installing SDS Plus Bits
- Ensure the tool is unplugged from the power source.
- Clean the shank of the SDS Plus bit.
- Pull back the chuck sleeve and insert the bit into the chuck until it clicks into place.
- Release the chuck sleeve. Pull on the bit to ensure it is securely locked. A slight axial play is normal for SDS Plus systems.
- To remove, pull back the chuck sleeve and pull the bit out.
5. Operating Instructions
5.1 Selecting Operating Mode
Rotate the mode selector switch to choose the desired function:
- Drilling Mode (Rotary Only): For drilling in wood, metal, and plastics. No hammering action.
- Hammer Drilling Mode (Rotary with Hammer): For drilling in concrete, masonry, and stone.
- Chiseling Mode (Hammer Only): For light demolition, chiseling, and breaking. The rotation is locked.
5.2 General Operation
- Ensure the correct bit is installed and the mode is selected.
- Plug the tool into a suitable power outlet (220-240V ~ 50/60Hz).
- Hold the tool firmly with both hands, using the main handle and the auxiliary handle.
- Position the bit on the workpiece.
- Press the trigger switch to start the tool. For continuous operation, press the lock-on button while the trigger is depressed.
- Apply steady, even pressure. Do not force the tool. Let the tool do the work.
- To stop the tool, release the trigger switch. If the lock-on button is engaged, press the trigger switch again to release it.
Important: When drilling into walls, ceilings, or floors, always check for hidden electrical wires and pipes using a suitable detector before starting work.
6. Maintenance
Regular maintenance ensures the longevity and optimal performance of your rotary hammer.
- Cleaning: After each use, clean the tool with a soft cloth. Remove any dust or debris from the ventilation openings. Do not use water or chemical cleaners.
- Chuck Maintenance: Keep the SDS Plus chuck clean and lightly lubricated with grease to ensure smooth bit changes and prevent wear.
- Carbon Brushes: The carbon brushes are wear parts. If the motor sparks excessively or the tool loses power, the carbon brushes may need replacement. This should be done by a qualified service technician.
- Power Cord: Regularly inspect the power cord for damage. If damaged, have it replaced by a qualified technician to avoid electrical hazards.
- Storage: Store the tool in a dry, secure place, out of reach of children. Use the provided carrying case for protection.
7. Troubleshooting
| Problem | Possible Cause | Solution |
|---|---|---|
| Tool does not start. | No power supply; damaged cord; faulty switch. | Check power connection. Inspect cord for damage. If cord or switch is faulty, seek professional repair. |
| Loss of power or excessive sparking. | Worn carbon brushes. | Have carbon brushes inspected and replaced by a qualified technician. |
| Bit not locking in chuck. | Chuck dirty; bit shank damaged; chuck mechanism faulty. | Clean chuck and bit shank. Ensure bit is SDS Plus compatible. If problem persists, seek professional inspection. |
| Overheating during operation. | Overloading the tool; blocked ventilation. | Reduce load. Ensure ventilation slots are clear. Allow tool to cool down. |
8. Specifications
| Feature | Specification |
|---|---|
| Model Number | RH15008 |
| Input Power | 1500 W |
| Voltage | 220-240 V ~ 50/60 Hz |
| No-load Speed | 750 rpm |
| Impact Rate | 3000 bpm |
| Impact Energy | 5.0 J |
| Max. Drilling Capacity (Concrete) | 36 mm |
| Max. Drilling Capacity (Steel) | 13 mm |
| Max. Drilling Capacity (Wood) | 40 mm |
| Chuck System | SDS Plus |
| Weight | 10 kg |
| Included Accessories | 3 Drills, 2 Chisels, Auxiliary Handle, Depth Gauge, Carrying Case |
9. Warranty and Support
Ingco products are manufactured to high-quality standards. For warranty information, please refer to the warranty card included with your product or visit the official Ingco website. In case of technical issues or questions regarding your Ingco RH15008 Rotary Hammer, please contact Ingco customer support or your authorized dealer. Always provide the model number (RH15008) when seeking assistance.
For further assistance, you may visit the Ingco Store on Amazon.


