1. Introduction
The Focusrite Scarlett Solo (2nd Gen) is a compact and user-friendly USB audio interface designed for musicians and content creators. It offers class-leading sound quality and digital conversion, making it ideal for recording studio-quality audio directly to your computer. This manual provides essential information for setting up, operating, and maintaining your Scarlett Solo.
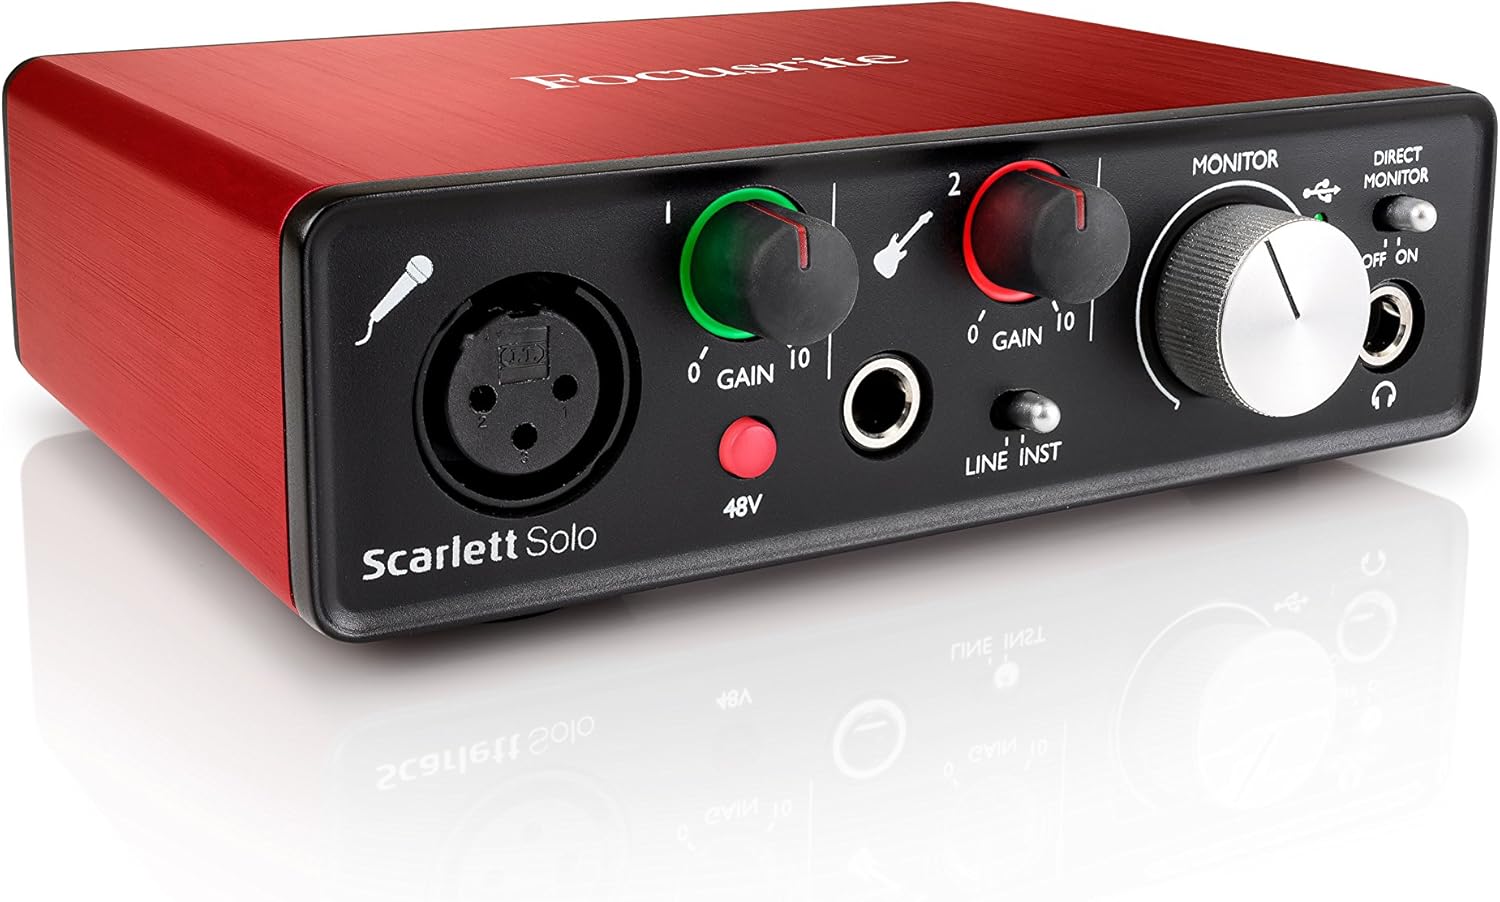
Figure 1: Focusrite Scarlett Solo (2nd Gen) USB Audio Interface. This image displays the compact, red-colored audio interface from an angled perspective, highlighting its sleek design and front panel controls.
2. Key Features
- 2-in/2-out Configuration: Features two audio inputs and two audio outputs for versatile recording and playback.
- Scarlett Mic Preamp: Equipped with one specially-designed Scarlett microphone preamp, offering superb sound quality, 48V phantom power, low noise, and ample gain for clear vocal and instrument recordings.
- Instrument Input: Includes a newly-designed instrument input to easily capture studio-quality audio from guitars or other instruments.
- Ultra-Low Latency: Experience super-low round-trip latency for real-time monitoring and recording.
- Portable Design: Compact, lightweight, and robust construction makes it suitable for use anywhere.
- Software Bundle: Comes with an exclusive version of Pro Tools | First Focusrite Creative Pack, Ableton Live Lite, XLN Audio Addictive Keys, Softube Time and Tone Bundle, Loopmasters samples, Novation Bass Station Virtual Synth, and Focusrite Red Plug-In Suite.

Figure 2: Included Software Bundle. This image highlights the various software titles bundled with the Scarlett 2nd Gen interfaces, including DAWs, virtual instruments, and effects plugins.
3. Setup Guide
3.1. Connecting to Your Computer
- Connect the Scarlett Solo to your computer using the provided USB cable. The device is USB-powered, eliminating the need for an external power adapter.
- For Windows and macOS, the device is plug-and-play. Ensure your operating system is up to date.
- Install the necessary drivers and bundled software (Pro Tools | First, Ableton Live Lite, etc.) by following the instructions provided with your software licenses.
3.2. Connecting Microphones and Instruments

Figure 3: Front Panel Connections. This image provides a clear view of the Scarlett Solo's front panel, showing the XLR microphone input, 1/4-inch instrument input, and headphone jack.
- Microphone: Plug your XLR microphone into Input 1 on the front panel. If using a condenser microphone, press the '48V' button to supply phantom power.
- Instrument: Connect your instrument (e.g., guitar) to the 1/4-inch jack (Input 2) on the front panel.
3.3. Connecting Output Devices
- Headphones: Plug your headphones into the 1/4-inch headphone jack on the front panel. Adjust the headphone volume using the dedicated knob.
- Studio Monitors: Connect your studio monitors to the 'Line Outputs' (Left and Right RCA jacks) on the rear panel.
4. Operating Instructions

Figure 4: Detailed Front Panel Controls. This close-up shows the gain knobs with their LED indicators, the 48V phantom power button, the Air mode button, the Monitor knob, and the Direct Monitor switch.
4.1. Input Gain Control
- Adjust the 'Gain' knobs for Input 1 (microphone) and Input 2 (instrument) to set the input level.
- The LED rings around the gain knobs indicate the input level:
- Green: Healthy signal level.
- Yellow: Signal is approaching clipping.
- Red: Signal is clipping. Reduce gain immediately to avoid distortion.
4.2. 48V Phantom Power
- Press the '48V' button to enable phantom power for condenser microphones connected to Input 1. The button will illuminate when active.
4.3. Air Mode
- Press the 'Air' button to activate Air mode, which enhances the microphone's sound quality by emulating the classic Focusrite ISA preamp sound. The button will illuminate when active.
4.4. Direct Monitoring
- Toggle the 'Direct Monitor' switch to 'ON' to listen to your input signal directly through your headphones or monitors with near-zero latency. This bypasses audio processing through the computer.
4.5. Output Volume
- Use the large 'Monitor' knob to control the overall output volume to your studio monitors.
- Use the dedicated 'Headphone' knob to control the volume for your headphones.
4.6. Software Integration
- The Scarlett Solo is compatible with all major Digital Audio Workstations (DAWs) on Mac and PC.
- When recording a single microphone via XLR, the output may initially be a single channel (e.g., left channel only). To address this, enable a 'mono' setting within your DAW or operating system's audio preferences to route the signal to both left and right channels.
Video 1: Focusrite Scarlett Solo Overview. This video provides a general overview of the Focusrite Scarlett Solo, demonstrating its features and basic functionality.
Video 2: Essential Information Before Purchase. This short video highlights key aspects of the Scarlett Solo, including its USB-C connectivity, input channels, phantom power, direct monitoring, and build quality.
5. Maintenance
- Keep the device clean and free from dust. Use a soft, dry cloth for cleaning.
- Avoid exposing the Scarlett Solo to extreme temperatures, humidity, or direct sunlight.
- Ensure all cables are securely connected but do not force them.
6. Troubleshooting
- No Sound/Distortion: Check all cable connections, ensure input gain levels are not clipping (red LED), and verify output volumes.
- Microphone Not Working: Ensure 48V phantom power is enabled for condenser microphones. Check microphone cable integrity.
- Latency Issues: Adjust buffer size settings within your DAW to optimize performance. Using Direct Monitoring can eliminate input latency.
- Single Channel Output from XLR Mic: If your DAW only registers sound on one channel (e.g., left) from an XLR microphone, enable a 'mono' input setting within your DAW's audio preferences to spread the signal across both stereo channels.
7. Specifications
| Feature | Detail |
|---|---|
| Brand | Focusrite |
| Model Number | AMS-SCARLETT-SOLO-2ND-GEN |
| Connectivity Technology | USB |
| Number of Channels | 2 (2-in/2-out) |
| Hardware Interface | USB 2.0 |
| Compatible Devices | Personal Computer |
| Operating System | Windows, macOS |
| Item Weight | 15.8 ounces |
| Product Dimensions | 1.77 x 5.71 x 4.41 inches |
| Supported Software | Pro Tools | First - Focusrite Creative Pack, Ableton Live Lite |
8. Warranty & Support
The Focusrite Scarlett Solo (2nd Gen) comes with a manufacturer's warranty. Please refer to the warranty card included in your product packaging for specific terms and conditions. For technical support, driver downloads, and additional resources, visit the official Focusrite website: www.focusrite.com.


