Product Overview
This manual provides instructions for the Smartby replacement remote control, designed for various PROSCAN TV models. This remote is pre-programmed and does not require additional setup for compatible televisions.
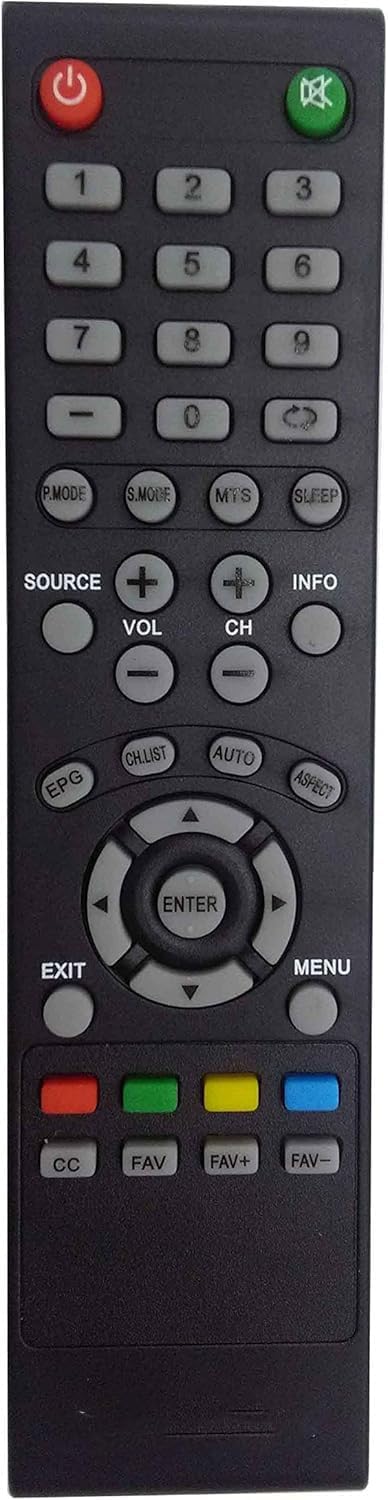
Figure 1: Front view of the Smartby PROSCAN TV Remote Control, showing all buttons and layout.

Figure 2: Angled view of the remote control, highlighting its ergonomic design.
Compatible TV Models
This remote control is specifically compatible with the following PROSCAN TV models:
- PLDED4017
- PLDED4016A-D
- PLDED3996A-E
- PLDED3273A-E
- PLDED5066A-B
- PLDED5068A-D
- PLED5529A-G
- PLCD3271A-D
Important: This is not a universal remote. If your original remote does not look identical to the one shown in this manual, it may not be compatible with your television.
Setup and Battery Installation
The Smartby PROSCAN TV Remote Control is pre-programmed and ready to use out of the box once batteries are installed. No additional programming is required.
Battery Installation Steps:
- Locate the battery compartment on the back of the remote control.
- Slide the battery compartment cover downwards to open it.
- Insert two (2) AA batteries, ensuring the positive (+) and negative (-) ends align with the markings inside the compartment.
- Slide the battery compartment cover back into place until it clicks securely.

Figure 3: Back view of the remote control with the battery cover removed, illustrating the battery insertion process.
Operating Instructions
This section outlines the basic functions of the remote control buttons.
| Button | Function |
|---|---|
| Power (⏻) | Turns the television on or off. |
| Mute (🔇) | Mutes or unmutes the television audio. |
| Number Buttons (0-9) | Directly selects TV channels. |
| SOURCE | Selects input sources (e.g., HDMI, AV, Component). |
| VOL +/- | Adjusts the volume level. |
| CH +/- | Changes the television channel up or down. |
| INFO | Displays current channel information or program details. |
| P.MODE | Cycles through picture modes (e.g., Standard, Dynamic, Movie). |
| S.MODE | Cycles through sound modes (e.g., Standard, Music, Movie). |
| MTS | Selects Multi-channel Television Sound options (e.g., Stereo, SAP). |
| SLEEP | Sets a sleep timer for the television. |
| EPG | Accesses the Electronic Program Guide. |
| CH.LIST | Displays the channel list. |
| AUTO | Initiates auto-tuning or auto-adjustment functions. |
| ASPECT | Changes the screen aspect ratio. |
| Navigation Buttons (Up, Down, Left, Right) | Navigates through menus and options. |
| ENTER | Confirms selections in menus. |
| EXIT | Exits the current menu or function. |
| MENU | Opens the main television menu. |
| CC | Activates or deactivates Closed Captions. |
| FAV / FAV+ / FAV- | Manages or navigates through favorite channels. |
| Color Buttons (Red, Green, Yellow, Blue) | Functions vary depending on the TV menu or application. Refer to your TV's manual for specific uses. |
Maintenance
Cleaning the Remote:
- Wipe the remote control with a soft, dry cloth.
- For stubborn dirt, lightly dampen the cloth with water or a mild, non-abrasive cleaner. Ensure no liquid enters the remote.
- Do not use harsh chemicals, solvents, or abrasive cleaning pads.
Battery Care:
- Replace batteries when the remote's response becomes sluggish or stops working.
- Remove batteries if the remote will not be used for an extended period to prevent leakage.
- Dispose of used batteries according to local regulations.
Troubleshooting
If your remote control is not functioning as expected, please follow these troubleshooting steps:
- Remove the batteries from the remote control.
- Press each button for 3 seconds to drain any leftover power and check for stuck buttons.
- Insert new batteries, ensuring they are installed correctly with the positive (+) and negative (-) ends aligned as indicated.
- If the remote still doesn't work, unplug the TV from the power outlet.
- While the TV is unplugged, hold down the power button on the TV itself for 15 seconds to reset it.
- Plug the TV back in and turn it on.
- Test the remote again to see if it works.

Figure 4: Visual guide for troubleshooting common remote control issues.
If these steps do not resolve the issue, please refer to the support information section.
Specifications
| Feature | Detail |
|---|---|
| Brand | Smartby |
| Model Number | LYSB01DOXUTX2-ELECTRNCS |
| Compatible Devices | Television (Specific PROSCAN models) |
| Special Features | Infrared, Pre-Programmed |
| Battery Type | AA (2 required) |
| Batteries Included | No |
| Connectivity Technology | Infrared |
| Product Dimensions | 22.86 x 5.08 x 2.54 cm (9.0 x 2.0 x 1.0 inches) |
| Item Weight | 9.07 g (0.32 ounces) |
Warranty and Support
Specific warranty information for this product is not provided in the available documentation. For details regarding warranty coverage or technical support, please contact the seller or manufacturer directly.
You can typically find seller contact information through your purchase history on the platform where the product was acquired.