1. Introduction
The Gskyer AZ70400 Refractor Telescope is designed for both beginners and experienced enthusiasts, offering a clear view of celestial objects and terrestrial landscapes. With its 70mm aperture and 400mm focal length, this telescope provides bright and sharp images, making it an excellent tool for exploring the cosmos and the natural world.
This manual provides detailed instructions for setting up, operating, and maintaining your Gskyer AZ70400 telescope to ensure optimal performance and longevity.
2. Safety Information
- WARNING: NEVER look directly at the sun through your telescope or its finderscope, even for an instant, without a professionally made solar filter. Permanent and irreversible eye damage, including blindness, can result.
- Do not leave the telescope unsupervised, especially when children or inexperienced adults are present.
- Handle optical components with care to avoid scratches or damage.
- Ensure the tripod is stable on a flat, firm surface before attaching the telescope.
- Avoid exposing the telescope to extreme temperatures or sudden temperature changes.
3. Package Contents
Carefully unpack all components and verify that all items listed below are present. If any items are missing or damaged, please contact Gskyer customer service.
- Telescope Optical Tube (Refractor)
- Adjustable Aluminum Alloy Tripod
- Altazimuth Mount
- 5x24 Finderscope with Mounting Bracket
- 48° Erecting BAK7 Prism (Diagonal)
- 25mm Eyepiece (1.25")
- 10mm Eyepiece (1.25")
- 3X Barlow Lens (1.25")
- Accessory Tray
- Carry Bag
- User Manual (this document)

Figure 3.1: All components included in the Gskyer AZ70400 package.
4. Setup Instructions
The Gskyer AZ70400 telescope is designed for quick and easy setup without the need for tools. Follow these steps to assemble your telescope:
- Set up the Tripod: Spread the tripod legs outwards until they are fully extended and stable. Secure the accessory tray to the center brace of the tripod.
- Attach the Telescope Tube: Locate the mounting screw on the Altazimuth mount head. Align the telescope optical tube with the mount and secure it using the mounting screw. Ensure it is firmly attached.
- Install the Finderscope: Slide the 5x24 finderscope into its mounting bracket on the telescope tube. Tighten the small thumbscrew on the bracket to hold the finderscope in place.
- Insert the Diagonal: Insert the 48° Erecting BAK7 Prism (diagonal) into the focuser tube. Secure it by tightening the small thumbscrew on the focuser.
- Insert an Eyepiece: Choose either the 25mm or 10mm eyepiece. Insert the desired eyepiece into the diagonal. Secure it by tightening the small thumbscrew on the diagonal.
- (Optional) Use the Barlow Lens: To increase magnification, insert the 3X Barlow lens into the diagonal first, then insert an eyepiece into the Barlow lens.

Figure 4.1: Fully assembled Gskyer AZ70400 Telescope.
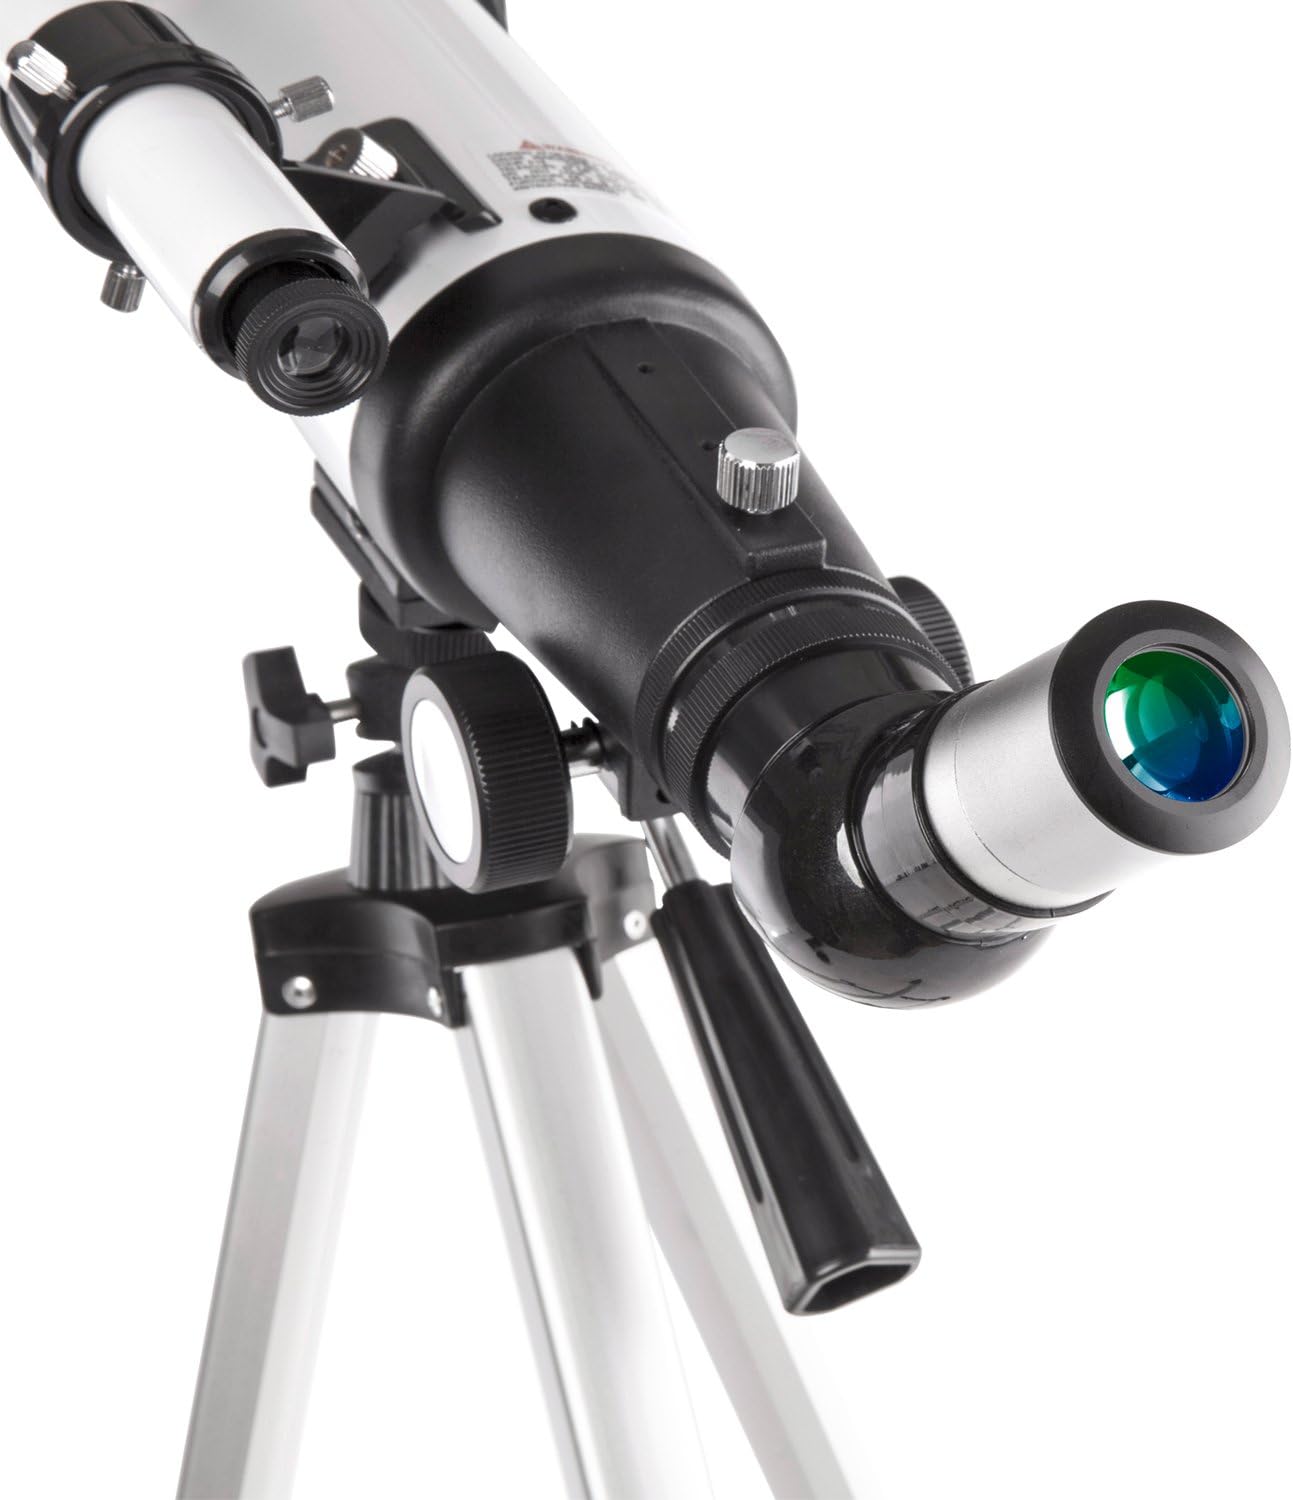
Figure 4.2: Detail of the focuser and eyepiece insertion point.
5. Operating the Telescope
5.1 Aligning the Finderscope
The finderscope is a low-power, wide-field telescope that helps you locate objects before viewing them through the main telescope. It must be aligned with the main telescope for accurate targeting.
- Point the main telescope at a distant, stationary object (e.g., a tree or building) during daylight hours.
- Center the object in the main telescope's eyepiece.
- Look through the finderscope and adjust its alignment screws until the same object is centered in the finderscope's crosshairs.
5.2 Focusing
Once an object is centered in your eyepiece, turn the focus knob slowly until the image is sharp and clear. For fine adjustments, turn the knob slightly in either direction until the best focus is achieved.
5.3 Changing Magnification
Your telescope comes with two eyepieces (25mm and 10mm) and a 3X Barlow lens, allowing for various magnifications:
- 25mm Eyepiece: Provides 16X magnification (400mm / 25mm = 16X). Ideal for wide-field views and locating objects.
- 10mm Eyepiece: Provides 40X magnification (400mm / 10mm = 40X). Suitable for more detailed observations.
- 3X Barlow Lens: Triples the magnification of any eyepiece. For example, with the 25mm eyepiece, it provides 48X (16X * 3 = 48X); with the 10mm eyepiece, it provides 120X (40X * 3 = 120X).
Always start with the lowest magnification (25mm eyepiece) to locate and center your target, then switch to higher magnifications for more detailed viewing.
6. Maintenance
- Cleaning Lenses: Use a soft, lint-free cloth specifically designed for optical lenses. For stubborn smudges, use a small amount of optical cleaning fluid applied to the cloth, not directly to the lens. Avoid touching the lens surfaces with your fingers.
- Storage: When not in use, store the telescope in its carry bag in a cool, dry place, away from dust and moisture. Keep dust caps on the objective lens and eyepiece openings.
- General Care: Avoid sudden impacts or dropping the telescope. Do not overtighten knobs or screws, as this can damage the components.
7. Troubleshooting
Refer to the table below for common issues and their potential solutions:
| Problem | Possible Cause | Solution |
|---|---|---|
| Image is blurry or out of focus. | Incorrect focus setting. | Adjust the focus knob slowly until the image is sharp. |
| Cannot find objects. | Finderscope is not aligned with the main telescope. | Align the finderscope during daylight hours using a distant, stationary object. |
| Image is dim or dark. | High magnification used in low light; dirty lenses. | Switch to a lower magnification eyepiece; clean the objective lens and eyepiece. |
| Image appears upside down or reversed. | Normal for astronomical telescopes without an erecting prism. | The included 48° Erecting BAK7 Prism corrects the image for terrestrial viewing. For astronomical viewing, an inverted image is common and does not affect observation. |
| Telescope shakes excessively. | Unstable tripod setup; windy conditions. | Ensure tripod legs are fully extended and stable on a firm surface. Observe in calm conditions if possible. |
8. Specifications
Detailed technical specifications for the Gskyer AZ70400 Telescope:
| Feature | Specification |
|---|---|
| Optical Design | Refractor |
| Aperture | 70mm (2.75in) |
| Focal Length | 400mm (15.7in) |
| Focal Ratio | F5.7 |
| Eyepiece 1 | 25mm (Magnification: 16X) |
| Eyepiece 2 | 10mm (Magnification: 40X) |
| Max Magnification | 120X |
| Finderscope | 5x24 |
| Zenith Mirror | 48° Erecting BAK7 Prism |
| Mount Type | Altazimuth Mount |
| Optical Coating | Antireflection Blue Film (Fully Coated) |
| Barlow Lens | 3X |
| Resolution | ≤3.1 |
| Angular Field of View | 2°24" |
| Tripod Material | Aluminium Alloy (Adjustable) |
| Product Dimensions | 26 x 8.3 x 4.9 inches |
| Item Weight | 5 pounds |

Figure 8.1: Key dimensions of the Gskyer AZ70400 Telescope.
9. Warranty and Customer Support
Gskyer provides a 1-year warranty against defects in materials and workmanship for your telescope. Additionally, lifetime maintenance support is offered to ensure your continued satisfaction.
If you encounter any problems with your Gskyer AZ70400 telescope after purchase, or require assistance with setup or operation, please do not hesitate to contact Gskyer customer service. We are committed to providing the best service and reliable products to all our customers.

