1. Introduction
The Tech 21 SansAmp Bass Fly Rig V2 is a versatile multi-effects pedal designed for bassists. It integrates essential bass tones and effects into a compact, all-analog unit, suitable for live performances, studio recording, and practice. This manual provides detailed instructions for setting up, operating, and maintaining your Bass Fly Rig V2.
2. Key Features
- All-Analog SansAmp Circuitry: Provides authentic tube amp emulation with built-in speaker and cabinet simulation, ideal for direct connection to a PA system or recording interface.
- Selectable SansAmp Character Modes: Choose between Bass Driver DI and VT Bass DI voicings for diverse bass amp tones.
- Channel Switching: Seamlessly toggle between two independent Drive and Level settings for a range of clean to saturated tones.
- Integrated Effects: Includes Octave, Fuzz, Chorus, and Compression effects for comprehensive tonal shaping.
- Chromatic Tuner: Built-in tuner with signal mute for silent and accurate tuning.
- Headphone Output: The 1/4-inch output can be switched to headphone mode for private practice.
- High-Impedance Input: Features a 1/4-inch 4.7megOhm input, optimized for piezos and passive instruments.
- Input Pad: A dedicated pad for active basses to prevent input clipping.
- XLR Output: Balanced XLR output with ground connect for direct connection to mixing consoles.
- 1/4-inch Low Impedance Output: Standard instrument output for connecting to amplifiers or other pedals.
3. Product Overview
The image below illustrates the layout of the Tech 21 SansAmp Bass Fly Rig V2, highlighting its various controls and connections.
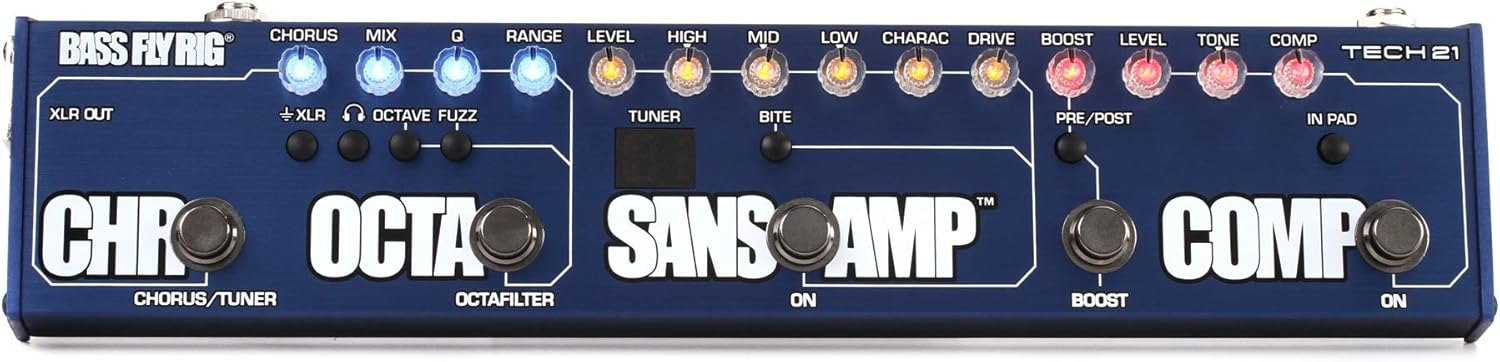
Figure 1: Tech 21 SansAmp Bass Fly Rig V2 Pedal Layout
This image displays the top panel of the Bass Fly Rig V2, showing the arrangement of its controls. On the far left, the XLR OUT is visible. The pedal features four main sections: CHORUS/TUNER, OCTAFILTER, SANSAMP, and COMP. Each section has dedicated knobs and footswitches. The CHORUS section has CHORUS, MIX, and Q knobs. The OCTAFILTER section has a RANGE knob. The SANSAMP section includes LEVEL, HIGH, MID, LOW, CHARAC, DRIVE, and BOOST knobs, along with a TUNER display and a BITE button. The COMP section has LEVEL, TONE, and COMP knobs. There are also small buttons for XLR, Headphone, Octave Fuzz, PRE/POST, and IN PAD. The main footswitches are labeled CHORUS/TUNER, OCTAFILTER, SANSAMP ON, BOOST, and COMP ON.
3.1. Controls and Indicators
- CHORUS/TUNER Section:
- CHORUS Knob: Adjusts the intensity of the chorus effect.
- MIX Knob: Controls the blend of the wet (effected) and dry (unaffected) signals for the chorus.
- Q Knob: Shapes the frequency response of the chorus effect.
- CHORUS/TUNER Footswitch: Toggles the chorus effect on/off. Hold to activate the chromatic tuner.
- OCTAFILTER Section:
- RANGE Knob: Adjusts the frequency range of the Octafilter.
- OCTAFILTER Footswitch: Engages or disengages the Octafilter effect.
- OCTAVE FUZZ Button: Activates the octave fuzz effect.
- SANSAMP Section:
- LEVEL Knob: Controls the overall output level of the SansAmp section.
- HIGH Knob: Adjusts the high-frequency equalization.
- MID Knob: Adjusts the mid-frequency equalization.
- LOW Knob: Adjusts the low-frequency equalization.
- CHARAC Knob: Selects between Bass Driver DI and VT Bass DI character modes.
- DRIVE Knob: Controls the amount of gain and overdrive.
- BOOST Knob: Sets the level of the independent boost function.
- TUNER Display: LED display for the chromatic tuner.
- BITE Button: Engages a high-end boost for added presence.
- SANSAMP ON Footswitch: Activates or bypasses the SansAmp section.
- PRE/POST Button: Determines if the boost is applied before or after the SansAmp section.
- COMP Section:
- LEVEL Knob: Controls the output level of the compressor.
- TONE Knob: Adjusts the tonal character of the compressed signal.
- COMP Knob: Sets the amount of compression.
- COMP ON Footswitch: Toggles the compressor effect on/off.
- IN PAD Button: Engages an input pad for active basses to prevent signal overload.
- Inputs/Outputs:
- XLR OUT: Balanced XLR output for direct connection to a mixing console or audio interface.
- XLR Button: Activates the XLR output.
- Headphone Button: Switches the 1/4-inch output to headphone mode.
- 1/4-inch Input: Instrument input.
- 1/4-inch Output: Standard instrument output.
4. Setup
- Power Connection: Connect the included 9V DC power adapter to the power input jack on the Bass Fly Rig V2. Plug the adapter into a suitable power outlet. Ensure the power supply is stable and provides the correct voltage and amperage (9V DC, 100mA minimum).
- Instrument Connection: Connect your bass guitar to the 1/4-inch input jack on the pedal using a standard instrument cable. If you are using an active bass with high output, press the IN PAD button to engage the input pad and prevent signal clipping.
- Output Connection:
- To an Amplifier: Connect the 1/4-inch output jack of the Bass Fly Rig V2 to the input of your bass amplifier using an instrument cable.
- To a PA System or Audio Interface (DI): Connect the XLR OUT to a mixing console or audio interface using an XLR cable. Ensure the XLR button is engaged. This provides a balanced, direct signal with SansAmp emulation.
- Headphone Use: To use headphones for silent practice, connect your headphones to the 1/4-inch output jack and press the Headphone button. This will reconfigure the output for headphone use.
- Initial Settings: Before powering on, set all effect knobs to their minimum positions and the SansAmp LEVEL knob to a low setting to avoid sudden loud sounds.
5. Operation
5.1. General Operation
Once connected, power on your amplifier or audio system. The Bass Fly Rig V2 is always active when powered, but individual sections can be engaged or disengaged using their respective footswitches.
5.2. SansAmp Section
The SansAmp section is the core of the pedal, providing analog tube amp emulation. Press the SANSAMP ON footswitch to activate it. Use the LEVEL, HIGH, MID, and LOW knobs to shape your tone. The DRIVE knob controls the amount of gain and distortion. The CHARAC knob allows you to switch between different amp voicings (e.g., Bass Driver DI and VT Bass DI), offering a wide range of classic and modern bass tones. The BITE button adds a high-end presence boost.
5.3. Boost Function
The Bass Fly Rig V2 features an independent boost function. Use the BOOST knob in the SansAmp section to set the desired boost level. Press the BOOST footswitch to engage it. The PRE/POST button determines whether the boost is applied before or after the SansAmp section, affecting how it interacts with the SansAmp's gain structure.
5.4. Chorus Section
Engage the chorus effect by pressing the CHORUS/TUNER footswitch. Adjust the CHORUS knob for effect depth, MIX for wet/dry blend, and Q for tonal shaping of the chorus.
5.5. Octafilter Section
Activate the Octafilter by pressing the OCTAFILTER footswitch. The RANGE knob controls the frequency range of the filter. For an added effect, press the OCTAVE FUZZ button to combine the Octafilter with a fuzz effect.
5.6. Compressor Section
Engage the compressor by pressing the COMP ON footswitch. Use the COMP knob to set the compression amount, LEVEL to adjust the output volume, and TONE to fine-tune the compressed signal's character.
5.7. Chromatic Tuner
To activate the chromatic tuner, hold down the CHORUS/TUNER footswitch for a few seconds. The signal will be muted, and the TUNER display will show your note. Tune your instrument until the display indicates the note is in tune. Press the footswitch again to exit tuner mode and unmute the signal.
6. Maintenance
- Cleaning: Use a soft, dry cloth to clean the pedal's surface. Avoid using abrasive cleaners or solvents, as they may damage the finish or internal components.
- Storage: When not in use, store the pedal in a cool, dry place away from direct sunlight and extreme temperatures. Disconnect the power supply.
- Power Supply: Handle the power adapter with care. Avoid bending or crimping the cable, especially near the connectors, as this can lead to damage. Always use the original or a compatible power supply (9V DC, 100mA minimum, center negative).
- Footswitches and Knobs: While durable, avoid excessive force when operating footswitches and turning knobs to prevent mechanical damage.
7. Troubleshooting
| Problem | Possible Cause | Solution |
|---|---|---|
| No sound or weak signal. | Incorrect cable connections, low instrument volume, pedal not powered, effect bypassed, SansAmp LEVEL too low. | Check all cable connections. Ensure instrument volume is up. Verify power supply is connected and working. Engage desired effects. Increase SansAmp LEVEL. |
| Distorted or noisy sound. | Input signal too hot (active bass), faulty cables, power supply noise, high DRIVE setting. | Engage the IN PAD button for active basses. Try different cables. Use a clean, regulated power supply. Reduce the DRIVE knob if distortion is unintended. |
| Loud "pop" when engaging/disengaging effects via XLR. | Common characteristic with some XLR connections on certain units, especially when switching effects. | While often unavoidable with some designs, ensure proper gain staging on your mixer/interface. If persistent and disruptive, consider using the 1/4-inch output into a separate DI box. |
| Tuner not working or inaccurate. | Not in tuner mode, instrument not plugged in, low battery on active bass. | Hold the CHORUS/TUNER footswitch to enter tuner mode. Ensure your instrument is properly connected. Check battery on active basses. |
8. Specifications
| Feature | Detail |
|---|---|
| Model Number | FR-BASS |
| Dimensions (L x W x H) | 11.69 x 2.56 x 1.06 inches (29.69 x 6.50 x 2.69 cm) |
| Item Weight | 1.14 pounds (0.52 kg) |
| Signal Format | Analog |
| Power Source | Corded Electric |
| Voltage | 9V DC |
| Amperage | 100 Milliamps (minimum) |
| Input Impedance | 4.7 megOhm (1/4-inch input) |
| Output Impedance | Low Impedance (1/4-inch output) |
9. Warranty & Support
Tech 21 products are manufactured to high standards and typically come with a limited warranty covering defects in materials and workmanship. For specific warranty terms and conditions, please refer to the documentation included with your purchase or visit the official Tech 21 website.
Should you encounter any issues or require technical assistance, please contact Tech 21 customer support. They are known for providing excellent service and can help with troubleshooting or repair inquiries.
Tech 21 Official Website: www.tech21nyc.com


