
1. Introduction
Thank you for choosing the Cooler Master CM 690 III Mid Tower Computer Case. This manual provides detailed instructions for the installation, operation, and maintenance of your new computer chassis. Please read this manual thoroughly before beginning installation to ensure proper setup and to maximize the performance and longevity of your system.
The CM 690 III is designed for superior cooling and component compatibility, featuring a full mesh front panel, top panel, and support for multiple radiators and fans. It accommodates various high-end components and includes multiple removable dust filters for easy maintenance.
2. Safety Information
- Always disconnect the power supply from the wall outlet before installing or removing any components.
- Wear an anti-static wrist strap to prevent electrostatic discharge (ESD) damage to sensitive components.
- Handle components carefully to avoid physical damage.
- Ensure all cables are properly routed and secured to prevent interference with fans or other moving parts.
- Keep the case away from direct sunlight, heat sources, and moisture.
3. Package Contents
Please verify that all items are present in your package:
- Cooler Master CM 690 III Mid Tower Computer Case
- Accessory Box (screws, cable ties, standoffs, etc.)
- User Manual (this document)
4. Setup and Component Installation
Follow these steps for installing your computer components into the CM 690 III chassis.
4.1. Preparing the Case
- Place the case on a flat, stable surface.
- Remove the side panels by unscrewing the thumbscrews at the rear of the case and sliding the panels backward.
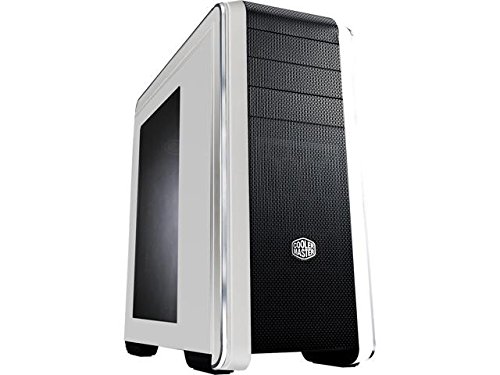
Figure 1: Front and side view of the Cooler Master CM 690 III case, showing the mesh front panel and side window.
4.2. Motherboard Installation
- Install the I/O shield into the rear opening of the case.
- Align the motherboard with the pre-installed standoffs. Ensure the standoff locations match your ATX motherboard's screw holes.
- Secure the motherboard using the provided screws.
4.3. Storage Drive Installation (HDD/SSD)
The CM 690 III supports up to 5 SSDs and multiple 3.5-inch HDDs.
- For 3.5-inch HDDs: Slide the drive into a drive bay until it clicks into place. Tool-less installation is supported.
- For 2.5-inch SSDs: Attach the SSD to a 2.5-inch drive tray or adapter (if necessary) and secure it in an available bay.
4.4. Expansion Card Installation
- Remove the necessary PCI slot covers from the rear of the case.
- Insert your graphics card or other expansion cards into the appropriate PCI-E slots on the motherboard.
- Secure the cards with the provided screws or tool-less clips.

Figure 2: Rear and side view of the Cooler Master CM 690 III case, highlighting the expansion slots and rear fan mount.
4.5. Power Supply Installation
- Slide the power supply unit (PSU) into the designated compartment at the bottom rear of the case.
- Secure the PSU with screws from the exterior rear of the case.
- Connect the necessary power cables to your motherboard and components.
4.6. Fan and Radiator Installation
The CM 690 III supports up to six fans and multiple radiators for advanced cooling.
- Install additional fans or radiators in the front, top, rear, or bottom mounts as desired.
- Ensure proper airflow direction for optimal cooling (typically intake from front/bottom, exhaust from rear/top).

Figure 3: Internal view of the Cooler Master CM 690 III case, showing component layout and cable management options.
4.7. Cable Management
Utilize the cable routing cutouts and tie-down points behind the motherboard tray to manage cables. This improves airflow and aesthetics.
5. Operating Your System
Once all components are installed and cables connected, replace the side panels. Connect your peripherals, monitor, and power cable. Press the power button on the front panel to start your system.
The CM 690 III's full mesh front and top panels are designed to provide excellent airflow, contributing to lower system temperatures. Monitor your system's temperatures to ensure optimal performance.
6. Maintenance
Regular maintenance helps ensure optimal performance and longevity of your computer system.
6.1. Cleaning Dust Filters
The CM 690 III features multiple removable dust filters (front, top, bottom) to prevent dust buildup inside the case.
- Periodically remove the dust filters.
- Clean them using compressed air, a soft brush, or by rinsing with water (ensure they are completely dry before reinstallation).
- Reinstall the clean dust filters.
6.2. General Cleaning
- Use a soft, dry cloth to wipe down the exterior of the case.
- For interior cleaning, use compressed air to remove dust from components and fan blades. Ensure the system is powered off and unplugged.
7. Troubleshooting
If you encounter issues, refer to these common troubleshooting steps:
- System not powering on: Ensure all power cables (24-pin ATX, 8-pin CPU, GPU power) are securely connected. Check that the power supply switch is in the 'ON' position. Verify front panel power button connections to the motherboard.
- No display: Confirm the monitor is connected to the graphics card (not the motherboard integrated graphics, unless intended). Reseat the graphics card and RAM modules.
- Overheating: Check fan connections and ensure they are spinning. Verify proper airflow direction. Clean dust filters and internal components. Ensure CPU cooler is properly seated.
- Unusual noises: Identify the source of the noise. It could be a loose fan, a vibrating component, or a hard drive. Ensure all screws are tightened and cables are clear of fan blades.
8. Specifications
| Feature | Specification |
|---|---|
| Model Name | CM 690 III |
| Model Number | CMS-693-WWN1-V2 |
| Case Type | Mid Tower |
| Motherboard Compatibility | ATX |
| Color | White |
| Cooling Method | Air |
| Fan Support | Up to 6 fans (including two 200mm fans) |
| Radiator Support | Multiple radiators |
| Storage Drive Support | Up to 5 SSDs, 3.5-inch HDDs |
| Front Panel I/O | USB 3.0, USB 2.0, Audio In/Out |
| Removable Dust Filters | Yes (Front, Top, Bottom) |
| Item Weight | 41000 Grams (41 kg) |
9. Warranty and Support
Cooler Master products come with a limited warranty. Please refer to the official Cooler Master website for detailed warranty terms and conditions specific to your region and product model.
For technical support, product registration, or to download the latest drivers and manuals, please visit the Cooler Master support portal:
When contacting support, please have your product model number (CMS-693-WWN1-V2) and proof of purchase readily available.