
1. Important Safety Information
Please read this entire instruction manual before installation and assembly. If you have any questions regarding any of the instructions or warnings, please contact your local distributor for assistance. Failure to understand the instructions and warnings may result in serious personal injury or property damage.
- This product is designed for installation on wood stud walls or solid concrete/brick walls. Do not install on drywall alone.
- Ensure the mounting surface can safely support the combined weight of the equipment and all attached hardware and components.
- Always use an assistant or mechanical lifting equipment to safely lift and position the television.
- Tighten screws firmly but do not overtighten. Overtightening can damage the screws and mounting hardware.
- Never exceed the maximum load capacity of 88 lbs (40 kg).
- Check that the mount is secure and safe to use at regular intervals (at least every three months).
2. Package Contents
Verify that all components are present and undamaged before installation. If any parts are missing or damaged, do not attempt to install the product.
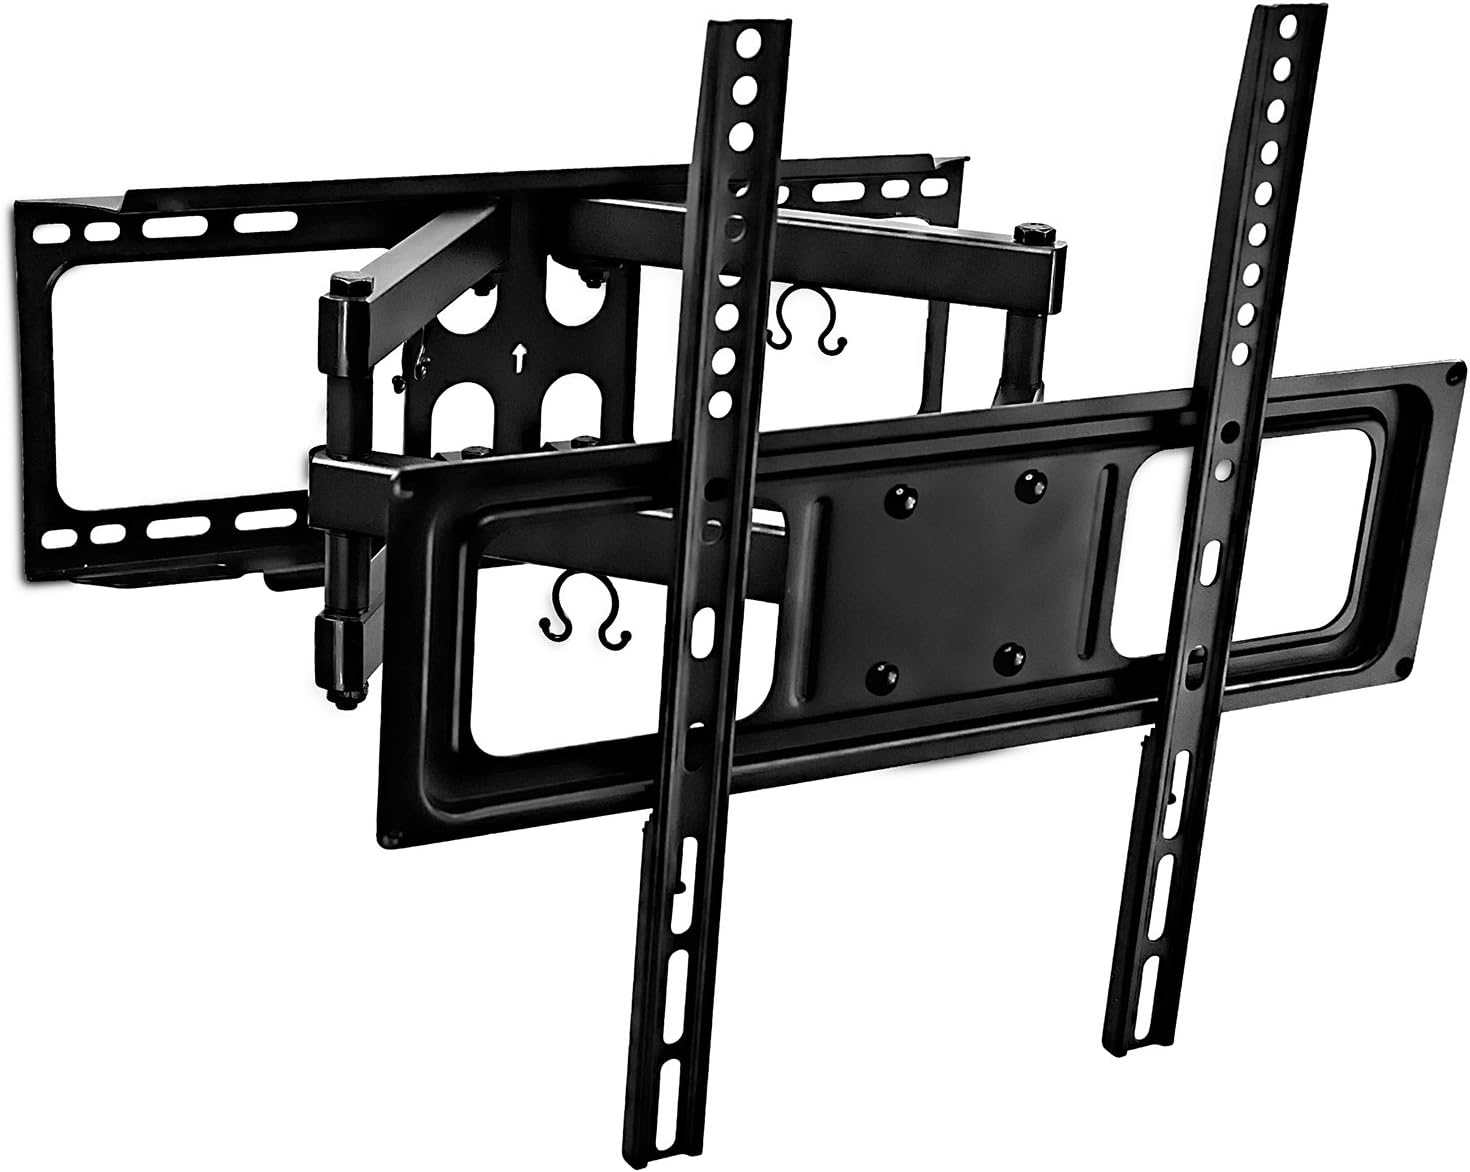
Image: The Mount-It! Full Motion TV Wall Mount, showing the wall plate, articulating arms, and TV bracket components.
The package should include the main wall mount assembly, TV attachment brackets, and various hardware for different TV and wall types. Refer to the included hardware bag for specific screw sizes and anchors.
3. Setup and Installation
Follow these steps carefully to ensure a secure installation of your TV wall mount.
3.1 Mounting the Wall Plate
- Determine Mounting Location: Choose a location on your wall that can support the weight of your TV and the mount. Use a stud finder to locate wood studs if mounting to a wood stud wall.
- Mark Pilot Holes: Hold the wall plate of the mount against the wall at the desired height and use a pencil to mark the locations for drilling pilot holes. Ensure the marks are level.
- Drill Pilot Holes: Drill pilot holes at the marked locations. For wood studs, use a 7/32 inch (5.5mm) drill bit. For solid concrete/brick walls, use a 3/8 inch (10mm) drill bit and insert concrete anchors.
- Attach Wall Plate: Secure the wall plate to the wall using the provided lag bolts and washers. Tighten the bolts firmly with a socket wrench until the wall plate is snug against the wall. Do not overtighten.
3.2 Attaching TV Brackets to the Television
- Select VESA Screws: Choose the correct diameter and length screws that fit your TV's VESA mounting holes. Use spacers if necessary to prevent overtightening and damage to the TV.
- Attach Brackets: Align the TV brackets with the VESA mounting holes on the back of your television. Secure the brackets using the selected screws and washers. Ensure the brackets are oriented correctly (hooks facing downwards).

Image: Rear view of a television with the vertical mounting brackets securely attached to its VESA holes.
3.3 Hanging the Television
- Hook TV onto Mount: With assistance, carefully lift the television and hook the attached TV brackets onto the horizontal arms of the wall mount. Ensure both brackets are securely seated.
- Secure TV: Locate the safety screws or locking mechanisms on the bottom of the TV brackets. Tighten these screws to lock the TV securely to the wall mount, preventing accidental dislodgement.

Image: Close-up of the safety screw mechanism used to secure the TV brackets to the wall mount, ensuring the television is locked in place.
3.4 Cable Management
The mount features built-in cable management clips to keep your cables tidy and organized.
- Route Cables: Gather all necessary cables (power, HDMI, etc.) and route them along the articulating arms of the mount.
- Secure with Clips: Use the integrated cable clips on the mount arms to hold the cables in place. Close the clips to secure the cables, preventing them from dangling or getting caught when adjusting the TV.
3.5 Installation Video Guide
Video: An official Mount-It! product video demonstrating the installation process for the MI-3990 Full Motion TV Wall Mount, including wall mounting, TV attachment, and cable management.
4. Operating Instructions (Adjustments)
The Mount-It! MI-3990B offers full motion capabilities for optimal viewing angles.
4.1 Tilt Adjustment
You can tilt your TV up or down to reduce glare and achieve a comfortable viewing angle. The mount allows for a tilt range of +5° to -15°.
- To adjust the tilt, loosen the tilt adjustment knobs or bolts on the TV bracket.
- Carefully tilt the TV to the desired angle.
- Tighten the knobs or bolts to secure the TV in position.
4.2 Swivel Adjustment
Swivel the TV left or right to view it from different seating positions in the room. The mount provides a swivel range of +/- 60°.
- Gently push or pull the side of the TV to swivel it to your preferred angle.
- The articulating arms will move smoothly to accommodate the swivel.
4.3 Extension and Retraction
Extend the TV away from the wall for maximum flexibility or retract it for a low-profile appearance.
- To extend, gently pull the TV straight out from the wall. The articulating arms will extend up to 18.3 inches (464mm).
- To retract, gently push the TV back towards the wall until it reaches its minimum profile of 2.1 inches (53mm).

Image: Diagram illustrating the TV mount in its fully compressed position (2.1 inches from the wall) and fully extended position (18.3 inches from the wall).
4.4 Level Adjustment
The mount allows for minor post-installation level adjustments of +/- 3° to ensure your TV is perfectly horizontal.
- Loosen the leveling screws on the TV brackets.
- Adjust the TV until it is level using a spirit level.
- Tighten the leveling screws to secure the TV's horizontal position.
5. Maintenance
Regular maintenance helps ensure the longevity and safe operation of your TV wall mount.
- Check Connections: Periodically inspect all screws and connections to ensure they are tight and secure. Retighten if necessary.
- Clean: Wipe the mount with a soft, dry cloth to remove dust. Avoid using abrasive cleaners or solvents.
- Lubrication: If the articulating arms become stiff, a small amount of silicone-based lubricant can be applied to the moving joints.
6. Troubleshooting
If you encounter issues with your Mount-It! TV wall mount, refer to the following common problems and solutions.
| Problem | Possible Cause | Solution |
|---|---|---|
| TV is not level after installation. | Wall plate or TV brackets are slightly off-level. | Use the post-installation level adjustment feature (+/- 3°) by loosening the leveling screws, adjusting, and retightening. |
| Difficulty moving the TV (swivel/tilt/extension). | Joints may be stiff or screws are too tight. | Check if any adjustment screws are overtightened. Apply a small amount of silicone lubricant to the moving joints if needed. |
| TV feels unstable or sags. | Mounting screws are loose or TV weight exceeds capacity. | Ensure all wall plate and TV bracket screws are securely tightened. Verify your TV's weight does not exceed 88 lbs (40 kg). |
| Cables are messy or get caught. | Cables are not properly routed. | Utilize the built-in cable management clips on the articulating arms to organize and secure cables. |
7. Specifications
Detailed technical specifications for the Mount-It! Full Motion TV Wall Mount MI-3990B.
- Model Number: MI-3990B
- Screen Size Compatibility: 32-55 inches
- VESA Compatibility: 100x100mm, 200x200mm, 300x300mm, 400x400mm
- Weight Capacity: 88 lbs (40 kg)
- Profile (Distance from Wall): 2.1 inches (53mm) to 18.3 inches (464mm)
- Tilt Range: +5° to -15°
- Swivel Range: +/- 60°
- Level Adjustment: +/- 3°
- Material: Heavy-duty steel with durable powder-coated finish
- Color: Black

Image: Diagram illustrating various VESA mounting patterns supported by the mount, ranging from 100x100mm to 400x400mm.

Image: Technical diagram highlighting key features such as dual arm design, cold-rolled steel construction, adjustable VESA brackets, tilt, swivel, and built-in cable management clips.
8. Warranty and Support
For warranty information or technical support, please contact Mount-It! customer service. Keep your purchase receipt for warranty claims.
Contact Information: Refer to the Mount-It! official website or your product packaging for the most current contact details.


