Introduction
The Hyper Tough 18V Cordless Drill (Model: AQ75005G) is designed to provide efficient and versatile performance for a variety of drilling and driving tasks. This powerful tool features a two-speed setting and a 20+1 position torque clutch, allowing for precise control and adaptability to different materials and applications. Its cordless design offers enhanced portability and ease of use without the restriction of power cords.
This manual provides essential information for the safe and effective operation, maintenance, and troubleshooting of your Hyper Tough 18V Cordless Drill. Please read it thoroughly before first use and keep it for future reference.
Safety Information
WARNING: Always wear appropriate personal protective equipment, including safety glasses, when operating power tools.
- Keep work area clean and well lit. Cluttered or dark areas invite accidents.
- Do not operate power tools in explosive atmospheres, such as in the presence of flammable liquids, gases or dust.
- Keep children and bystanders away while operating a power tool. Distractions can cause you to lose control.
- Avoid accidental starting. Ensure the switch is in the off-position before inserting battery pack, picking up or carrying the tool.
- Use the correct power tool for your application. The correct power tool will do the job better and safer at the rate for which it was designed.
- Disconnect the battery pack from the power tool before making any adjustments, changing accessories, or storing power tools.
- Store idle power tools out of the reach of children and do not allow persons unfamiliar with the power tool or these instructions to operate the power tool.
Components
Familiarize yourself with the parts of your Hyper Tough 18V Cordless Drill:

Figure 1: Hyper Tough 18V Cordless Drill with battery attached.

Figure 2: Drill kit including the drill, 18V Ni-Cd battery, and CEC charger.
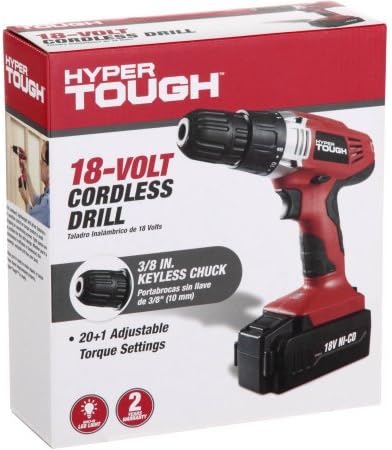
Figure 3: The product packaging for the Hyper Tough 18V Cordless Drill.
- Keyless Chuck: For quick and easy bit changes.
- Torque Adjustment Collar: Allows selection of 20+1 torque settings for various applications.
- Speed Selector: Two-speed settings for high-speed drilling or high-torque driving.
- Forward/Reverse Switch: Controls the direction of rotation.
- Trigger Switch: Activates the drill and controls variable speed.
- LED Work Light: Illuminates the work area for improved visibility.
- Battery Pack: 18V Ni-Cd rechargeable battery.
- CEC Charger: For charging the battery pack.
- Double-End Bit: Included for immediate use.
- Bit Holder: Convenient storage for an extra bit on the tool.
Setup
1. Charging the Battery
The 18V Ni-Cd battery pack must be fully charged before first use. Use only the supplied CEC charger.
- Connect the CEC charger to a standard electrical outlet.
- Insert the battery pack into the charger stand.
- The LED charging indicator on the charger stand will illuminate to show charging status. Refer to the charger's specific instructions for light indications (e.g., solid red for charging, solid green for fully charged).
- Once fully charged, disconnect the charger from the outlet and remove the battery pack.
2. Installing/Removing the Battery Pack
- Installation: Align the battery pack with the base of the drill handle and slide it in until it clicks securely into place.
- Removal: Press the battery release button (usually located on the front or sides of the battery pack) and slide the battery pack out of the drill handle.
3. Installing/Removing Drill Bits

Figure 4: Close-up view of the keyless chuck for bit installation.
- Installation: Rotate the front collar of the keyless chuck counter-clockwise to open the jaws. Insert the desired drill bit or driver bit into the chuck. Rotate the collar clockwise to tighten the jaws firmly around the bit. Ensure the bit is centered and secure.
- Removal: Rotate the front collar of the keyless chuck counter-clockwise to loosen the jaws and remove the bit.
Operating Instructions
1. Powering On/Off and Variable Speed

Figure 5: Proper grip and usage of the drill during operation.
- To start the drill, press the trigger switch. The speed of the drill increases as you increase pressure on the trigger.
- To stop the drill, release the trigger switch.
2. Forward/Reverse Rotation
- The forward/reverse switch is located above the trigger.
- Push the switch to the left for forward rotation (for drilling and driving screws).
- Push the switch to the right for reverse rotation (for removing screws or clearing jammed bits).
- Center the switch to lock the trigger and prevent accidental starting.
3. Torque Adjustment
- The torque adjustment collar allows you to select from 20 torque settings plus a drill mode.
- Rotate the collar to align the desired setting with the indicator mark. Lower settings are for driving small screws or working with soft materials. Higher settings are for driving larger screws or working with harder materials.
- The drill symbol (drill bit icon) is for drilling applications, providing maximum torque.
4. Speed Selection
- The speed selector switch is located on top of the drill.
- Position '1' provides lower speed and higher torque, ideal for driving screws or drilling large holes.
- Position '2' provides higher speed and lower torque, suitable for drilling small holes or light-duty applications.
5. LED Work Light

Figure 6: The integrated LED work light illuminates the immediate work area.
The built-in LED work light automatically activates when the trigger is pressed, illuminating the work surface for better visibility in dimly lit areas.
6. On-Board Bit Holder
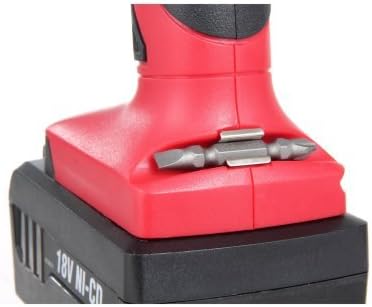
Figure 7: The convenient on-board bit holder for quick access to an extra bit.
The drill features a convenient on-board storage slot for an extra double-end bit, allowing for quick bit changes during tasks.
Maintenance
- Cleaning: Keep the ventilation openings of the tool clean to prevent overheating. Use a soft, damp cloth to clean the exterior. Do not use harsh chemicals or abrasive cleaners.
- Battery Care: Store batteries in a cool, dry place away from direct sunlight and extreme temperatures. Do not store batteries in a discharged state for extended periods.
- Storage: When not in use, store the drill and its accessories in a dry, secure location out of reach of children.
- Inspection: Regularly inspect the drill for any signs of damage, loose parts, or wear. If any issues are found, discontinue use and contact customer service.
Troubleshooting
| Problem | Possible Cause | Solution |
|---|---|---|
| Drill does not start. | Battery not charged or not properly installed. Forward/Reverse switch in center (locked) position. | Ensure battery is fully charged and securely installed. Move the Forward/Reverse switch to either forward or reverse position. |
| Loss of power during operation. | Battery charge is low. Overload due to excessive pressure. | Recharge the battery pack. Reduce pressure and allow the drill to work at its own pace. |
| Bit wobbles or falls out. | Chuck not tightened sufficiently. Bit shank is dirty or damaged. | Ensure the chuck is tightened firmly around the bit. Clean or replace the bit if necessary. |
Specifications
| Feature | Detail |
|---|---|
| Brand | Hyper Tough |
| Model Number | AQ75005G |
| Power Source | Cordless |
| Voltage | 18 Volts |
| Amperage | 500 Milliamps |
| Maximum Chuck Size | 10 Millimeters (3/8 inch) |
| Color | Black/Red |
| Included Components | Bare-Tool (typically includes drill, battery, charger, double-end bit) |
| Special Feature | Variable Speed, LED Work Light, 20+1 Torque Settings |
| Material | Plastic |
| Number of Speeds | 2 |
| Item Weight | 1.86 Kilograms (4.09 pounds) |
| Product Dimensions | 14.1 x 18.8 x 8.75 inches |
| UPC | 889526012038 |
Warranty and Support
For information regarding warranty coverage, technical support, or replacement parts for your Hyper Tough 18V Cordless Drill, please refer to the warranty card included with your product or visit the official Hyper Tough website. Keep your purchase receipt as proof of purchase for any warranty claims.