Introduction
This manual provides detailed instructions for the installation, operation, and maintenance of your Memphis Audio SRX750D.1 Street Reference Series Mono Subwoofer Amplifier. Please read this manual thoroughly before attempting installation or operation to ensure proper use and to prevent damage to the unit or your vehicle's audio system.
The SRX750D.1 amplifier is designed to deliver reliable performance and powerful bass output for your car audio system. It features a textured aluminum heatsink, high-level inputs, selectable bass boost, remote level control, and a variable crossover network.
Safety Precautions
- Always disconnect the vehicle's battery negative terminal before starting any installation.
- Ensure all wiring is properly routed and secured to prevent damage or short circuits.
- Use appropriate gauge wiring as recommended in the specifications section.
- Avoid mounting the amplifier in areas exposed to direct sunlight, excessive heat, moisture, or dust.
- Do not operate the amplifier if it is damaged or malfunctioning. Refer to the troubleshooting section or contact support.
- Professional installation is recommended for optimal performance and safety.
Package Contents
Verify that all items are present in the package:
- Memphis Audio SRX750D.1 Mono Subwoofer Amplifier
- Remote Bass Knob
- Mounting Hardware
- User Manual (this document)
Installation and Setup
1. Choosing a Mounting Location
Select a location that provides adequate ventilation for the amplifier's heatsink. Avoid mounting directly on carpet or in enclosed spaces without airflow. Common locations include under seats, in the trunk, or on a custom amplifier rack.

Figure 1: Angled view of the SRX750D.1 amplifier, highlighting its heatsink design.
2. Power Wiring
- Battery Disconnection: Disconnect the negative (-) terminal of your vehicle's battery.
- Power Cable: Run a 4-gauge power cable (Recommended Amp Kit: 4GKIT) from the positive (+) terminal of the battery to the amplifier's power input. Install an inline fuse holder within 18 inches (45 cm) of the battery. The fuse rating should match the amplifier's requirements (refer to specifications).
- Ground Cable: Connect a 4-gauge ground cable from the amplifier's ground terminal to a clean, unpainted metal surface on the vehicle's chassis. Ensure a solid, low-resistance connection. The ground cable should be as short as possible, ideally less than 3 feet (1 meter).
- Remote Turn-On: Connect a remote turn-on wire (typically 18-gauge) from your head unit's remote output to the amplifier's REM terminal. This wire signals the amplifier to turn on and off with your head unit.
3. Signal Input Wiring
The SRX750D.1 supports both low-level (RCA) and high-level inputs.
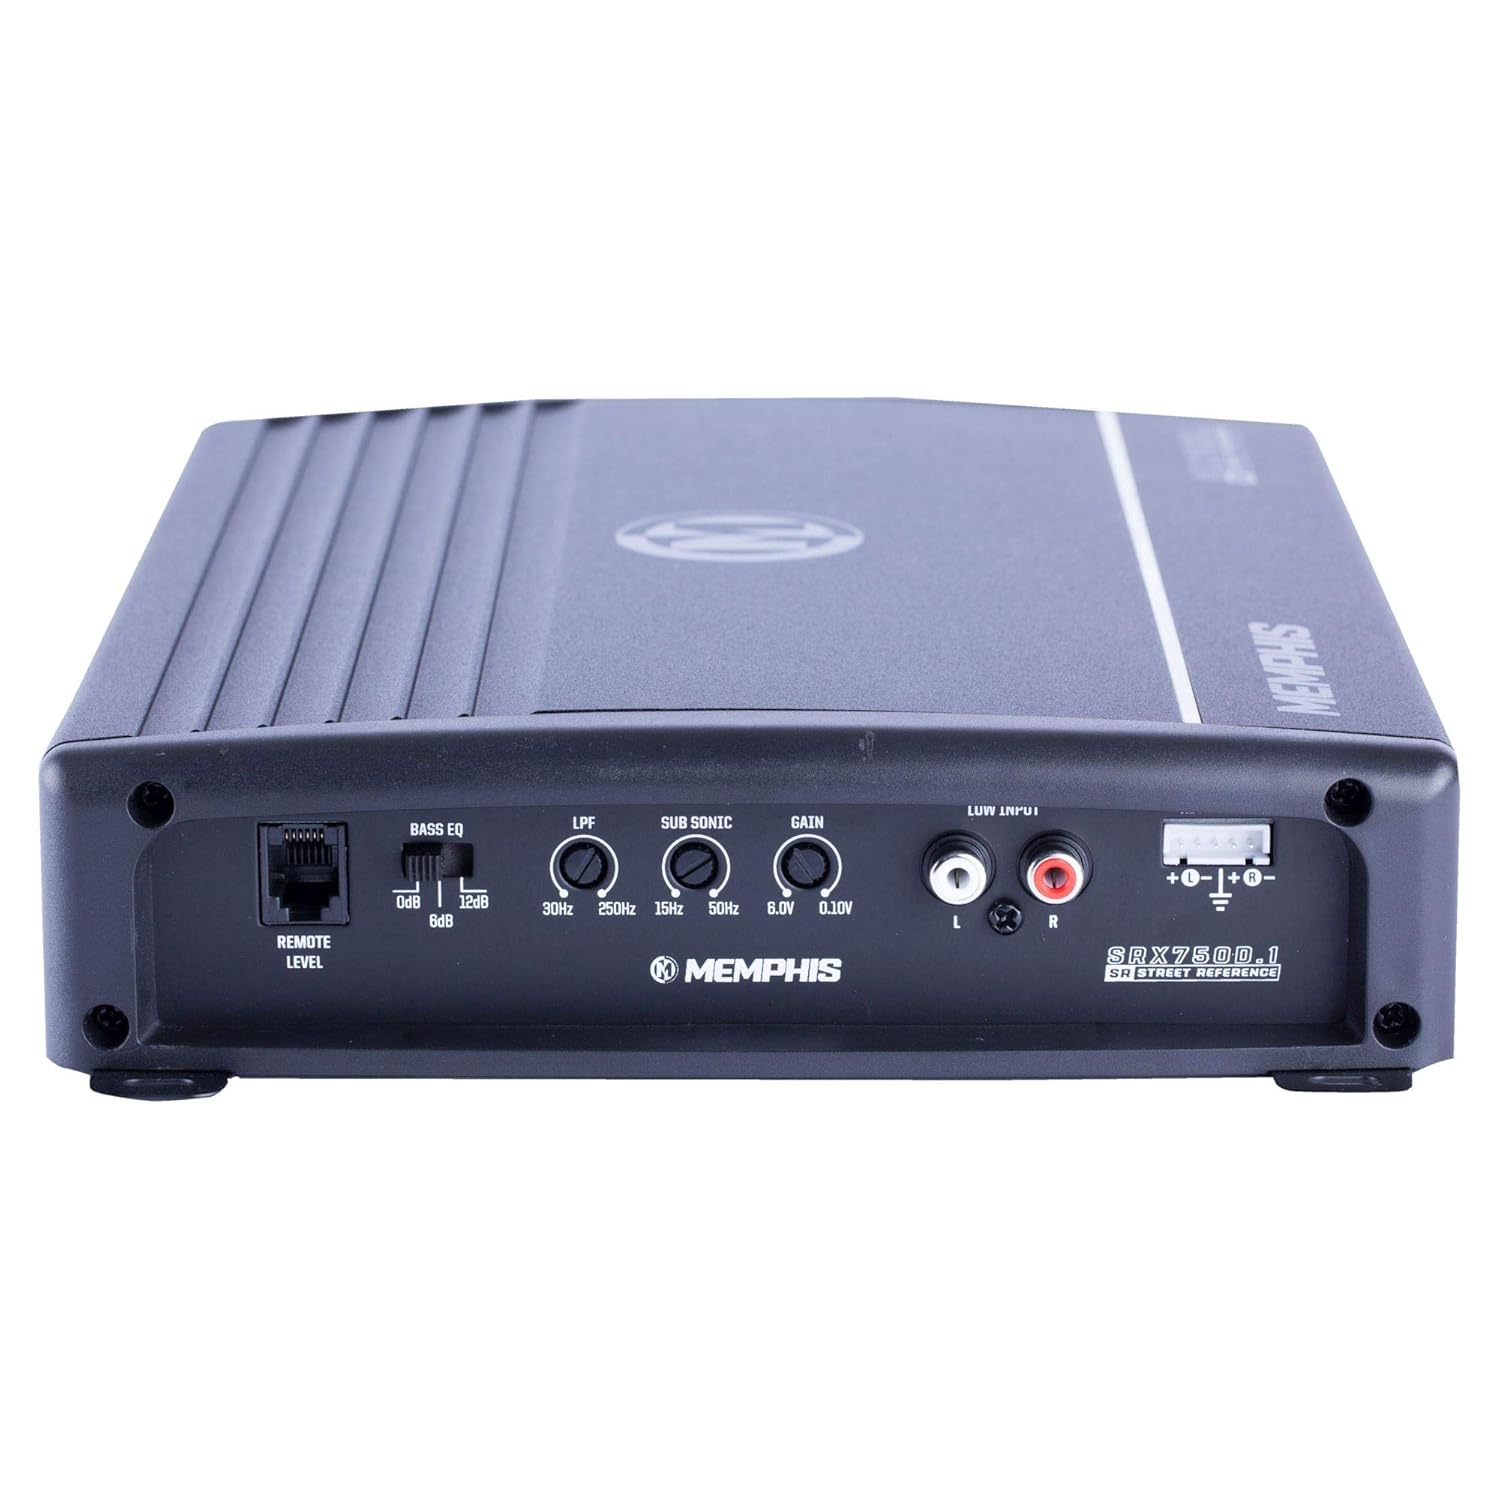
Figure 2: Rear panel of the SRX750D.1 amplifier with input and control connections.
- Low-Level Input (RCA): Connect RCA cables from your head unit's subwoofer or full-range pre-outs to the amplifier's "LOW INPUT" RCA jacks.
- High-Level Input: If your head unit does not have RCA outputs, use the high-level input. Connect the speaker wires from your head unit directly to the amplifier's high-level input terminal. Refer to your head unit's manual for speaker wire polarity.
4. Speaker Output Wiring
Connect your subwoofer(s) to the amplifier's speaker output terminals. Ensure correct polarity (+ to + and - to -). The SRX750D.1 is a mono amplifier, designed for a single subwoofer or multiple subwoofers wired to a final impedance of 2 ohms or 4 ohms.
Important: Do not wire the amplifier below a 2-ohm load, as this can cause damage and void the warranty.
5. Remote Bass Knob Installation
Connect the included remote bass knob to the "REMOTE LEVEL" port on the amplifier. Mount the knob in a convenient location for easy access while driving. This allows for real-time adjustment of the subwoofer output level.
Operating Instructions
1. Initial Power-Up
After all connections are made and verified, reconnect the vehicle's battery negative terminal. Turn on your head unit. The amplifier should power on, indicated by an LED indicator (if present).
2. Gain Adjustment
The "GAIN" control matches the amplifier's input sensitivity to the output level of your head unit. This is not a volume control. To set the gain:
- Turn the amplifier's gain control to its minimum (counter-clockwise) setting.
- Set your head unit's volume to about 75% of its maximum level.
- Play a dynamic piece of music with strong bass.
- Slowly increase the amplifier's gain control (clockwise) until you hear distortion, then back it off slightly until the sound is clear.
3. Crossover Settings (LPF)
The "LPF" (Low Pass Filter) control allows only frequencies below the set point to pass through to the subwoofer. This is crucial for blending the subwoofer with your main speakers.
- Adjust the LPF control (30Hz - 250Hz) to a frequency typically between 80Hz and 120Hz, depending on your subwoofer and main speaker capabilities.
- Experiment with different settings to achieve the best sound integration.
4. Sub Sonic Filter
The "SUB SONIC" filter removes extremely low frequencies that your subwoofer cannot reproduce effectively, preventing wasted power and potential damage. Set this filter slightly below your LPF setting, typically around 20Hz-30Hz.
5. Bass EQ / Bass Boost
The "BASS EQ" or "BASS BOOST" control provides an adjustable boost at a specific low frequency (e.g., 0dB to +12dB). Use this sparingly to enhance bass impact. Excessive boost can lead to distortion and damage.
Maintenance
- Cleaning: Periodically clean the amplifier's exterior with a soft, dry cloth. Do not use harsh chemicals or abrasive cleaners.
- Ventilation: Ensure the heatsink fins remain clear of obstructions to allow for proper cooling. Dust or debris buildup can impair cooling performance.
- Connections: Occasionally check all power, ground, and signal connections to ensure they are secure and free from corrosion.
- Fuse Replacement: If the amplifier's fuse blows, replace it only with a fuse of the exact same type and rating. Using an incorrect fuse can cause severe damage or fire.
Troubleshooting
| Problem | Possible Cause | Solution |
|---|---|---|
| No Power / Amplifier does not turn on |
|
|
| No Sound Output |
|
|
| Distorted Sound |
|
|
| Amplifier Overheats |
|
|
Specifications
| Feature | Specification |
|---|---|
| Model | SRX750D.1 |
| RMS Power @ 4Ω | 400 Watts x 1 |
| RMS Power @ 2Ω | 750 Watts x 1 |
| THD% @ 4Ω | <1% |
| Frequency Response | 30Hz - 250Hz |
| Input Range | 120mV - 6.1V |
| Dimensions (L x W x H) | 15 x 9.45 x 3.5 inches |
| Voltage | 6.1 Volts (Input/Supply) |
| Material | Aluminum |
| Item Weight | 7 pounds |
| Number of Channels | 1 (Mono) |
| Recommended Amp Kit | 4GKIT (4-Gauge) |
| Features | Textured aluminum heatsink, High level inputs, Selectable bass boost, Remote level control/bass knob, Variable crossover network |
Warranty and Support
Warranty Information
The Memphis Audio SRX750D.1 amplifier comes with a 1-year limited warranty from the date of purchase. This warranty covers defects in materials and workmanship under normal use. It does not cover damage caused by improper installation, accident, misuse, abuse, negligence, or unauthorized modification.
Please retain your proof of purchase for warranty claims.
Customer Support
For technical assistance, warranty service, or further inquiries, please contact Memphis Audio customer support. Refer to the official Memphis Audio website for the most current contact information.
Online Resources: www.memphiscaraudio.com


