1. Product Overview
The HPC Dexen 6003 Series Millivolt Valve Kit with Quick Connect (MVK-PQM) is a high-quality gas valve designed for propane gas systems. This kit ensures reliable operation and features a straightforward design for ease of installation and use. It is rated for temperatures up to 225°F and supports up to 85,000 BTU. The kit includes a complete pilot assembly.
Key Features:
- Standard capacity millivolt gas valve.
- Convenient quick-mount installation system.
- Rated for operating temperatures up to 225°F.
- Suitable for applications up to 85,000 BTU.
- Includes a complete pilot assembly.
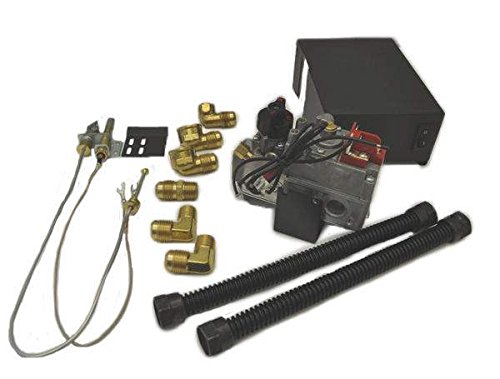
Figure 1: HPC Dexen 6003 Series Millivolt Valve Kit (MVK-PQM). This image shows the main components of the valve kit, including the valve body and pilot assembly.
2. Safety Information
WARNING: Improper installation, adjustment, alteration, service, or maintenance can cause injury or property damage. Read the installation, operating, and maintenance instructions thoroughly before installing or servicing this equipment.
- Installation must be performed by a qualified service technician, gas installer, or licensed plumber.
- Adhere to all local codes and regulations, as well as national standards for gas appliance installation.
- Ensure the gas supply is turned off before any installation or maintenance procedures.
- Verify that the valve kit is compatible with propane gas systems only. Do not use with natural gas unless a specific conversion kit is installed by a professional.
- Check for gas leaks after installation using a non-corrosive leak detection solution.
- Do not store or use gasoline or other flammable vapors and liquids in the vicinity of this or any other appliance.
- Keep the area around the appliance clear and free from combustible materials.
3. Package Contents
Carefully unpack the contents and ensure all items are present and undamaged. If any components are missing or damaged, contact your supplier immediately.
- Dexen 6003 Series Millivolt Gas Valve (MVK-PQM)
- Quick Connect fittings
- Complete Pilot Assembly (thermopile, pilot burner, igniter)
- Instruction Manual (this document)
4. Setup and Installation
IMPORTANT: Installation must be performed by a qualified professional in accordance with all local codes and the manufacturer's instructions.
- Preparation:
- Ensure the main gas supply to the appliance is turned off.
- Confirm that the appliance and gas lines are clean and free of debris.
- Gather all necessary tools and materials for installation.
- Mounting the Valve:
- Position the millivolt valve in a suitable location within the appliance, ensuring proper ventilation and access for service.
- Utilize the quick-mount installation system for secure and efficient placement.
- Connecting Gas Lines:
- Connect the propane gas supply line to the inlet port of the valve.
- Connect the appliance's burner line to the outlet port of the valve.
- Use appropriate pipe sealant on all threaded connections, ensuring it is resistant to propane gas.
- Tighten all connections securely, but do not overtighten.
- Pilot Assembly Installation:
- Install the complete pilot assembly according to the appliance manufacturer's instructions.
- Connect the pilot gas line from the valve to the pilot assembly.
- Connect the thermopile wires from the pilot assembly to the appropriate terminals on the millivolt valve.
- Connect the igniter wire (if applicable) to the igniter button or module.
- Electrical Connections (if applicable):
- If using a wall switch or remote control, connect the appropriate wires to the TH and TH/TP terminals on the valve, ensuring correct polarity.
- Leak Testing:
- Turn on the main gas supply.
- Apply a non-corrosive leak detection solution to all gas connections.
- Bubbles indicate a leak. If a leak is detected, turn off the gas supply, tighten the connection, and re-test. Repeat until no leaks are present.
- Initial Ignition:
- Follow the appliance's specific instructions for initial pilot lighting and burner ignition.
5. Operating Instructions
This millivolt valve operates in conjunction with your appliance's control system (e.g., wall switch, remote control, or manual knob).
- Lighting the Pilot:
- Ensure the main gas supply is on.
- Locate the pilot knob on the valve. Turn it to the "PILOT" position.
- Press and hold the pilot knob down. Simultaneously, press the igniter button repeatedly until the pilot flame lights.
- Continue to hold the pilot knob down for approximately 30-60 seconds after the pilot lights to allow the thermopile to heat up and generate sufficient millivoltage.
- Release the pilot knob. The pilot flame should remain lit. If it extinguishes, repeat the process.
- Turning On the Main Burner:
- Once the pilot is lit and stable, turn the pilot knob to the "ON" position.
- Activate your appliance's control (e.g., flip the wall switch, press "ON" on the remote) to ignite the main burner.
- Turning Off the Main Burner:
- Deactivate your appliance's control (e.g., flip the wall switch to "OFF", press "OFF" on the remote). The main burner will extinguish, but the pilot will remain lit.
- Turning Off the Entire System (including Pilot):
- Turn the pilot knob on the valve to the "OFF" position. This will extinguish both the main burner and the pilot flame.
- For extended periods of non-use, it is recommended to turn off the main gas supply to the appliance.
6. Maintenance
Regular maintenance ensures the safe and efficient operation of your millivolt valve kit. All maintenance should be performed by a qualified service technician.
- Annual Inspection: Have a qualified technician inspect the valve, pilot assembly, and all gas connections annually for wear, leaks, and proper operation.
- Pilot Assembly Cleaning: Periodically inspect the pilot burner and thermopile for dust, lint, or carbon buildup. Clean gently with a soft brush or compressed air if necessary. Ensure the pilot flame impinges correctly on the thermopile.
- Gas Line Inspection: Check gas lines for any signs of corrosion, damage, or leaks.
- Valve Operation: Ensure the valve knob turns smoothly and clicks positively into each position (OFF, PILOT, ON).
7. Troubleshooting
Before attempting any troubleshooting, ensure the main gas supply is on and all connections are secure. If you are unsure about any step, contact a qualified service technician.
| Problem | Possible Cause | Solution |
|---|---|---|
| Pilot will not light. |
|
|
| Pilot lights but goes out when knob is released. |
|
|
| Main burner does not light. |
|
|
8. Specifications
| Model Number | MVK-PQM |
| Product Type | Millivolt Valve Kit with Quick Connect |
| Gas Type | Propane Gas |
| Maximum BTU Rating | 85,000 BTU |
| Maximum Operating Temperature | 225°F |
| Product Dimensions | 13 x 11 x 13 inches |
| Item Weight | 6 pounds |
| Manufacturer | Hearth Products Controls (HPC) |
9. Warranty and Support
For warranty information, technical support, or to purchase replacement parts, please contact Hearth Products Controls (HPC) directly or refer to their official website. Keep your purchase receipt as proof of purchase.
Manufacturer: Hearth Products Controls (HPC)
Note: Specific warranty terms and conditions may vary and are subject to the manufacturer's policy at the time of purchase.


