1. Introduction
Thank you for purchasing the SunDinG SD576A Wired Cycle Computer. This device is designed to provide essential cycling data, including speed, distance, time, and temperature, to enhance your riding experience. Please read this manual carefully before installation and use to ensure proper operation and longevity of your device.
2. Product Features
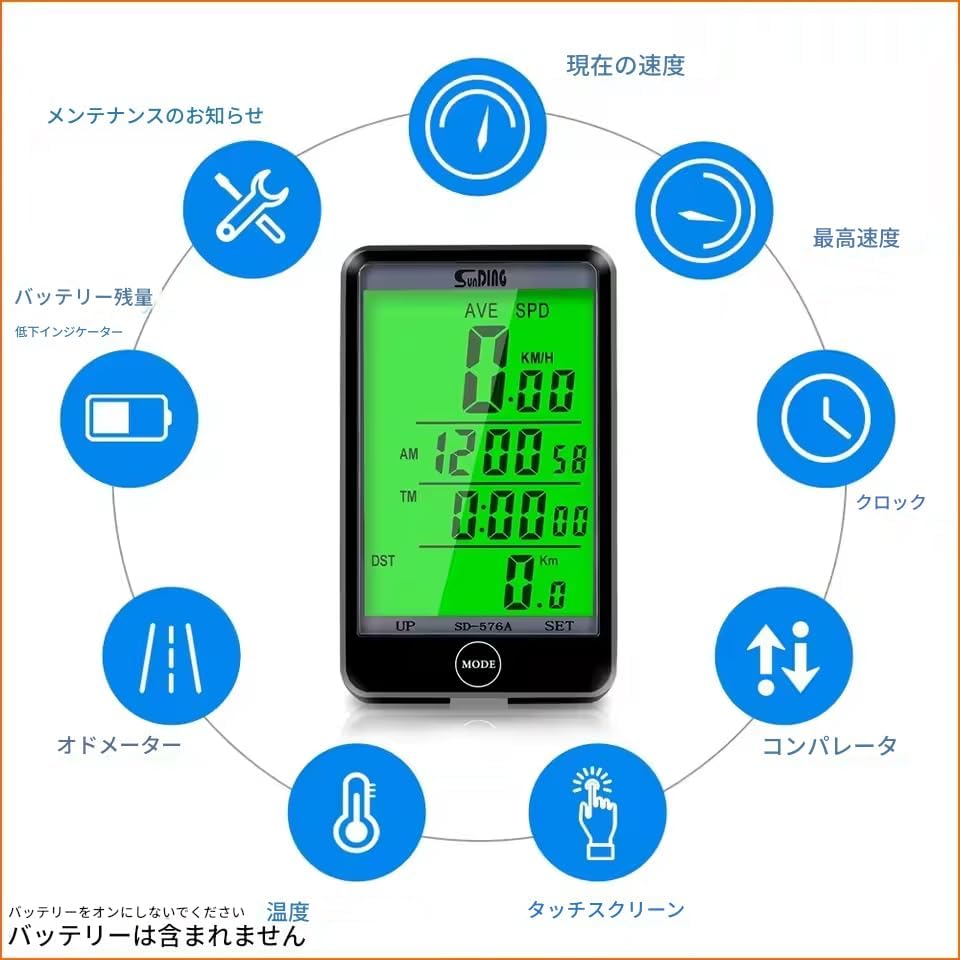
- Multi-function Display: Shows current speed, average speed, maximum speed, trip distance, total distance, riding time, clock, and temperature.
- Wired Connection: Ensures stable and accurate data transmission.
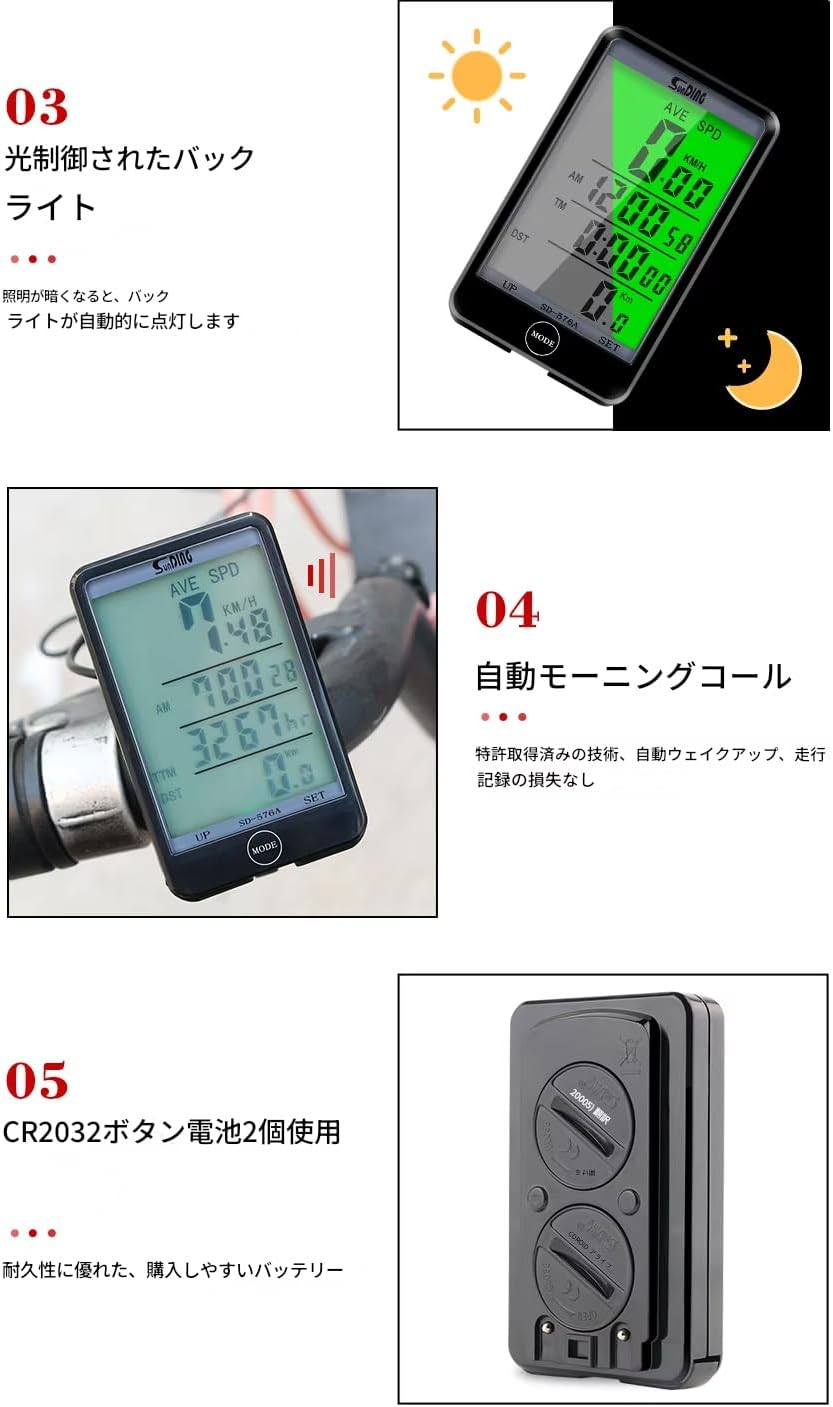
- Backlight: Provides clear visibility in low-light conditions or at night.
- Waterproof Design: Suitable for use in various weather conditions (short periods of light or heavy rain are not an issue).
- Wired Control Key: Allows easy switching between functions without removing hands from the handlebars.
- Automatic Wake-up: Automatically activates from sleep mode.
- Battery: Uses two CR2032 button batteries for power.
3. Package Contents
Verify that all items are present in the package:
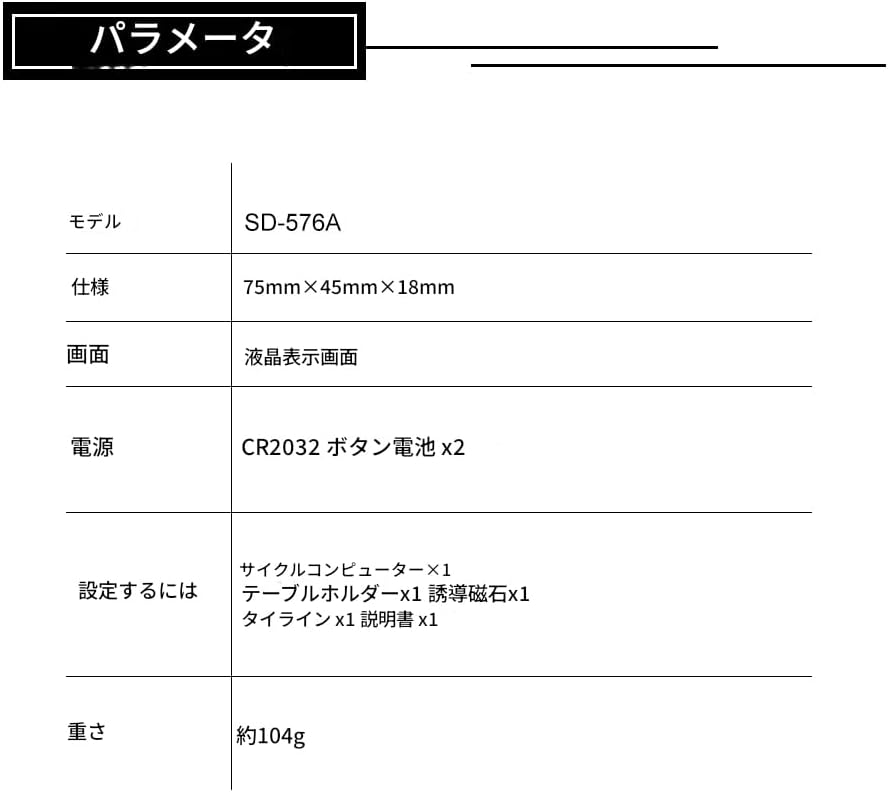
- Cycle Computer Unit x 1
- Handlebar Mount x 1
- Wired Sensor with Cable x 1
- Spoke Magnet x 1
- Cable Ties x 4
- Instruction Manual x 1
4. Setup and Installation
Follow these steps to install your cycle computer:
- Mount the Computer Base: Securely attach the handlebar mount to your bicycle's handlebar.
- Install the Wired Sensor: Attach the wired sensor to the front fork of your bicycle using the provided cable ties. Ensure the sensor is positioned correctly to align with the spoke magnet.
- Attach the Spoke Magnet: Secure the magnet to one of the spokes on your front wheel.
- Adjust Sensor-Magnet Distance: Position the magnet so that it passes within 1.5mm of the sensor head. This precise distance is crucial for accurate speed detection.
- Attach the Cycle Computer: Slide the cycle computer unit onto the mounted base until it clicks into place.

5. Operating Instructions
The SD576A features a simple interface with a MODE button for switching displays and a SET button for adjustments. The wired control key allows for convenient operation while riding.
5.1. Basic Operation
- Power On/Off: The unit typically powers on automatically when motion is detected or a button is pressed. It enters sleep mode after a period of inactivity.
- Switching Display Modes: Press the MODE button to cycle through different display functions (e.g., current speed, average speed, trip distance, total distance, clock, temperature).
- Backlight Activation: The backlight can be activated automatically in low light conditions or manually by pressing a specific button (refer to the detailed instructions in the included paper manual for specific button press combinations).
6. Settings
To access settings, typically a long press of the SET button is required. Use the MODE button to change values and the SET button to confirm.
6.1. Time Zone Setting
Set the correct time zone for your region. For Japan, the time zone is typically set to '09'.
6.2. Speed Unit Setting
You can choose between kilometers per hour (KM/H) or miles per hour (M/H) as your preferred speed unit.
6.3. Odometer (Total Distance) Setting
The total distance can be manually adjusted or reset. This is useful if you are transferring the computer to a new bike or wish to correct the total mileage.
7. Maintenance
- Cleaning: Wipe the unit with a soft, damp cloth. Do not use abrasive cleaners or solvents.
- Battery Replacement: When the battery indicator shows low power, replace both CR2032 batteries. Ensure correct polarity.
- Sensor and Magnet Check: Periodically check the sensor and magnet for proper alignment and secure attachment. Ensure the gap remains within 1.5mm.
8. Troubleshooting
- No Speed Reading: Check the sensor and magnet alignment. Ensure the gap is less than 1.5mm. Verify the sensor cable is securely connected to the main unit.
- Inaccurate Readings: Recheck the wheel circumference setting in the device settings. Ensure the sensor and magnet are stable and not moving during rides.
- Display Not Working: Check battery levels and replace if necessary. Ensure the unit is properly seated in its mount.
- Buttons Unresponsive: Ensure the buttons are not stuck. If the issue persists, try removing and reinserting the batteries to perform a soft reset.
- Water Ingress: While designed to be waterproof, extreme conditions or prolonged exposure to heavy rain may cause issues. If water enters the unit, remove batteries and allow it to dry completely before re-use.
9. Specifications
| Model | SD-576A |
| Dimensions | 75mm × 45mm × 18mm |
| Weight | Approx. 82g (Product only) |
| Display Type | LCD |
| Sensor Type | Speed Sensor (Wired) |
| Power Source | CR2032 Button Battery x 2 |
| Color | Green (Display Backlight) |
10. Warranty and Support
For warranty information or technical support, please refer to the specific terms provided at the point of purchase or contact the seller directly. Keep your purchase receipt as proof of purchase.


