1. Introduction
Thank you for purchasing the Omron M400 Automatic Upper Arm Blood Pressure Monitor. This device is designed to measure your blood pressure and pulse rate simply and quickly. It utilizes the oscillometric method of blood pressure measurement. This manual provides essential information for the safe and effective use of the monitor.
Regular monitoring of your blood pressure can provide valuable health insights. The Omron M400 is equipped with the Intelli Wrap Cuff for accurate readings and Intellisense technology for comfortable inflation.

Image 1: The Omron M400 Blood Pressure Monitor with its Intelli Wrap Cuff. The monitor features a large digital display and control buttons.
2. Important Safety Information
Please read this section carefully before using the device. Incorrect use may lead to inaccurate readings or injury.
- Consult your physician before using this device if you have any medical conditions.
- Do not self-diagnose or self-medicate based on measurement results. Always consult a healthcare professional.
- Keep the device out of reach of infants and children.
- Do not use the device on an injured arm or an arm undergoing medical treatment.
- Avoid taking measurements in a moving vehicle or during physical activity.
- Use only authorized parts and accessories.
3. Package Contents
Verify that all components are present in the package:
- Omron M400 Automatic Upper Arm Blood Pressure Monitor
- Intelli Wrap Cuff (22-42 cm arm circumference)
- 4 x AA Batteries
- Instruction Manual

Image 2: The retail packaging for the Omron M400, showing the monitor and cuff.
4. Setup
4.1. Installing Batteries
- Open the battery compartment cover on the back of the monitor.
- Insert the four AA batteries according to the polarity markings (+/-) inside the compartment.
- Close the battery compartment cover securely.
4.2. Attaching the Air Tube to the Monitor
- Insert the air plug of the Intelli Wrap Cuff firmly into the air jack on the left side of the monitor.
- Ensure the connection is secure to prevent air leakage during measurement.
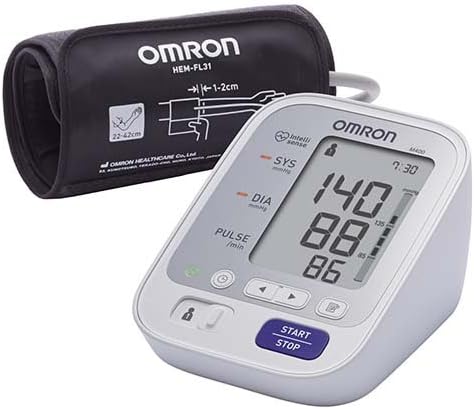
Image 3: The Omron M400 monitor with the Intelli Wrap Cuff connected, ready for use.
4.3. Setting Date and Time (If applicable)
Refer to the on-screen prompts or specific buttons (often indicated by a clock icon) to set the current date and time. This ensures accurate time-stamping of your measurement results in the memory.
5. Operation
5.1. Applying the Intelli Wrap Cuff
The Intelli Wrap Cuff is designed for easy and accurate placement. It can be applied to virtually any position around the upper arm.
- Sit in a chair with your feet flat on the floor. Rest your arm on a table so the cuff is at heart level.
- Slide your arm through the cuff loop. The air tube should run down the inside of your arm.
- Position the cuff so the bottom edge is 1-2 cm above your elbow.
- Secure the cuff firmly using the fabric fastener. Ensure it is snug but not too tight. The monitor features a cuff wrap guide to confirm correct placement.
5.2. Taking a Measurement
- Select User 1 or User 2 using the designated switch or button, if available. The M400 supports memory for two users.
- Press the START/STOP button. The cuff will begin to inflate automatically using Intellisense technology, which ensures comfortable inflation without over-pressurization.
- Remain still and silent during the measurement.
- Once the measurement is complete, your systolic pressure (SYS), diastolic pressure (DIA), and pulse rate will be displayed on the screen.
- The monitor will also indicate if an irregular heartbeat was detected or if your blood pressure is excessively high (hypertension indicator).
- Press the START/STOP button again to turn off the monitor. If you do not turn it off, it will automatically shut down after a few minutes.

Image 4: A close-up view of the Omron M400's digital display, showing systolic, diastolic, and pulse readings.
5.3. Memory Function
The Omron M400 stores up to 60 measurement values for each of two users (User 1 and User 2). To review past readings:
- Ensure the monitor is off.
- Press the memory button (often indicated by a symbol like a book or 'M').
- Use the arrow buttons to scroll through the stored readings.
6. Maintenance
6.1. Cleaning
- Wipe the monitor and cuff with a soft, dry cloth.
- If necessary, use a soft cloth moistened with water and a mild soap, then wipe dry.
- Do not use abrasive cleaners or immerse the device in water.
6.2. Storage
- Store the device in a clean, dry place.
- Avoid extreme temperatures, humidity, direct sunlight, and dust.
- Do not fold the cuff or air tube tightly.
6.3. Battery Replacement
When the battery indicator appears on the display, replace all four AA batteries with new ones. Do not mix old and new batteries or different types of batteries.
7. Troubleshooting
| Problem | Possible Cause | Solution |
|---|---|---|
| No display when powered on. | Batteries are dead or incorrectly inserted. | Replace batteries or reinsert them correctly. |
| Error message (e.g., "E1", "E2"). | Cuff not applied correctly, movement during measurement, or air leakage. | Reapply cuff, remain still, check air tube connection. Retake measurement. |
| Inaccurate readings. | Incorrect cuff size, improper cuff placement, or movement/talking during measurement. | Ensure correct cuff size (22-42 cm), proper placement, and follow measurement guidelines. |
| Irregular Heartbeat symbol appears frequently. | Indicates an irregular heartbeat. | Consult your physician if this symbol appears frequently. |
8. Specifications
- Model: Omron M400
- Display: Digital LCD
- Measurement Method: Oscillometric method
- Cuff Type: Intelli Wrap Cuff (HEM-FL31)
- Cuff Circumference: 22 to 42 cm
- Memory: 60 measurements for 2 users
- Power Source: 4 "AA" batteries 1.5V
- Dimensions: Approximately 19.2 x 18 x 11.6 cm
- Weight: Approximately 310 grams
- Features: Intellisense Technology, Cuff Wrap Guide, Irregular Heartbeat Detection, Hypertension Indicator.

Image 5: Certification seal indicating clinical validation for measurement accuracy.
9. Warranty and Support
Omron products are manufactured under a strict quality system. For information regarding warranty, repairs, or any technical support, please refer to the warranty card included with your product or visit the official Omron website. Do not attempt to repair the device yourself.
For further assistance, you may contact Omron customer service through their official channels. Keep your purchase receipt as proof of purchase for warranty claims.