1. Introduction
This instruction manual provides essential information for the safe and effective use of the Marinco-Bryant 3765N Locking Plug. This industrial-grade male plug is designed for demanding electrical applications, featuring a 3 Pole, 4 Wire Grounding configuration and rated for 50 Amperes at 250/600 Volts AC/DC. Please read this manual thoroughly before installation and operation to ensure proper usage and to prevent potential hazards.
2. Safety Information
WARNING: Electrical shock hazard. Improper installation or use of this product can result in serious injury or death. Always follow local electrical codes and safety regulations.
- Installation should only be performed by a qualified electrician.
- Ensure power is disconnected at the source before attempting any wiring or installation.
- Verify that the voltage and amperage ratings of the plug match the electrical system and equipment it will be connected to.
- Do not use this plug if it appears damaged or if any internal components are exposed.
- This product contains chemicals known to the State of California to cause cancer and birth defects or other reproductive harm (Proposition 65 warning). Wash hands after handling.
- Keep children away from electrical connections.
3. Product Overview
The Marinco-Bryant 3765N is a robust male locking plug designed for industrial and heavy-duty applications. Its construction ensures durability and reliable performance in challenging environments.
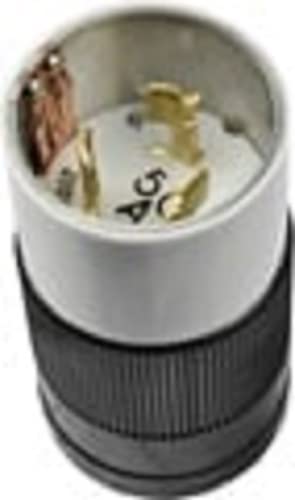
Figure 1: Front view of the Marinco-Bryant 3765N Locking Plug. This image shows the robust construction and the configuration of the plug pins.
Key Features:
- Model: 3765N
- Configuration: 3 Pole, 4 Wire Grounding (3P4W)
- Amperage: 50 Ampere
- Voltage: 250/600 Volts AC/DC
- Material: Durable Nylon construction
- Resistance: Chemical resistant, dust tight, impact resistant, moisture resistant
- Polarization: Polarized design for correct connection
- Approvals: UL, CSA certified

Figure 2: Side view of the Marinco-Bryant 3765N Locking Plug. This view highlights the overall form factor and connection points for wiring.
4. Setup and Installation
Proper installation is crucial for the safe and reliable operation of the locking plug. Always consult a qualified electrician for installation.
Required Tools:
- Screwdriver set (flathead and Phillips)
- Wire strippers/cutters
- Multimeter (for verifying power disconnection)
- Personal protective equipment (PPE) such as safety glasses and insulated gloves
Installation Steps:
- Disconnect Power: Locate the circuit breaker or fuse box controlling the power supply to the receptacle where the plug will be used. Turn off the power completely and verify with a multimeter that no voltage is present.
- Prepare Cable: Select an appropriate electrical cable with a wire range of 8 or 6 gauge and an outer cord size between 0.65 to 1.2 inches, compatible with the plug's ratings. Strip the outer jacket of the cable to expose the individual insulated wires, and then strip the insulation from each wire end according to the plug's terminal requirements.
- Disassemble Plug: Unscrew the housing of the 3765N locking plug to access the internal wiring terminals.
- Wire Connections: Carefully insert each stripped wire into its corresponding terminal. The 3P4W configuration typically includes Line 1, Line 2, Line 3, and Ground. Ensure correct polarity and secure each wire firmly by tightening the terminal screws. Refer to the internal markings on the plug for proper wire assignment.
- Assemble Plug: Reassemble the plug housing, ensuring all components are correctly aligned and securely fastened. The cord grip should firmly hold the cable to prevent strain on the wire connections.
- Final Check: Visually inspect all connections for proper seating and ensure no bare wires are exposed.
- Restore Power: Once installation is complete and verified, restore power at the circuit breaker.
5. Operating Instructions
The Marinco-Bryant 3765N locking plug is designed for secure and reliable connections. Follow these steps for proper operation:
- Align and Insert: Align the plug with the corresponding locking receptacle. The polarized design ensures it can only be inserted in one orientation. Push the plug firmly into the receptacle.
- Twist to Lock: Once fully inserted, twist the plug clockwise (typically 1/4 turn) until it locks into place. You should feel a positive engagement, indicating a secure connection.
- Verify Connection: Ensure the plug is fully seated and locked. A properly locked connection prevents accidental disconnection.
- To Disconnect: Twist the plug counter-clockwise to unlock it, then pull it straight out from the receptacle. Do not yank the cord.
6. Maintenance
Regular inspection and basic maintenance can extend the life of your locking plug and ensure continued safe operation.
- Visual Inspection: Periodically inspect the plug for any signs of damage, such as cracks, discoloration, or exposed wiring. Check for bent or corroded pins.
- Cleaning: If necessary, clean the exterior of the plug with a dry, lint-free cloth. Do not use liquid cleaners or solvents, especially near electrical contacts. Ensure the plug is disconnected from power before cleaning.
- Connection Check: Ensure the cable entry point remains secure and the cord grip is tight. Loose connections can lead to overheating and electrical hazards.
- Storage: When not in use, store the plug in a clean, dry environment, protected from extreme temperatures and physical damage.
If any damage is observed, discontinue use immediately and replace the plug.
7. Troubleshooting
This section addresses common issues you might encounter with the locking plug.
| Problem | Possible Cause | Solution |
|---|---|---|
| No power to connected equipment. |
|
|
| Plug feels loose or wobbly in receptacle. |
|
|
| Plug or cable becomes hot during use. |
|
|
If you are unable to resolve an issue, or if you suspect a serious electrical problem, immediately disconnect power and consult a qualified electrician.
8. Specifications
| Feature | Detail |
|---|---|
| Model Number | 3765N |
| Brand | Marinco-Bryant |
| Connector Type | Locking Plug (Male) |
| Configuration | 3 Pole, 4 Wire Grounding (3P4W) |
| Amperage Rating | 50 Ampere |
| Voltage Rating | 250/600 Volts AC/DC |
| Material | Nylon |
| Color | Gold |
| Wire Range | 8 & 6 Gauge |
| Cord Size Compatibility | 0.65 to 1.2 inches |
| Approvals | UL, CSA |
| Product Dimensions | 4 x 4 x 6 inches |
| Weight | 1 Pound |
9. Warranty and Support
For specific warranty information regarding the Marinco-Bryant 3765N Locking Plug, please refer to the documentation provided with your purchase or contact Marinco customer support directly. Warranty terms typically cover manufacturing defects under normal use.
If you require technical assistance or have questions not covered in this manual, please contact Marinco customer service. Contact information can usually be found on the manufacturer's official website or on the product packaging.
Note: The seller's return policy states that there are no refunds on electrical items, but replacements may be offered for manufacturer defects. Shipping costs for returns/replacements may be the buyer's responsibility. Always verify current policies with your point of purchase.


