
Introduction
Welcome to the world of creative sewing with your new Janome MOD-30 Computerized Sewing Machine. This machine is designed to provide power, precision, and confidence for all your sewing projects, from modern garments to home decor and quilts. It features 30 built-in stitches, including 3 one-step buttonholes, to help you bring your creative visions to life.
Please read this instruction manual thoroughly before operating your machine to ensure safe and efficient use. Keep this manual in a safe place for future reference.
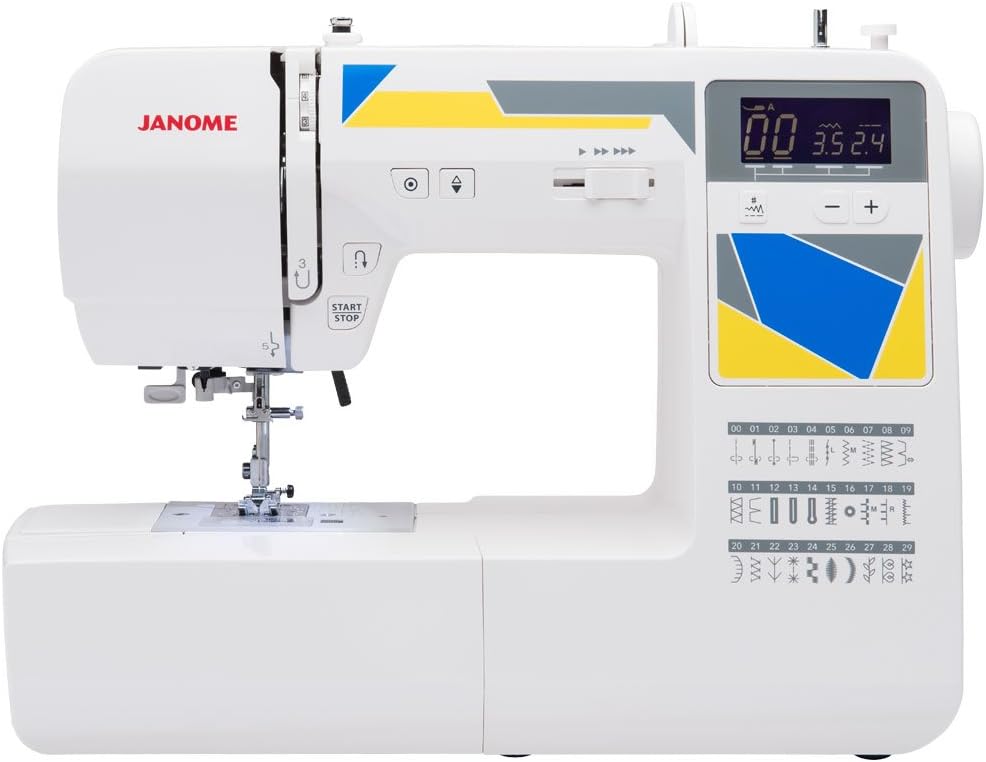
Image: Front view of the Janome MOD-30 Computerized Sewing Machine, showcasing its compact design and control panel.
Safety Instructions
Always follow basic safety precautions when using electrical appliances to reduce the risk of fire, electric shock, or injury to persons.
- Ensure the machine is unplugged from the electrical outlet when not in use, when servicing, or when making any adjustments.
- Keep fingers away from all moving parts. Special care is required around the sewing machine needle.
- Use only accessories recommended by the manufacturer as contained in this manual.
- Never operate the sewing machine with any air opening blocked. Keep ventilation openings of the sewing machine and foot controller free from the accumulation of lint, dust, and loose cloth.
- Do not operate where aerosol (spray) products are being used or where oxygen is being administered.
- This appliance is designed for 120V and has a US-type plug. Ensure compatibility with your local electrical voltage before use.
Getting Started (Setup)
Unpacking and Placement
Carefully remove the machine from its packaging. Place the machine on a stable, flat surface. Ensure there is adequate lighting for your workspace.

Image: The Janome MOD-30 sewing machine set up on a wooden table, ready for use with fabric nearby.
Power Connection
Connect the power cord to the machine and then to a suitable electrical outlet. The machine is designed for 120V. Locate the power switch, typically on the side or back of the machine, and turn it on.
Note: Some international users have reported issues with voltage compatibility. Always verify your local voltage matches the machine's requirements (120V) or use an appropriate voltage converter.
Threading the Machine
Follow the numbered guides on the machine for proper upper thread tension. The Janome MOD-30 features an easy one-hand needle threader for convenience.
- Place your thread spool on the spool pin.
- Guide the thread through the upper thread guides as indicated by the arrows.
- Bring the thread down through the tension discs and up through the take-up lever.
- Thread the needle using the built-in one-hand needle threader. Pull the thread through the needle eye.

Image: Top view of the Janome MOD-30, showing the thread spool pins and upper threading path.
Bobbin Winding and Insertion
The Janome MOD-30 features a top-loading bobbin with a clear cover for easy monitoring.
- Place an empty bobbin on the bobbin winder spindle.
- Guide the thread from the spool through the bobbin winding tension disc.
- Wind a few turns of thread onto the bobbin manually, then push the spindle to the right.
- Start the machine; it will automatically stop when the bobbin is full.
- Remove the bobbin and insert it into the bobbin case under the needle plate, following the indicated thread path. Ensure the thread is wrapped around the outside part of the bobbin as shown in the directions to prevent tension issues.
- Replace the clear bobbin cover.
Operating the Machine
Control Panel and Display
The backlit LCD display shows the selected stitch number, stitch length, and stitch width. Use the navigation keys to select stitches and adjust settings.
- Start/Stop Button: Allows you to operate the machine without the foot controller.
- Reverse Button: Used for reinforcing stitches at the beginning and end of seams.
- Locking Stitch Button: Automatically ties off stitches for a secure finish.
- Needle Up/Down Button: Positions the needle up or down for pivoting fabric.
- Speed Control Slider: Adjusts the sewing speed from slow to fast.
Video: An overview of the Janome MOD-30's features, including the control panel, stitch selection, and automatic functions.
Stitch Selection and Adjustment
The Janome MOD-30 offers 30 built-in stitches. Refer to the stitch chart on the machine for visual reference.
- Use the stitch selection buttons (+/-) to choose your desired stitch. The selected stitch number will appear on the LCD.
- Adjust stitch length and width using the dedicated buttons on the control panel.
- For decorative stitches or alphabets, ensure the machine is in the correct mode (Mode 1 or Mode 2) as indicated on the stitch chart.

Image: A close-up of hands guiding fabric under the presser foot and needle, demonstrating the sewing process.
Sewing Tips
- Always test your stitch on a scrap piece of fabric before sewing your main project.
- Ensure the presser foot is lowered before you begin sewing.
- For thick fabrics or multiple layers, the machine may make a "ca-chunk" sound. Guide the fabric carefully.
- The free arm feature, accessed by removing the accessory storage compartment, is ideal for sewing cuffs, sleeves, and pant hems.

Image: The Janome MOD-30 sewing machine positioned on a wooden table, with two pairs of finished fabric shorts, demonstrating potential projects.
Maintenance
Regular maintenance ensures the longevity and optimal performance of your Janome MOD-30.
- Cleaning: Regularly clean lint and dust from the bobbin area and feed dogs using the brush provided.
- Needle Replacement: Replace needles frequently, especially when sewing different fabric types or if the needle becomes dull or bent.
- Storage: When not in use, store the machine in its vinyl cover to protect it from dust.

Image: A collection of Janome MOD-30 sewing machine accessories, including needles, bobbins, a seam ripper, and a cleaning brush.
Troubleshooting
| Problem | Possible Cause | Solution |
|---|---|---|
| Thread bunching on bottom | Incorrect bobbin loading or tension issue. | Ensure bobbin thread is wrapped correctly around the outside part of the bobbin. Adjust upper thread tension if necessary. |
| Needle breaking | Incorrect needle size for fabric, bent needle, or pulling fabric while sewing. | Use the correct needle for your fabric. Replace bent needles. Guide fabric gently without pulling. |
| Machine not sewing | Machine unplugged, power switch off, or bobbin not correctly inserted. | Check power connection and switch. Re-insert bobbin correctly. |
Specifications
- Model: MOD-30
- Stitches: 30 Built-In Stitches, including 3 One-Step Buttonholes
- Bobbin Type: Top Loading Bobbin with Clear Cover
- Feed System: 7-Piece Feed Dog System
- Needle Threader: One-Hand Needle Threader
- Display: Backlit LCD Display with Easy Navigation Keys
- Convenience Features: Start/Stop Button, Reverse, Locking Stitch, Needle Up/Down
- Dimensions: 7 x 16 x 12 inches
- Weight: 12.7 pounds
- Manufacturer: Janome
- Country of Origin: Taiwan
Warranty and Support
The Janome MOD-30 Computerized Sewing Machine comes with a 25-year limited warranty. For detailed warranty information or technical support, please refer to the warranty card included with your purchase or visit the official Janome website.
You can also visit the Janome Store on Amazon for additional product information and resources.