Introduction
This manual provides detailed instructions for the installation, operation, and maintenance of your RICOO Dual Monitor Desk Mount, model TS3511. Please read these instructions carefully before installation to ensure safe and correct usage. Keep this manual for future reference.
Safety Information
- Ensure all components are present and undamaged before installation. Do not use if any parts are missing or faulty.
- Verify that the mounting surface (desk) can support the combined weight of the mount and two monitors.
- Do not exceed the maximum weight capacity of 8 kg (17.6 lbs) per monitor arm.
- Ensure your monitors are VESA compatible (75x75mm or 100x100mm).
- Always use appropriate tools and follow installation steps precisely. Incorrect installation can lead to product failure or injury.
- Keep children and pets away during installation.
Package Contents
Please check that all parts are included in your package. If any parts are missing or damaged, contact customer support.
- Main pole with desk clamp
- Two monitor arms with VESA plates
- Cable management clips
- Mounting hardware (screws, washers, spacers)
- Tools for assembly (e.g., Allen keys)

Image: Overview of the RICOO TS3511 mount, highlighting its maximum weight capacity of 2x8kg (17lbs) and VESA compatibility up to 100x100mm.
Setup and Installation
Follow these steps to correctly install your dual monitor desk mount.
Step 1: Attach Desk Clamp
- Place the main pole with the integrated desk clamp onto the edge of your desk.
- Tighten the clamp screw firmly until the mount is stable and secure on the desk. Ensure the desk thickness is compatible with the clamp (max 90mm).

Image: Technical drawing illustrating the dimensions of the desk mount, including the clamp's maximum opening of 90mm and the total height of 880mm.
Step 2: Install Monitor Arms
- Slide the two monitor arms onto the main pole at your desired heights.
- Secure each arm in place using the provided locking mechanisms.
Step 3: Attach Monitors to VESA Plates
- Carefully attach your monitors to the VESA plates on each arm using the appropriate screws from the hardware kit.
- Ensure the VESA pattern on your monitor matches the mount (75x75mm or 100x100mm).
- Tighten all screws securely, but do not overtighten.

Image: A VESA compatibility chart showing supported patterns (75x75mm, 100x100mm) and visual guidance on how to correctly attach the VESA plate to a monitor, avoiding obstruction of ports.
Operating Instructions
The RICOO TS3511 mount offers various adjustment options for optimal viewing comfort.
Height Adjustment
- To adjust the height of a monitor, loosen the locking mechanism on the arm, slide the arm up or down the main pole, and then re-tighten the mechanism firmly.
- The maximum height for two monitors stacked vertically is approximately 370mm per monitor.

Image: This image demonstrates two monitors mounted one above the other, showing the maximum height of 37cm for each monitor and the 8kg weight limit per arm.
Tilt, Swivel, and Rotation
- Tilt: The monitor can be tilted +/- 15 degrees to reduce glare and optimize viewing angles. Adjust by loosening the tilt knob, positioning the monitor, and re-tightening.
- Swivel: Each monitor arm can swivel 180 degrees horizontally.
- Rotation: The VESA plate allows for 360-degree rotation, enabling you to switch between landscape and portrait orientations.

Image: A dynamic view of the monitor mount demonstrating its full adjustability, including vertical height adjustment, and the ability to tilt, swivel, and rotate the monitor 360 degrees.
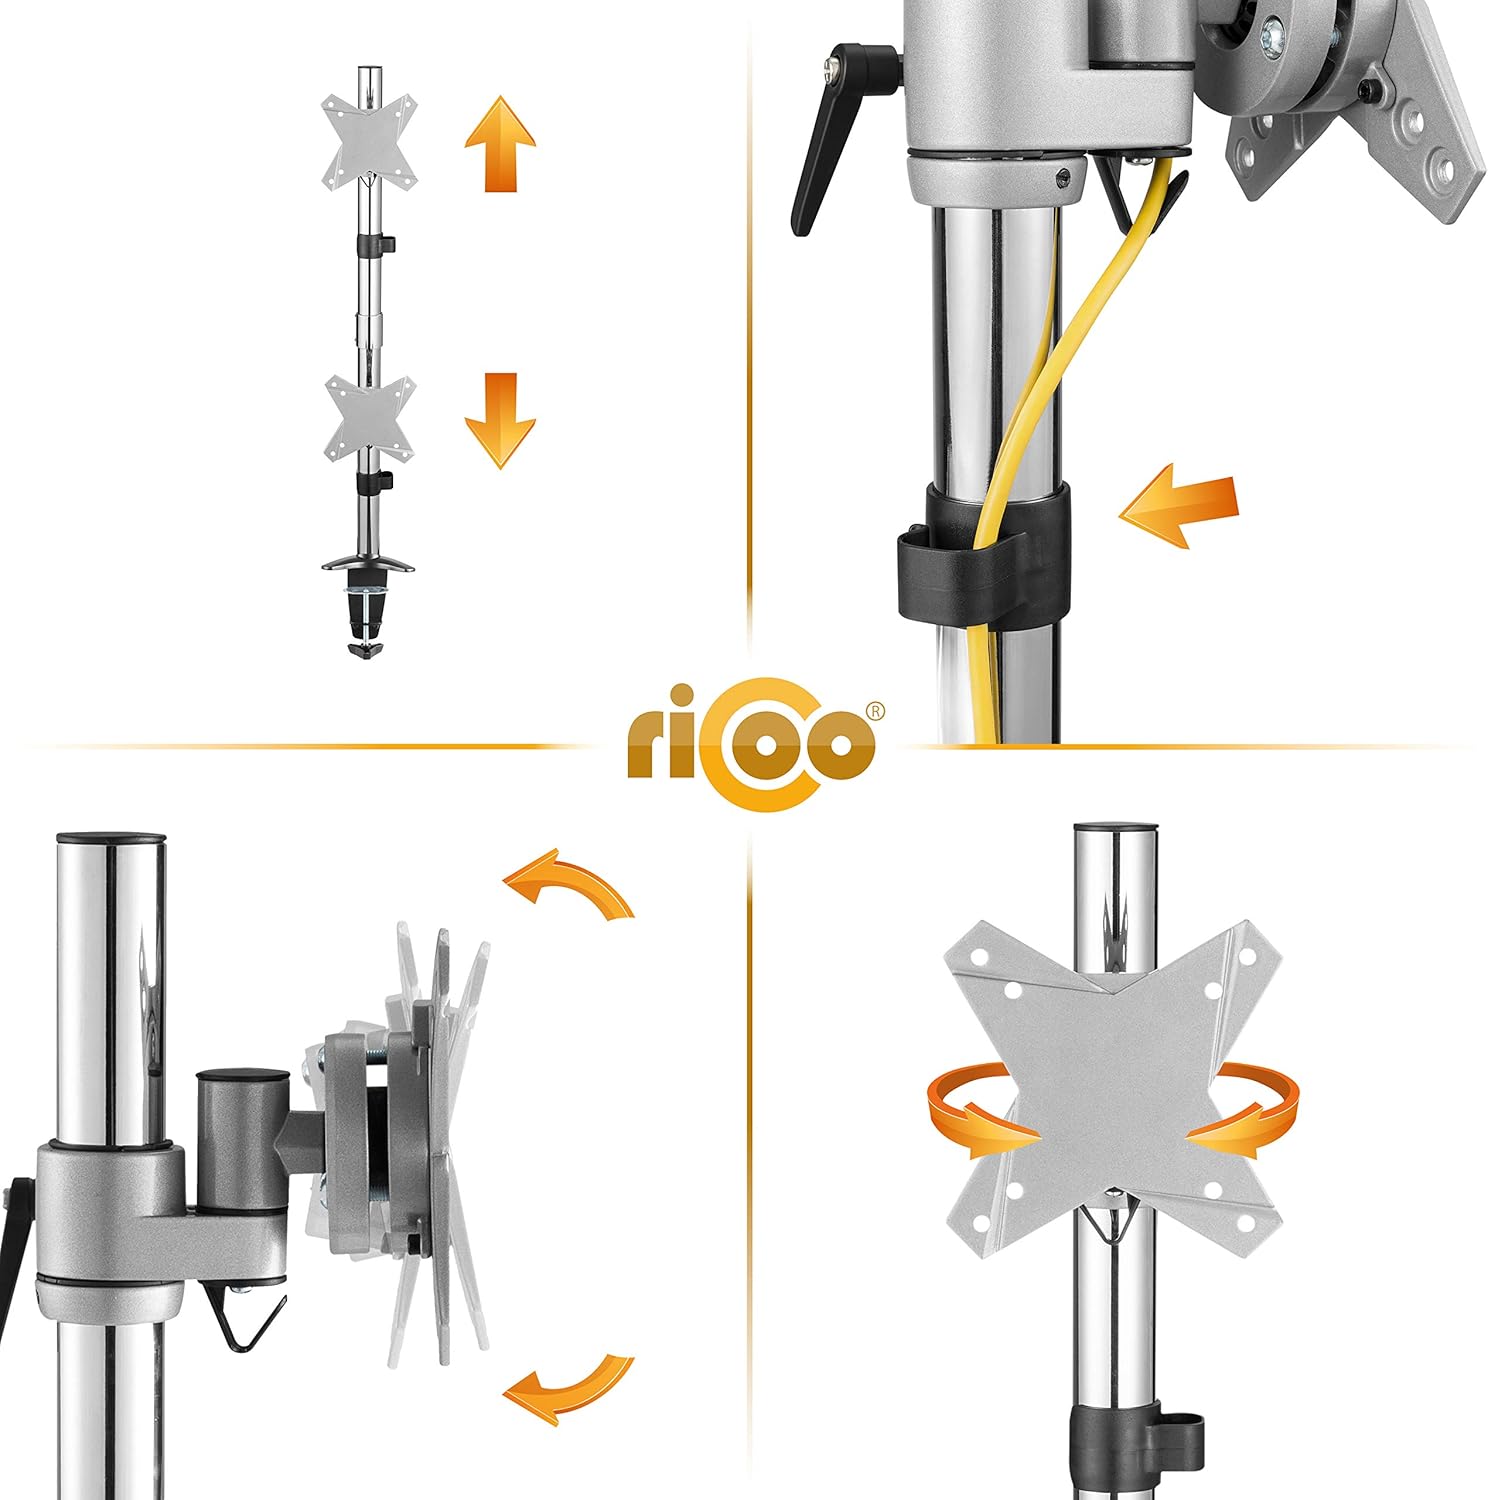
Image: Detailed views showing the integrated cable management system, the mechanism for vertical height adjustment on the pole, and the 360-degree rotation capability of the VESA mounting plate.
Cable Management
Utilize the provided cable management clips to route and organize your monitor cables along the arms and main pole. This helps maintain a tidy workspace and prevents cable damage.
Maintenance
- Regularly check all screws and connections to ensure they remain tight and secure. Re-tighten if necessary.
- Clean the mount with a soft, damp cloth. Avoid abrasive cleaners or solvents that could damage the finish.
- Do not lubricate any moving parts unless specifically instructed by the manufacturer.
Troubleshooting
| Problem | Possible Cause | Solution |
|---|---|---|
| Monitor sags or tilts unexpectedly. | Tilt mechanism is loose; monitor weight exceeds capacity. | Tighten the tilt adjustment knob. Verify monitor weight is within 8 kg per arm. |
| Mount feels unstable on the desk. | Desk clamp is not tightened sufficiently; desk surface is too thin or uneven. | Re-tighten the desk clamp. Consider adding a protective pad or reinforcing the desk if it's too thin. |
| Difficulty adjusting monitor height. | Locking mechanism is too tight or loose. | Loosen the locking mechanism slightly before adjusting, then re-tighten. |
| Monitors are not aligned. | Arms are at different heights or VESA plates are not level. | Adjust the height of each arm independently. Use the rotation feature to fine-tune horizontal alignment. |
Specifications
- Model: TS3511
- Brand: RICOO
- Material: Alloy Steel
- Color: Silver
- Mounting Type: Desk Clamp
- Movement Type: Articulating, Swivel, Tilt, Rotation
- VESA Compatibility: 75x75mm, 100x100mm
- Screen Size Compatibility: 13 to 27 inches
- Weight Capacity: Max 8 kg (17.6 lbs) per arm
- Tilt Range: +/- 15 degrees
- Swivel Range: 180 degrees
- Rotation: 360 degrees
- Max Desk Thickness: 90 mm
- Product Dimensions (L x W x H): 39 x 13 x 24 cm (base unit, without arms extended)
- Product Weight: 4.1 kg
Warranty and Support
For warranty information or technical support, please refer to the official RICOO website or contact your retailer. Keep your purchase receipt as proof of purchase.
For further assistance, you may visit the RICOO Brand Store.


