
Important Safety Instructions
Read all instructions carefully before operating the appliance. Failure to follow these instructions may result in electric shock, fire, or serious injury.
- Always unplug the slicer from the power outlet before cleaning, assembling, or disassembling parts.
- Keep hands clear of the blade at all times. The blade is extremely sharp.
- Do not operate the slicer with a damaged cord or plug, or if the appliance malfunctions or has been damaged in any manner.
- This appliance is not intended for use by persons (including children) with reduced physical, sensory or mental capabilities, or lack of experience and knowledge, unless they have been given supervision or instruction concerning use of the appliance by a person responsible for their safety.
- Use only attachments recommended or sold by the manufacturer.
- Do not immerse the motor base in water or other liquids.
- Ensure the slicer is placed on a stable, flat, and dry surface during operation.
- Do not attempt to slice frozen foods, bones, or non-food items.
- Always use the food pusher to guide food towards the blade. Never use your hands directly.
- The double illuminated ON/OFF switch is designed for safety (24V) to prevent electric shock.
Product Overview and Components
The BESWOOD250 Electric Food Slicer is designed for precise slicing of various foods such as meat, cheese, and vegetables. Familiarize yourself with its main components before operation.
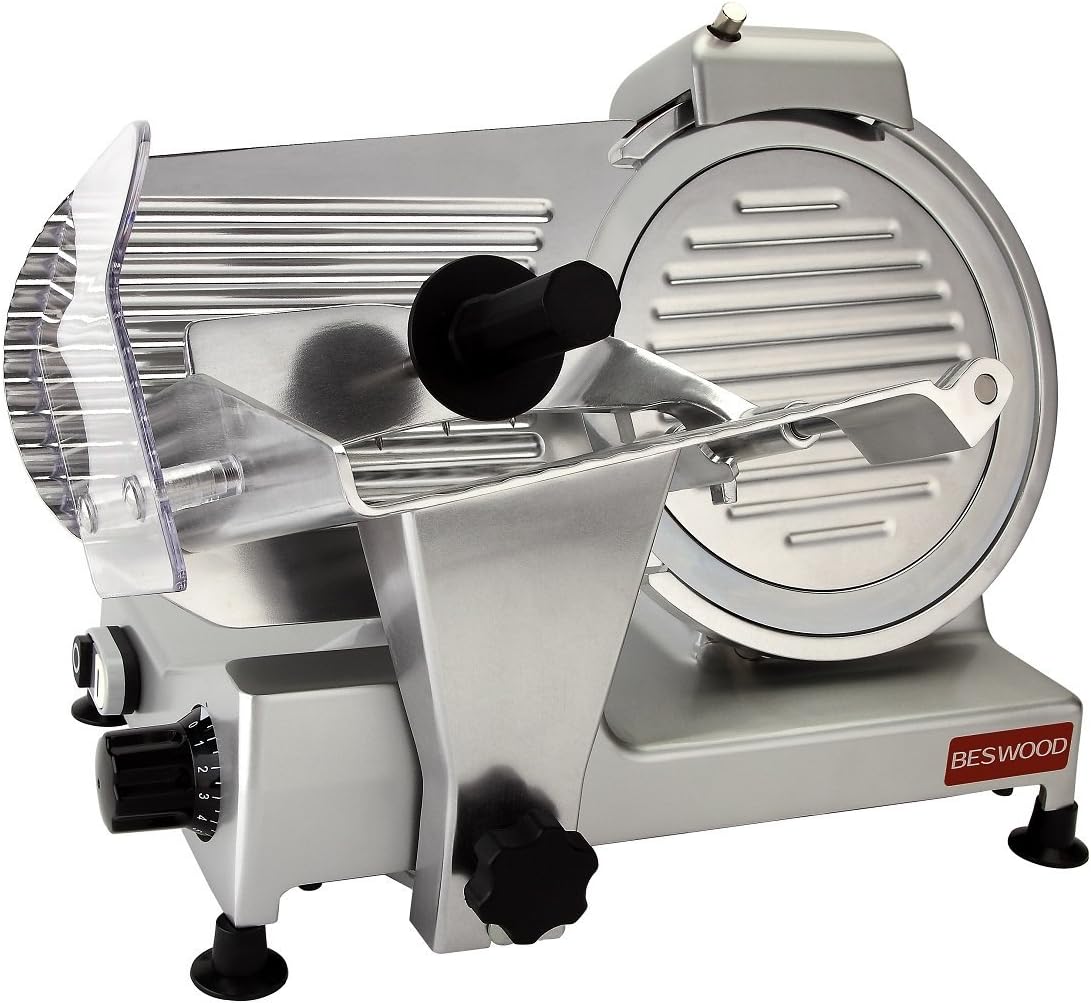
Figure 1: Overall view of the BESWOOD250 Electric Food Slicer, showcasing its chromium-plated steel blade and robust construction.

Figure 2: The slicer viewed from an angle, indicating approximate dimensions of 16 inches in length and 10 inches in width for the base.

Figure 3: Close-up of the transparent food pusher and blade guard, essential for safe operation and guiding food.

Figure 4: Detailed view of the 10-inch chromium-plated steel blade, designed for durability and precise cuts.

Figure 5: Close-up of the thickness adjustment knob, allowing precise control over slice thickness from 0 to 12mm.

Figure 6: Detail of the double illuminated ON/OFF switch, providing clear indication of power status and enhanced safety.

Figure 7: View of the BESWOOD brand logo on the base of the slicer, indicating authenticity.
Key Components:
- Chromium-plated Steel Blade: 10-inch diameter, durable and corrosion-resistant.
- Food Carriage: Platform for holding food to be sliced.
- Food Pusher: Clear plastic component used to secure and guide food safely.
- Thickness Adjustment Knob: Controls the slice thickness.
- Blade Guard: Protects the blade when not in use and during cleaning.
- On/Off Switch: Double illuminated 24V switch for safe operation.
- Motor Base: Houses the motor and provides stability.
Setup
- Unpacking: Carefully remove the slicer from its packaging. Retain packaging for future storage or transport.
- Placement: Place the slicer on a clean, dry, stable, and level surface. Ensure there is adequate space around the appliance for safe operation and ventilation.
- Initial Cleaning: Before first use, clean all parts that will come into contact with food. Refer to the "Cleaning and Maintenance" section for detailed instructions.
- Power Connection: Ensure the ON/OFF switch is in the "OFF" position. Plug the power cord into a grounded electrical outlet. The slicer operates on standard household voltage.
Operating Instructions
Follow these steps for safe and effective slicing:
- Prepare Food: Ensure the food item is of a suitable size and shape to fit on the food carriage. For best results, chill meats and cheeses before slicing.
- Adjust Thickness: Turn the thickness adjustment knob (Figure 5) to set your desired slice thickness. The range typically allows for very thin deli slices to thicker cuts.
- Place Food: Place the food item securely on the food carriage. Use the food pusher (Figure 3) to hold the food firmly against the fence and guide it towards the blade.
- Power On: Press the "ON" side of the illuminated ON/OFF switch (Figure 6). The blade will begin to rotate.
- Slicing: Gently push the food carriage back and forth, guiding the food into the rotating blade using the food pusher. Apply even pressure.
- Collect Slices: Sliced food will fall onto the receiving tray or surface placed beneath the blade.
- Power Off: Once slicing is complete, press the "OFF" side of the illuminated ON/OFF switch. Wait for the blade to come to a complete stop before handling the slicer or removing food.
- Unplug: Always unplug the slicer from the power outlet after use.
WARNING: Never use your bare hands to push food towards the blade. Always use the food pusher.
Cleaning and Maintenance
Regular cleaning and maintenance will ensure the longevity and safe operation of your slicer. Always unplug the appliance before cleaning.
- Daily Cleaning:
- Unplug the slicer.
- Carefully remove the food carriage and food pusher. These parts can be hand washed with warm, soapy water.
- To clean the blade, use a damp cloth or sponge with mild detergent. Wipe from the center outwards to avoid cutting yourself. Some models allow for blade removal for thorough cleaning; consult specific instructions if applicable.
- Wipe down the motor base and exterior surfaces with a damp cloth. Do not immerse the motor base in water.
- Dry all parts thoroughly before reassembling or storing.
- Blade Care: The premium chromium-plated steel blade is designed for durability and does not require frequent sharpening. If sharpening becomes necessary, consult a professional or refer to specialized blade sharpening instructions for this type of blade.
- Storage: Store the slicer in a clean, dry place, away from children. Ensure all parts are dry before storage.
CAUTION: The blade is extremely sharp. Exercise extreme care when cleaning the blade.
Troubleshooting
| Problem | Possible Cause | Solution |
|---|---|---|
| Slicer does not turn on. | Not plugged in; power switch off; power outage. | Ensure power cord is securely plugged into a working outlet. Press the "ON" side of the switch. Check household circuit breaker. |
| Blade is not slicing effectively. | Food too warm; blade dirty; blade dull. | Chill food before slicing. Clean the blade thoroughly. If blade is dull, consider professional sharpening. |
| Slices are uneven. | Food not held firmly; thickness setting incorrect. | Ensure food is pressed firmly against the fence and food pusher. Re-adjust thickness knob. |
| Motor sounds strained. | Overloading; slicing frozen or hard items. | Do not overload the slicer. Avoid slicing frozen foods or items with bones. Allow motor to cool if overheated. |
Specifications
| Feature | Detail |
|---|---|
| Brand | BESWOOD |
| Model | BESWOOD250 |
| Product Dimensions | 20"L x 17"W x 14.75"H |
| Material | Aluminum, Chromium-plated Steel, Rubber |
| Color | Silver |
| Special Feature | Electric |
| Recommended Uses | Cheese, Meat, Vegetable |
| Product Care Instructions | Hand Wash Only |
| Blade Material | High-carbon and Chromium-plated Steel |
| Item Weight | 33 Pounds |
| Blade Length | 10 Inches |
| Power | 240W |
| Safety Certification | ETL Listed & Certified |
Warranty and Support
This BESWOOD product is manufactured to high-quality standards. For information regarding warranty coverage, technical support, or replacement parts, please refer to the warranty card included with your purchase or contact BESWOOD customer service directly. Keep your purchase receipt as proof of purchase.
For further assistance, please visit the official BESWOOD website or contact their customer support line.