Introduction
This manual provides essential information for the proper installation, operation, and maintenance of your Alpine OEM Genuine Quick Disconnect Power Connector. This connector is designed for use with select Alpine PDX series amplifiers, including models PDX-F4, PDX-F6, PDX-M12, PDX-M6, and PDX-V9. Please read this manual thoroughly before use to ensure optimal performance and safety.
Product Overview
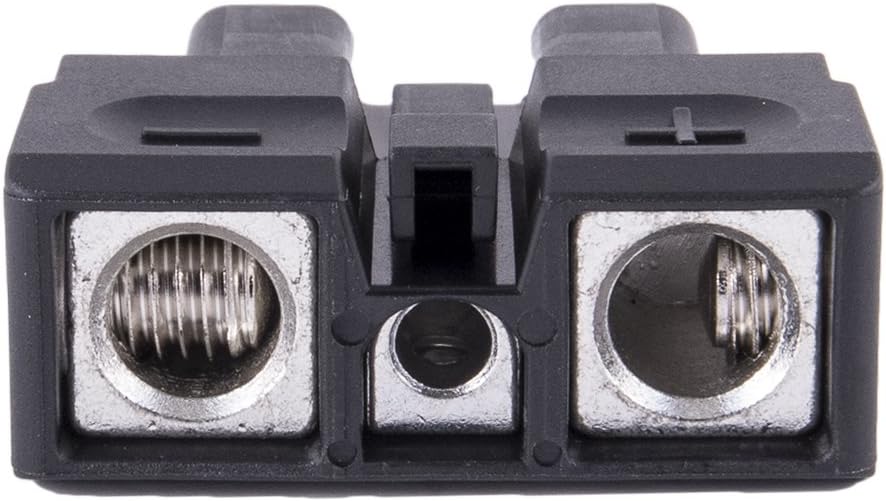
Figure 1: Top-down view of the Alpine Quick Disconnect Power Connector, showing the two main power terminals (positive and negative) and the central screw for securing wires. The connector is black with silver-colored terminals.
The Alpine Quick Disconnect Power Connector provides a secure and convenient method for connecting power to compatible Alpine PDX series amplifiers. Its design allows for quick and easy connection and disconnection, simplifying amplifier installation and removal.
Setup and Installation
Proper installation is crucial for the performance and longevity of your amplifier and the power connector. Always ensure the vehicle's battery is disconnected before beginning any electrical work.
- Prepare Wires: Strip approximately 1/2 inch (12-15mm) of insulation from the ends of your power and ground wires. Ensure the wire gauge is appropriate for your amplifier's power requirements.
- Insert Wires: Loosen the set screws on the connector's terminals. Insert the positive (+) power wire into the positive terminal and the negative (-) ground wire into the negative terminal. Ensure no stray wire strands are present that could cause a short circuit.
- Secure Wires: Tighten the set screws firmly to secure the wires. Pull gently on the wires to confirm they are held securely and cannot be easily dislodged.
- Connect to Amplifier: Align the connector with the corresponding power input on your Alpine PDX amplifier. Push the connector firmly into place until it clicks or is fully seated.
- Reconnect Battery: Once all connections are secure, reconnect the vehicle's battery.
Warning: Incorrect wiring can cause damage to the amplifier, vehicle, or result in fire. If you are unsure about any step, consult a professional car audio installer.
Operating Instructions
The Alpine Quick Disconnect Power Connector is a passive component designed to facilitate power transfer. Once properly installed, its operation is seamless with your amplifier.
- Power Transfer: The connector provides a stable electrical connection between your vehicle's power system and the amplifier, allowing the amplifier to receive the necessary power for operation.
- Quick Disconnect: To disconnect power, firmly pull the connector away from the amplifier's input. This allows for easy removal of the amplifier for maintenance, upgrades, or security.
- Quick Reconnect: To reconnect, simply align the connector and push it back into the amplifier's input until it is fully seated.
Maintenance
Regular inspection of the power connector can help prevent issues and ensure reliable performance.
- Visual Inspection: Periodically inspect the connector for any signs of wear, corrosion, or damage. Check for discoloration, especially around the terminals, which could indicate overheating.
- Connection Integrity: Ensure the wires are still securely fastened within the terminals. If any looseness is detected, disconnect power and re-tighten the set screws.
- Cleanliness: Keep the connector free from dust, dirt, and moisture. Use a dry, soft cloth to wipe down the connector if necessary.
- Avoid Stress: Do not put excessive strain or tension on the wires connected to the connector, as this can lead to premature wear or disconnection.
Troubleshooting
| Problem | Possible Cause | Solution |
|---|---|---|
| Amplifier not powering on | Loose connection at the power connector. No power from the vehicle's battery. Blown fuse in the power line. | Ensure the connector is fully seated and wires are tight. Check battery terminals and voltage. Inspect and replace fuse if necessary. |
| Connector feels hot or shows signs of melting/discoloration | Loose wire connection causing resistance. Undersized wiring for the amplifier's power draw. Overloaded amplifier. | Immediately disconnect power. Re-tighten all wire connections. Verify wire gauge is sufficient for amplifier. Ensure amplifier is not being overdriven. Consider professional inspection. |
| Difficulty disconnecting/reconnecting | Misalignment. Debris in the connector. | Ensure proper alignment before pushing/pulling. Inspect for and remove any foreign objects. |
Specifications
- Brand: Alpine
- Compatible Models: Alpine PDX-F4, PDX-F6, PDX-M12, PDX-M6, PDX-V9 Amplifiers
- Item Weight: 0.639 ounces
- Package Dimensions: 3.3 x 3.2 x 1 inches
- Type: OEM Genuine Quick Disconnect Power Connector
Contact and Support
For further assistance or technical support regarding your Alpine product, please visit the official Alpine website or contact their customer service department. You can find more information and products at the Alpine Store on Amazon.


