
Accusize Industrial Tools 2012-1001
Accusize Industrial Tools 0-1 inch by 0.0001 inch Resolution Blade Micrometer (Model 2012-1001) User Manual
Model: 2012-1001
1. Introduction
This manual provides comprehensive instructions for the proper use, care, and maintenance of your Accusize Industrial Tools 0-1 inch by 0.0001 inch Resolution Blade Micrometer, Model 2012-1001. Please read this manual thoroughly before operating the instrument to ensure accurate measurements and prolong its lifespan.
The Accusize Blade Micrometer is designed for precise measurement of grooves, slots, and other recessed features where standard micrometers cannot reach. Its specialized blade-shaped anvils allow for accurate readings in narrow spaces.
2. Product Overview
2.1 Key Features
- Range: 0-1 inch
- Resolution: 0.0001 inch
- Accuracy: 0.00015 inch
- Spindle Type: Non-rotating spindle
- Blade Thickness: 0.029 inch
- Blade Width: 0.256 inch
- Blade Penetration: 0.236 inch
- Material: Stainless Steel construction
- Supplied in a fitted plastic case for protection.
2.2 Components
The Accusize Blade Micrometer consists of the following main components:
- Frame: The main body of the micrometer, typically C-shaped.
- Anvil: The stationary measuring face, blade-shaped.
- Spindle: The movable measuring face, blade-shaped, which advances or retracts.
- Sleeve (Barrel): The stationary scale with main divisions.
- Thimble: The rotating part with finer divisions.
- Ratchet Stop: Ensures consistent measuring force.
- Lock Nut: Locks the spindle in position after measurement.

Figure 1: Accusize Blade Micrometer (Model 2012-1001) in its protective case. The case protects the precision instrument from damage and environmental factors.
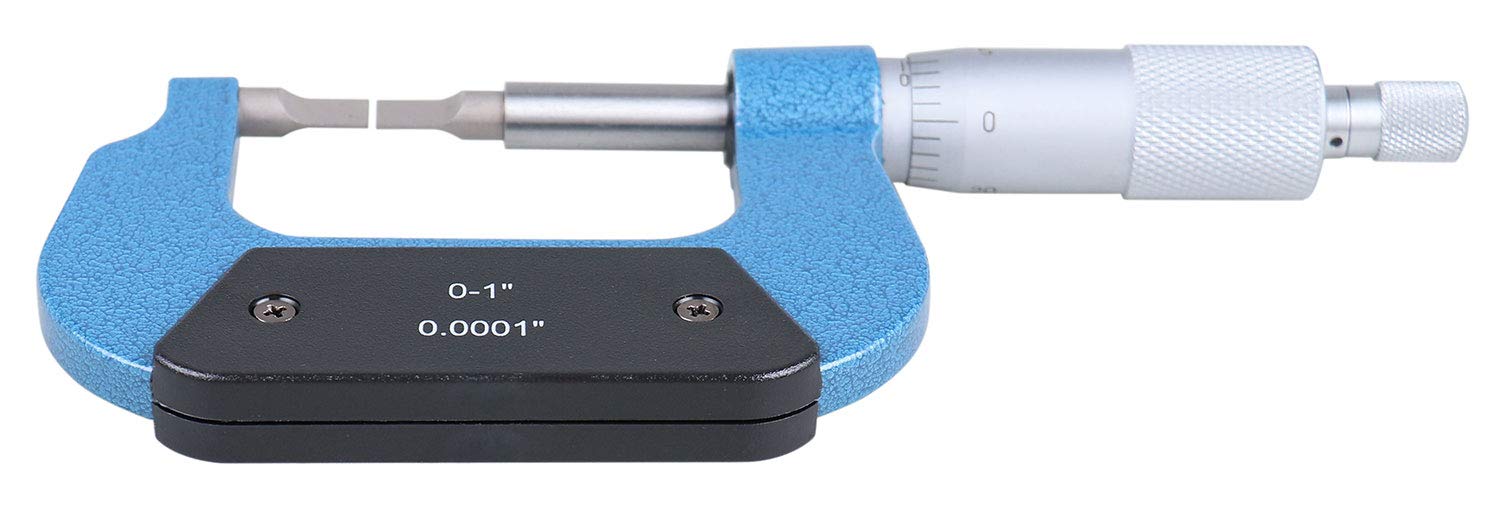
Figure 2: Close-up view of the Accusize Blade Micrometer, highlighting the 0-1 inch range and 0.0001 inch resolution markings on the frame.
3. Setup and Initial Inspection
3.1 Unpacking
- Carefully remove the micrometer from its packaging and protective case.
- Inspect the instrument for any visible damage that may have occurred during shipping.
- Ensure all components listed in Section 2.2 are present.
3.2 Cleaning
Before first use, gently wipe all measuring surfaces with a clean, lint-free cloth. If necessary, use a small amount of instrument cleaning fluid. Avoid harsh solvents.
3.3 Zero Point Adjustment
To ensure accurate measurements, the micrometer must be zeroed correctly.
- Clean the measuring faces (blade anvil and spindle) thoroughly.
- Slowly close the micrometer by rotating the thimble until the blade faces meet. Use the ratchet stop to apply consistent, light pressure until it clicks 2-3 times.
- Check if the zero line on the thimble aligns perfectly with the main line on the sleeve.
- If the zero lines do not align, use the provided wrench to adjust the sleeve until alignment is achieved. For minor adjustments, rotate the sleeve. For larger adjustments, loosen the lock nut, adjust, and then re-tighten.
- Once zeroed, lock the spindle using the lock nut.

Figure 3: Accusize Blade Micrometer shown with the adjustment wrench, used for zero point calibration.
4. Operating Instructions
4.1 Taking a Measurement
- Ensure the micrometer is clean and properly zeroed.
- Hold the micrometer firmly by the frame.
- Open the micrometer slightly wider than the object to be measured by rotating the thimble.
- Position the object between the blade anvil and the blade spindle. Ensure the blades are correctly seated in the groove or slot you intend to measure.
- Slowly close the micrometer using the ratchet stop until it clicks 2-3 times, applying consistent measuring pressure. Do not overtighten.
- Engage the lock nut to secure the spindle position.
- Carefully remove the micrometer from the workpiece.
- Read the measurement.

Figure 4: The Accusize Blade Micrometer with its blade-shaped measuring faces open, ready to measure a narrow feature.
4.2 Reading the Micrometer
The measurement is read in three parts:
- Main Scale (Sleeve): Read the largest whole number visible on the sleeve. Each major division represents 0.100 inch. Each minor division below the main line represents 0.025 inch.
- Thimble Scale: Read the line on the thimble that aligns with the main line on the sleeve. Each division on the thimble represents 0.001 inch.
- Vernier Scale (for 0.0001" resolution): On the sleeve, above the main line, there is a vernier scale. Find the line on the vernier scale that aligns perfectly with any line on the thimble. Each division on the vernier scale represents 0.0001 inch. Add this value to your reading.
Example: If the sleeve shows 0.300 inch, plus two minor divisions (0.050 inch), and the thimble reads 15 (0.015 inch), and the vernier scale aligns at 7 (0.0007 inch), the total reading would be 0.300 + 0.050 + 0.015 + 0.0007 = 0.3657 inch.

Figure 5: A view of the micrometer's sleeve and thimble, illustrating the scales used for reading measurements.
5. Maintenance and Care
5.1 Cleaning
- After each use, wipe the micrometer clean with a soft, lint-free cloth to remove any dust, oil, or debris.
- For thorough cleaning, use a specialized instrument cleaning fluid.
- Never use abrasive materials or harsh chemicals that could damage the finish or precision surfaces.
5.2 Lubrication
Apply a thin film of light machine oil to the spindle and other moving parts periodically to ensure smooth operation and prevent corrosion. Avoid over-lubrication.
5.3 Storage
- Always store the micrometer in its protective case when not in use.
- Store in a clean, dry environment, away from direct sunlight, extreme temperatures, and humidity.
- When storing for extended periods, leave a small gap (approx. 0.010 inch) between the measuring faces to prevent stress on the spindle and frame.
5.4 Calibration
Regular calibration checks are recommended to maintain accuracy. This can be done using gauge blocks or by verifying the zero point as described in Section 3.3.
6. Troubleshooting
| Problem | Possible Cause | Solution |
|---|---|---|
| Inaccurate readings |
|
|
| Spindle movement is stiff or rough |
|
|
| Lock nut does not hold spindle |
|
|
7. Specifications
| Feature | Detail |
|---|---|
| Model Number | 2012-1001 |
| Measuring Range | 0-1 inch |
| Resolution | 0.0001 inch |
| Accuracy | 0.00015 inch |
| Spindle Type | Non-rotating |
| Blade Thickness | 0.029 inch |
| Blade Width | 0.256 inch |
| Blade Penetration | 0.236 inch |
| Material | Stainless Steel |
| Product Dimensions | 9.84 x 10.63 x 1.57 inches |
| Item Weight | 1.03 Pounds |
| UPC | 641799801746 |
8. Warranty and Support
For warranty information or technical support, please refer to the official Accusize Industrial Tools website or contact their customer service department. Keep your purchase receipt as proof of purchase.
Accusize Industrial Tools Contact:
- Website: Accusize Industrial Tools Store on Amazon
- Refer to product packaging or official website for direct contact details.
Related documents2012-1001


Ask a question about this manual
Ask about setup, troubleshooting, compatibility, parts, safety, or missing instructions. Manuals+ will review the question and use this page’s manual context to help answer it.