1. Introduction
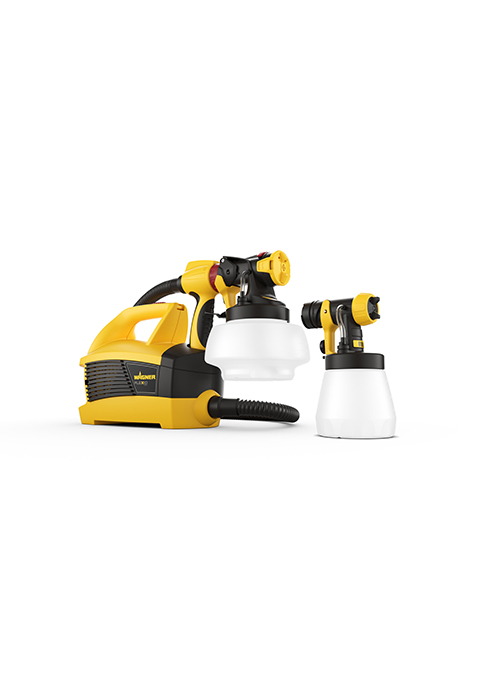
The WAGNER W 690 FLEXiO is a versatile paint spray system designed for both interior and exterior painting projects. This system includes two distinct spray attachments, allowing for efficient application of various materials such as wall paints, lacquers, and glazes. It ensures consistent and homogeneous coverage, even on challenging surfaces.
The innovative I-Spray nozzle is optimized for wall paints, providing excellent coverage rapidly. Both the material flow and air volume are adjustable, offering precise control. For lacquers and glazes, the Standard nozzle can be used, including a round jet option for quick and perfect results.
This system is suitable for small to medium-sized projects and utilizes FLEXiO Technology for high-coverage application of most conventional, even undiluted, products in a single work step. The spray gun is designed for quick detachment, facilitating easy changes between attachments and simplifying the cleaning process. Variable air flow adjustment further enhances its adaptability to different material viscosities.
2. Safety Information
WARNING:
Always use this paint sprayer in strict accordance with the provided instructions to prevent potential hazards. These hazards include risks associated with pressurized liquids, chemical exposure from paint materials, and mechanical risks during operation and maintenance. Ensure adequate ventilation and wear appropriate personal protective equipment, such as the included FFP2 protective mask, safety glasses, and gloves.
3. Package Contents
Your WAGNER W 690 FLEXiO Paint Spray System package should contain the following components:
- W 690 FLEXiO Base Unit
- I-Spray Attachment (1800 ml container) - for wall paints
- Standard Attachment (800 ml container) - for lacquers and glazes
- Handle and Adapter
- Strap for Base Unit
- Operating Instructions Manual
- Training Poster
- Mixing Stick
- Spare Nozzle Seal
- Filling Funnel
- FFP2 Protective Mask

4. Setup
- Prepare the Work Area: Ensure the area is well-ventilated. Cover all surfaces not intended for painting with masking tape and drop cloths.
- Select the Appropriate Attachment: Choose the I-Spray attachment for wall paints or the Standard attachment for lacquers, glazes, and other thinner materials.
- Prepare the Material: Stir the paint thoroughly. If necessary, dilute the paint according to the paint manufacturer's recommendations and the sprayer's instructions to achieve the correct viscosity. Use the included mixing stick and filling funnel. Proper dilution is crucial for optimal spray performance and to prevent clogging.
- Fill the Container: Detach the spray attachment from the gun. Fill the paint container with the prepared material. Securely reattach the container to the spray gun.
- Assemble the System: Connect the selected spray gun to the base unit via the air hose. Ensure all connections are secure. Attach the strap to the base unit for comfortable carrying during use.
- Power Connection: Plug the power cord into a suitable electrical outlet.

5. Operating Instructions
5.1 Adjusting the Spray Pattern and Material Flow
- Air Volume: Use the variable air flow adjustment on the base unit to match the viscosity of your material. Higher viscosity materials generally require more air.
- Material Flow: Adjust the material flow knob on the spray gun to control the amount of paint being sprayed. Start with a lower setting and increase as needed.
- Spray Pattern: The nozzle can be adjusted for horizontal, vertical, or round spray patterns. Rotate the air cap to select the desired pattern.
5.2 Spraying Technique
- Test Spray: Always perform a test spray on a piece of cardboard or scrap material to check the spray pattern and material flow before applying to your actual project.
- Distance: Maintain a consistent distance of approximately 10-30 cm (4-12 inches) from the surface, depending on the material and desired finish.
- Movement: Move the spray gun smoothly and consistently across the surface. Use your arm, not just your wrist, to ensure even coverage. Overlap each pass by about 50% to avoid streaks.
- Corners and Edges: For detailed work or corners, adjust the spray pattern to a narrower setting or use the round jet option on the Standard attachment.


6. Maintenance and Cleaning
Thorough cleaning immediately after each use is essential to ensure the longevity and optimal performance of your WAGNER W 690 FLEXiO system. Dried paint can significantly impair functionality.
- Empty and Rinse Container: Empty any remaining paint from the container. Fill the container with the appropriate cleaning agent (water for water-based paints, solvent for solvent-based paints) and spray it through the gun until clear.
- Disassemble the Spray Gun: Carefully detach the spray attachment from the base unit. Disassemble the spray gun components, including the air cap, nozzle, and material needle.
- Clean Components: Clean all disassembled parts thoroughly using the appropriate cleaning agent and brushes (a cleaning brush set is highly recommended, though not included). Pay close attention to the nozzle, air cap, and any small vent holes in the container or gun body. Dried paint in these small openings can cause significant operational issues.
- Clean the Base Unit: Wipe down the exterior of the base unit with a damp cloth. Ensure no paint or cleaning agent enters the air intake or motor housing.
- Dry and Reassemble: Allow all components to dry completely before reassembling. Ensure all seals and gaskets are correctly seated to prevent leaks.
- Storage: Store the clean and reassembled unit in a dry, dust-free environment.
7. Troubleshooting
If you encounter issues with your WAGNER W 690 FLEXiO, consult the following common problems and solutions:
| Problem | Possible Cause | Solution |
|---|---|---|
| No spray or weak spray | Clogged nozzle, material too thick, air vent blocked, low material level, loose connections. | Clean the nozzle and air cap. Dilute material if too thick. Check and clear any blocked air vents (e.g., in the container lid). Refill container. Tighten all connections. |
| Uneven spray pattern or spitting | Partially clogged nozzle, incorrect air cap setting, material too thick or thin, worn nozzle. | Thoroughly clean the nozzle and air cap. Ensure the air cap is correctly oriented for the desired pattern. Adjust material dilution. Replace worn nozzle if necessary. |
| Paint leaks from spray gun | Loose connections, damaged seals, incorrect assembly. | Check and tighten all connections. Inspect seals and replace if damaged (a spare nozzle seal is included). Ensure all components are correctly assembled. |
| Motor runs but no air flow | Blocked air hose, base unit air intake blocked. | Check air hose for kinks or blockages. Ensure the air intake on the base unit is clear of debris. |
For more detailed troubleshooting, refer to the comprehensive operating instructions manual included with your product.
8. Specifications
| Feature | Specification |
|---|---|
| Model Number | 2361543 (Universal Sprayer W690 Flexio) |
| ASIN | B01ABLFGK6 |
| Product Dimensions (L x W x H) | 56 x 26 x 32 cm |
| Item Weight | 4 Kilograms |
| Material | Plastic |
| Power Type | Corded Electric |
| Tank Volume (I-Spray) | 1800 Milliliters |
| Tank Volume (Standard) | 800 Milliliters |
| Recommended Uses | Painting (Interior wall paints, lacquers, glazes, wood protection, oils, water-based, solvent-based) |
| Manufacturer | WAGNER |
| Country of Origin | China |

9. Warranty and Support
For information regarding the product warranty, please refer to the warranty card included in your package or visit the official WAGNER website. For technical support, spare parts, or service inquiries, please contact WAGNER customer service directly. Ensure you have your model number (W 690 FLEXiO) and ASIN (B01ABLFGK6) available when contacting support.


