1. Introduction
This manual provides essential information for the safe and effective operation, maintenance, and troubleshooting of your TOOLCRAFT TC4636 10-inch Miter Saw. Please read this manual thoroughly before operating the tool to ensure proper use and to prevent injury or damage.
2. General Safety Instructions
Always follow basic safety precautions to reduce the risk of fire, electric shock, and personal injury. Keep this manual for future reference.
- Wear appropriate personal protective equipment (PPE), including safety glasses, hearing protection, and a dust mask.
- Ensure the work area is clean, well-lit, and free from obstructions.
- Keep children and bystanders away from the operating area.
- Do not operate power tools in explosive atmospheres, such as in the presence of flammable liquids, gases, or dust.
- Always disconnect the power plug from the power source before making any adjustments, changing accessories, or storing the tool.
- Use the correct blade for the material being cut. Ensure the blade is sharp and free from damage.
- Secure the workpiece firmly before cutting. Never hold the workpiece by hand.
- Avoid awkward body positions. Maintain proper footing and balance at all times.
- Do not force the tool. Allow the saw to reach full speed before beginning a cut.
- Regularly inspect the power cord for damage. If damaged, have it repaired by a qualified technician.
3. Product Components
Familiarize yourself with the main parts of your miter saw.
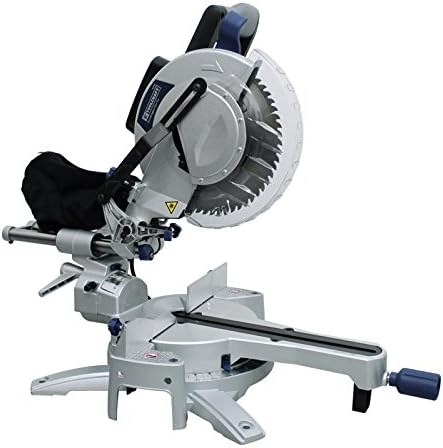
Figure 1: Overview of the TOOLCRAFT TC4636 10-inch Miter Saw. This image displays the complete miter saw unit, including the motor housing, blade guard, cutting table, fence, and base. The dust collection bag is visible at the rear of the motor housing.
- Motor Housing: Contains the motor and drive mechanism.
- Blade Guard: Retracts during cutting to expose the blade and covers it when not in use.
- Cutting Table/Base: Provides a stable surface for the workpiece.
- Fence: Supports the workpiece against the blade.
- Miter Angle Adjustment: Mechanism for setting the horizontal cutting angle.
- Bevel Angle Adjustment: Mechanism for setting the vertical cutting angle.
- Dust Collection Bag: Attaches to the dust port to collect sawdust.
- Extension Bars: Provide additional support for longer workpieces.
- Workpiece Clamp (Press): Secures the workpiece during cutting.
- Blade Wrench (Key): Used for changing the saw blade.
4. Technical Specifications
| Feature | Specification |
|---|---|
| Model | TC4636 |
| Disc Diameter | 10 inches (254 mm) |
| Power | 2000 W |
| Voltage | 127 V AC - 60 Hz |
| Current | 16.6 A |
| Motor Speed | 4500 RPM |
| Cutting Capacity (0°/0°) | 340 x 104 mm |
| Cutting Capacity (45°/0°) | 240 x 104 mm |
| Cutting Capacity (0°/45°) | 340 x 55 mm |
| Cutting Capacity (45°/45°) | 240 x 55 mm |
| Bevel Angle | 45° Right |
| Included Accessories | 60-tooth disc, dust collection bag, 2 extension bars, workpiece clamp, blade wrench |
| Item Weight | 26 Kilograms |
| Product Dimensions | 91 x 58 x 53 cm |
5. Setup and Assembly
Before operating the miter saw, ensure it is properly assembled and secured.
- Unpacking: Carefully remove all components from the packaging. Verify that all listed accessories are present.
- Mounting: Secure the miter saw to a stable workbench using bolts through the mounting holes in the base. This prevents movement during operation.
- Installing Extension Bars: Insert the two extension bars into their designated slots on the saw base. Tighten the locking knobs to secure them. These provide additional support for longer workpieces.
- Attaching Dust Collection Bag: Connect the dust collection bag to the dust port located at the rear of the blade housing. Ensure it is securely fastened to minimize dust dispersion.
- Blade Installation (if not pre-installed):
- Disconnect the saw from the power source.
- Lift the lower blade guard.
- Use the provided blade wrench to loosen the arbor nut while holding the arbor lock button.
- Place the 60-tooth disc onto the arbor, ensuring the teeth are pointing downwards towards the front of the saw.
- Re-tighten the arbor nut securely.
- Workpiece Clamp (Press) Installation: Attach the workpiece clamp to the saw table. It can be adjusted to hold various workpiece sizes.
6. Operating Instructions
Follow these steps for safe and effective operation of your miter saw.
- Power Connection: Connect the saw to a 127V AC, 60Hz power outlet. Ensure the circuit can handle the 16.6A current draw.
- Adjusting Miter Angle:
- Loosen the miter lock handle.
- Rotate the turntable to the desired angle (e.g., 0°, 45°). The scale indicates the angle.
- Tighten the miter lock handle to secure the angle.
- Adjusting Bevel Angle:
- Loosen the bevel lock knob.
- Tilt the saw head to the desired bevel angle (up to 45° right).
- Tighten the bevel lock knob.
- Positioning Workpiece:
- Place the workpiece firmly against the fence and the saw table.
- Use the extension bars for support if the workpiece is long.
- Secure the workpiece with the workpiece clamp to prevent movement during the cut.
- Making a Cut:
- Ensure the blade is clear of the workpiece before starting the motor.
- Press the power switch to start the saw. Allow the blade to reach full speed (4500 RPM).
- Slowly and steadily lower the saw head through the workpiece. Do not force the cut.
- Once the cut is complete, release the power switch and allow the blade to stop completely before raising the saw head.
- Wait for the blade to stop before removing the workpiece or clearing sawdust.
7. Maintenance
Regular maintenance ensures the longevity and safe operation of your miter saw.
- Cleaning: After each use, disconnect the power and clean the saw. Remove sawdust and debris from the motor vents, blade guard, and table using a brush or compressed air.
- Blade Inspection: Regularly inspect the saw blade for sharpness, cracks, or missing teeth. Replace dull or damaged blades immediately.
- Lubrication: Apply a light coat of machine oil to moving parts and pivot points as needed to ensure smooth operation.
- Carbon Brushes: Check carbon brushes periodically. If worn down, replace them with genuine TOOLCRAFT replacement parts. Refer to a qualified service technician if unsure.
- Power Cord: Inspect the power cord for any cuts, abrasions, or damage. Do not use the saw if the cord is damaged.
- Storage: Store the miter saw in a clean, dry, and secure location, out of reach of children.
8. Troubleshooting
This section addresses common issues you might encounter.
| Problem | Possible Cause | Solution |
|---|---|---|
| Saw does not start | No power supply; faulty switch; worn carbon brushes | Check power connection and circuit breaker; test switch; replace carbon brushes |
| Blade binds in workpiece | Dull blade; improper workpiece support; forcing the cut | Replace blade; ensure workpiece is securely clamped; reduce feed rate |
| Excessive vibration | Loose blade; damaged blade; saw not securely mounted | Tighten blade arbor nut; replace damaged blade; secure saw to workbench |
| Poor cut quality (rough cuts, splintering) | Dull blade; incorrect blade type for material; too fast feed rate | Replace or sharpen blade; use appropriate blade; slow down cutting speed |
9. Warranty and Support
For warranty information, technical support, or to order replacement parts, please contact TOOLCRAFT customer service. Keep your purchase receipt as proof of purchase.
Manufacturer: TOOLCRAFT
Please refer to the official TOOLCRAFT website or your point of purchase for the most current contact information and warranty details.


