
1. Introduction and Overview
This manual provides detailed instructions for the KOOKYE 28BYJ-48 DC 5V Stepper Motor Kit, which includes two 28BYJ-48 stepper motors and two ULN2003 driver boards. This kit is designed for precise rotational control in various electronic projects, commonly used with microcontrollers like Arduino and Raspberry Pi. It is suitable for applications such as air conditioner louvers and small cooling/heating fans.

Figure 1: Two 28BYJ-48 Stepper Motors with ULN2003 Driver Boards.
2. Product Components
The KOOKYE 28BYJ-48 Stepper Motor Kit includes the following components:
- 2 x 28BYJ-48 DC 5V Stepper Motors
- 2 x ULN2003 Driver Boards

Figure 2: A single 28BYJ-48 Stepper Motor and ULN2003 Driver Board.

Figure 3: Two ULN2003 Driver Boards.
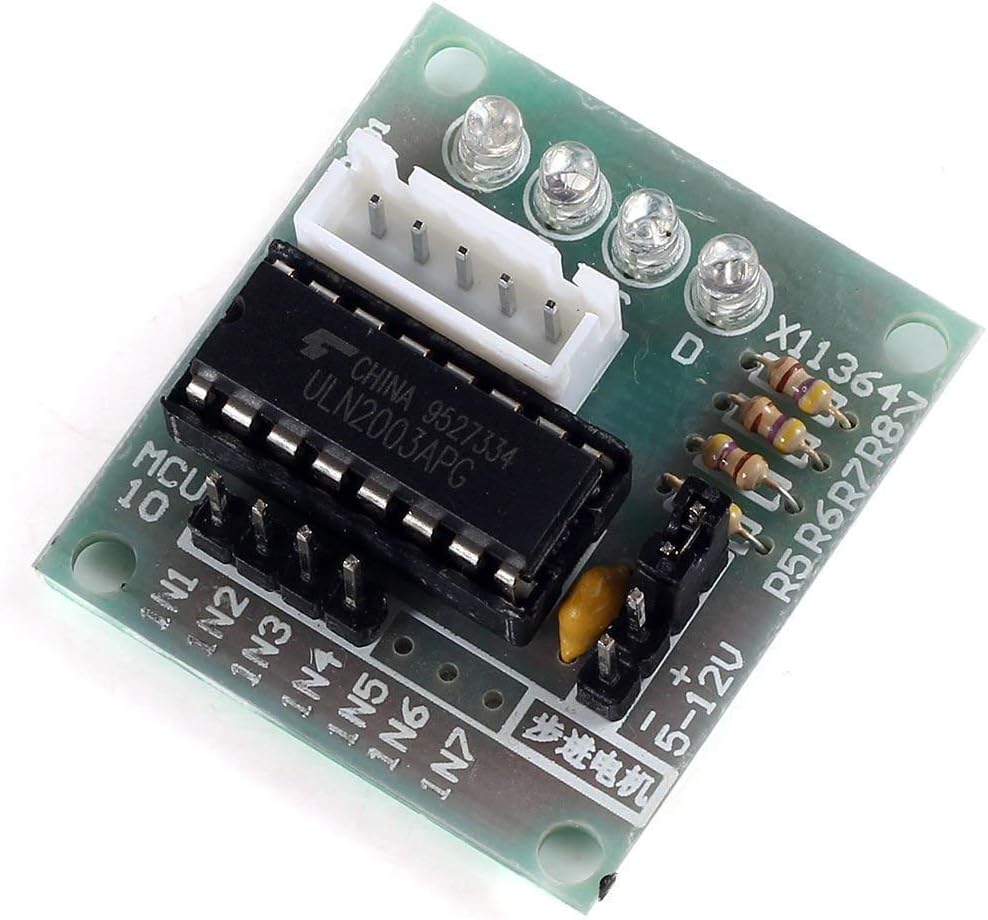
Figure 4: Detailed view of a ULN2003 Driver Board.
3. Specifications
The following are the technical specifications for the 28BYJ-48 Stepper Motor and ULN2003 Driver Board:
| Feature | Specification |
|---|---|
| Rated Voltage | DC 5V |
| Number of Pole | 4 |
| Speed Variation Ratio | 1/64 |
| Stride Angle | 5.625°/64 |
| DC Resistance | 200Ω ± 7% (at 25°C) |
| Idle In-traction Frequency | > 600Hz |
| Idle Out-traction Frequency | > 1000Hz |
| In-traction Torque | > 34.3mN.m (at 120Hz) |
| Self-positioning Torque | > 34.3mN.m |
| Insulated Resistance | > 10MΩ (at 500V) |
| Insulated Electricity Power | 600VAC/1mA/1s |
| Insulation Grade | A |
| Rise in Temperature | < 40K (at 120Hz) |
| Noise | < 40dB (at 120Hz, No load, 10cm) |
| Drive Module Board Size | 2.8 x 2.8 x 2 cm (1.1 x 1.1 x 0.79 inches) |
| Stepper Motor Size | 3.2 x 3.2 cm (1.26 x 1.26 inches) |
| Item Weight | 3.19 ounces (total for kit) |
| Compatible Devices | Arduino, Raspberry Pi |

Figure 5: Dimensions of the 28BYJ-48 Stepper Motor.
4. Setup Instructions
Follow these steps to set up your 28BYJ-48 stepper motor with the ULN2003 driver board:
- Connect the Stepper Motor to the Driver Board: The 28BYJ-48 stepper motor comes with a standard 5-pin connector. This connector plugs directly into the corresponding socket on the ULN2003 driver board. Ensure the connector is fully seated.
- Connect the Driver Board to a Microcontroller: The ULN2003 driver board has pins labeled IN1, IN2, IN3, and IN4. Connect these pins to digital output pins on your microcontroller (e.g., Arduino, Raspberry Pi).
- Provide Power: Connect the VCC pin on the ULN2003 driver board to a 5V DC power source. Connect the GND pin to the ground of your power source and microcontroller. The 28BYJ-48 motor operates at 5V DC.

Figure 6: 28BYJ-48 Stepper Motor with its wiring harness.
5. Operating Instructions
To operate the 28BYJ-48 stepper motor, you will need to send specific pulse sequences to the IN1-IN4 pins of the ULN2003 driver board from your microcontroller. The ULN2003 acts as a current amplifier, allowing the microcontroller to safely drive the motor.
- Control Logic: The 28BYJ-48 is a unipolar stepper motor. It can be driven in full-step, half-step, or wave drive modes. Each mode requires a specific sequence of HIGH/LOW signals on the IN1-IN4 pins.
- Indicator LEDs: The ULN2003 driver board features four on-board LEDs (A, B, C, D) that illuminate to indicate the active phase of the stepper motor. This can be useful for debugging your control sequences.
- Programming: For Arduino, libraries such as the 'Stepper' library can simplify motor control. For Raspberry Pi, you can use Python with GPIO libraries to control the pins directly. Refer to online tutorials and examples for specific code implementations.
6. Maintenance
The 28BYJ-48 stepper motor and ULN2003 driver board are generally low-maintenance components. Adhering to the following guidelines will help ensure their longevity:
- Keep Clean: Protect the components from dust, dirt, and moisture, which can interfere with electrical connections and motor operation.
- Handle with Care: Avoid applying excessive mechanical force to the motor shaft or the driver board's components.
- Secure Connections: Periodically check all wiring connections to ensure they are secure and free from corrosion. Loose connections can lead to intermittent operation or damage.
- Operating Environment: Operate the kit within its specified temperature and humidity ranges to prevent performance degradation or damage.
7. Troubleshooting
If you encounter issues with your stepper motor kit, consider the following troubleshooting steps:
- Motor Not Moving:
- Verify the 5V DC power supply is correctly connected and providing sufficient current.
- Check all wiring connections between the motor, driver board, and microcontroller for looseness or incorrect placement.
- Ensure your control code is sending the correct step sequences to the IN1-IN4 pins.
- Motor Vibrates but Doesn't Turn:
- This often indicates an incorrect phase sequence or insufficient power. Double-check your wiring and control code for proper sequencing.
- Confirm the power supply can deliver enough current for the motor's torque requirements.
- Motor Runs Erratically or Jumps Steps:
- Ensure a stable 5V power supply. Voltage fluctuations can cause erratic behavior.
- Check for any loose connections or interference in the control signals.
- The motor might be overloaded. Reduce the load or consider a motor with higher torque.
- Driver Board LEDs Not Lighting Up:
- Verify that the driver board is receiving 5V power.
- Check the connections from the microcontroller to the IN1-IN4 pins.
8. Warranty and Support
Warranty and support information for this product is not explicitly provided in the available documentation. For details regarding warranty coverage, technical support, or replacement parts, please refer to the KOOKYE official website or contact your point of purchase.