1. Introduction
This manual provides detailed instructions for the installation, operation, maintenance, and troubleshooting of your Hipa SRM 225 Carburetor replacement kit. Designed for various Echo outdoor power equipment, this kit aims to restore optimal engine performance. Please read this manual thoroughly before proceeding with any installation or maintenance.
2. Compatibility
The Hipa SRM 225 Carburetor is designed as a direct replacement for ZAMA RB-K93 and Echo part numbers A021001690, A021001691, A021001692. It is compatible with the following Echo models:
- Trimmers/Brushcutters: Echo SRM 225, SRM-225, GT225, GT-225, GT 225, SRM225, SRM225i, SRM225SB, SRM-225I, SRM225U, GT225i, GT225L, GT225SF, SRM-225SB
- Power Source Attachments/Edgers: Echo PAS 225, PAS-225, PAS225, PAS-225SB, PE 225, PE225, PE-225
- Hedge Trimmers/Power Pruners: Echo SHC-225S, SHC-225, SHC225, SHC225S, PPF-225, PPF225, PPF235ES, PPT235ES
Always verify your engine model and existing part numbers before purchasing to ensure correct fitment.
3. Package Contents
Your Hipa SRM 225 Carburetor kit includes the following components:
- 1 x Hipa 225 Carburetor
- 2 x Air Filters
- 1 x Spark Plug
- 2 x Primer Bulbs
- 2 x Mounting Gaskets
- 1 x Fuel Filter
- 3 x Fuel Tubes
- 1 x Grommet
- 1 x Vent

Image 3.1: Complete Hipa SRM 225 Carburetor replacement kit, including carburetor, air filters, spark plug, primer bulbs, gaskets, fuel filter, fuel tubes, grommet, and vent.

Image 3.2: A detailed view of the 'All-in-one kit' components, showcasing the carburetor, air filters, spark plug, fuel lines, and primer bulbs against a workshop background.
4. Specifications
| Feature | Specification |
|---|---|
| Brand | Hipa |
| Model | SRM 225 Carburetor |
| Flange Type | Bolt On |
| Fuel Type | Ethanol Compatible |
| Specific Uses | Echo Trimmer, Weedeater, Edger, Hedge Trimmer, Power Pruner |
| Product Dimensions (Approx.) | 3"D x 3"W x 2"H |
| Item Weight | 7.8 ounces |
| Mounting Hole Distance (Center to Center) | 31mm |
| Throttle Bore Diameter | 9mm |
| Choke Bore Diameter | 11mm |
| Venturi Diameter | 9.15mm |
| Fuel Inlet Line Diameter | 4.6mm |
| Fuel Return Line Diameter | 4mm |

Image 4.1: Diagram illustrating key dimensions of the Hipa SRM 225 Carburetor for precise fitment.
5. Setup and Installation
Before beginning installation, ensure the engine is cool and disconnected from any power source (e.g., spark plug wire removed). Refer to your equipment's original service manual for specific disassembly and reassembly procedures.
5.1. General Installation Steps
- Preparation: Gather necessary tools. Ensure a clean workspace to prevent debris from entering the engine.
- Remove Old Components: Carefully disconnect fuel lines, throttle linkage, and choke linkage from the old carburetor. Remove the old carburetor, air filter, spark plug, and fuel filter.
- Install New Components:
- Install the new fuel lines and fuel filter into the fuel tank, ensuring proper routing and sealing with the grommet.
- Attach the new mounting gaskets to the engine block and intake manifold.
- Mount the new Hipa carburetor, ensuring it is seated correctly and securely fastened.
- Reconnect the fuel lines to the carburetor's inlet and return ports.
- Reconnect the throttle and choke linkages.
- Install the new air filter and spark plug.
- Final Checks: Double-check all connections for tightness and proper routing. Ensure no fuel leaks are present.

Image 5.1: The Hipa carburetor positioned near an engine, illustrating its 'ready to run' state with factory tuning.
5.2. Initial Adjustment
The Hipa SRM 225 Carburetor is factory-tuned for immediate use, and typically no initial adjustment is needed. However, minor idle speed adjustments may be performed if necessary after the engine has warmed up. The idle speed screw (often a small flathead screw) can be found near the throttle pivot nut. Adjust in small increments to achieve a stable idle without the cutting attachment engaging.
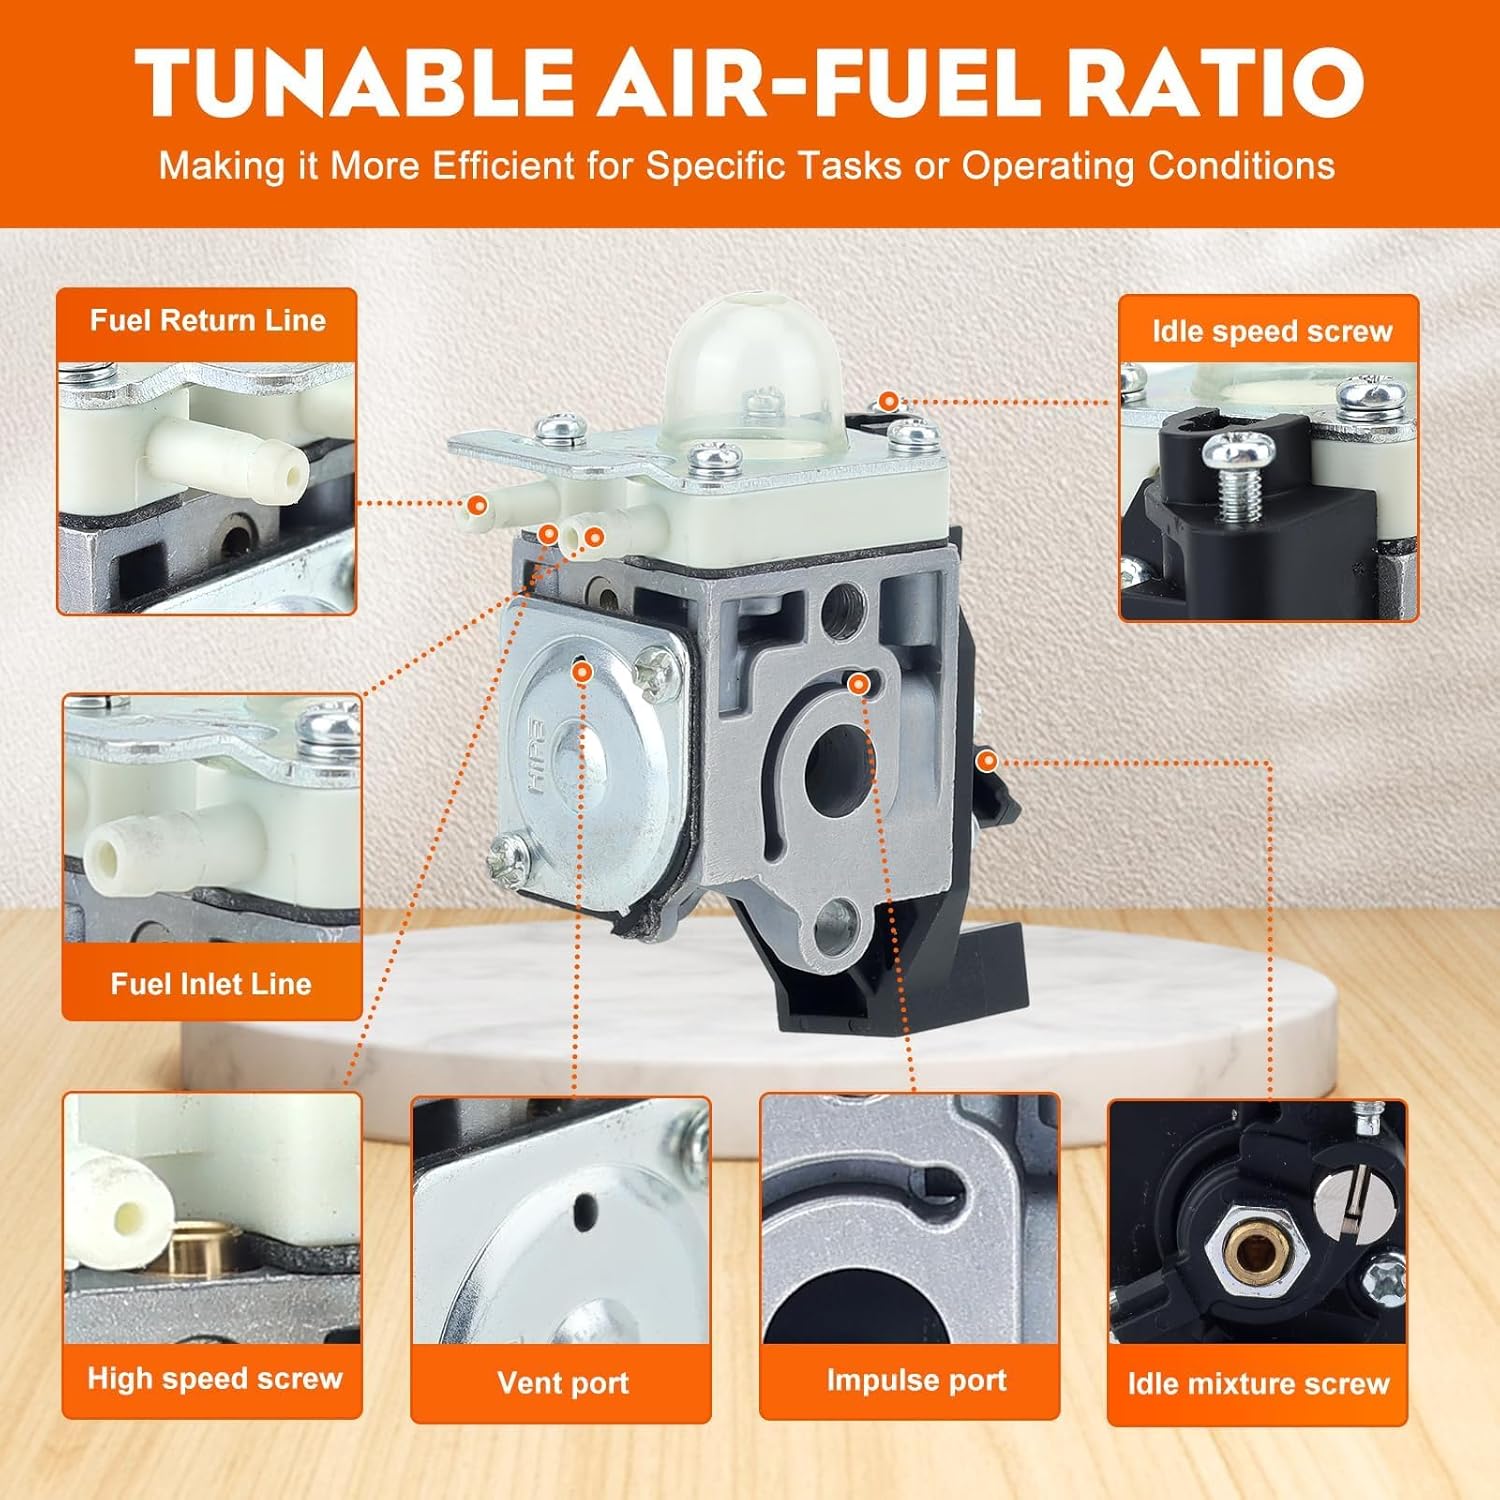
Image 5.2: Diagram highlighting various ports and adjustment screws on the carburetor, including fuel inlet, fuel return, vent port, impulse port, high speed screw, idle mixture screw, and idle speed screw.
6. Operating Instructions
After successful installation, follow your equipment's original manufacturer instructions for starting and operating the engine. Ensure the fuel tank contains the correct fuel mixture (if applicable for 2-stroke engines) and that the primer bulb is fully primed before attempting to start.
The Hipa carburetor is designed to provide quick starts, smooth throttle response, stable RPMs, and efficient fuel consumption, restoring your equipment's performance.
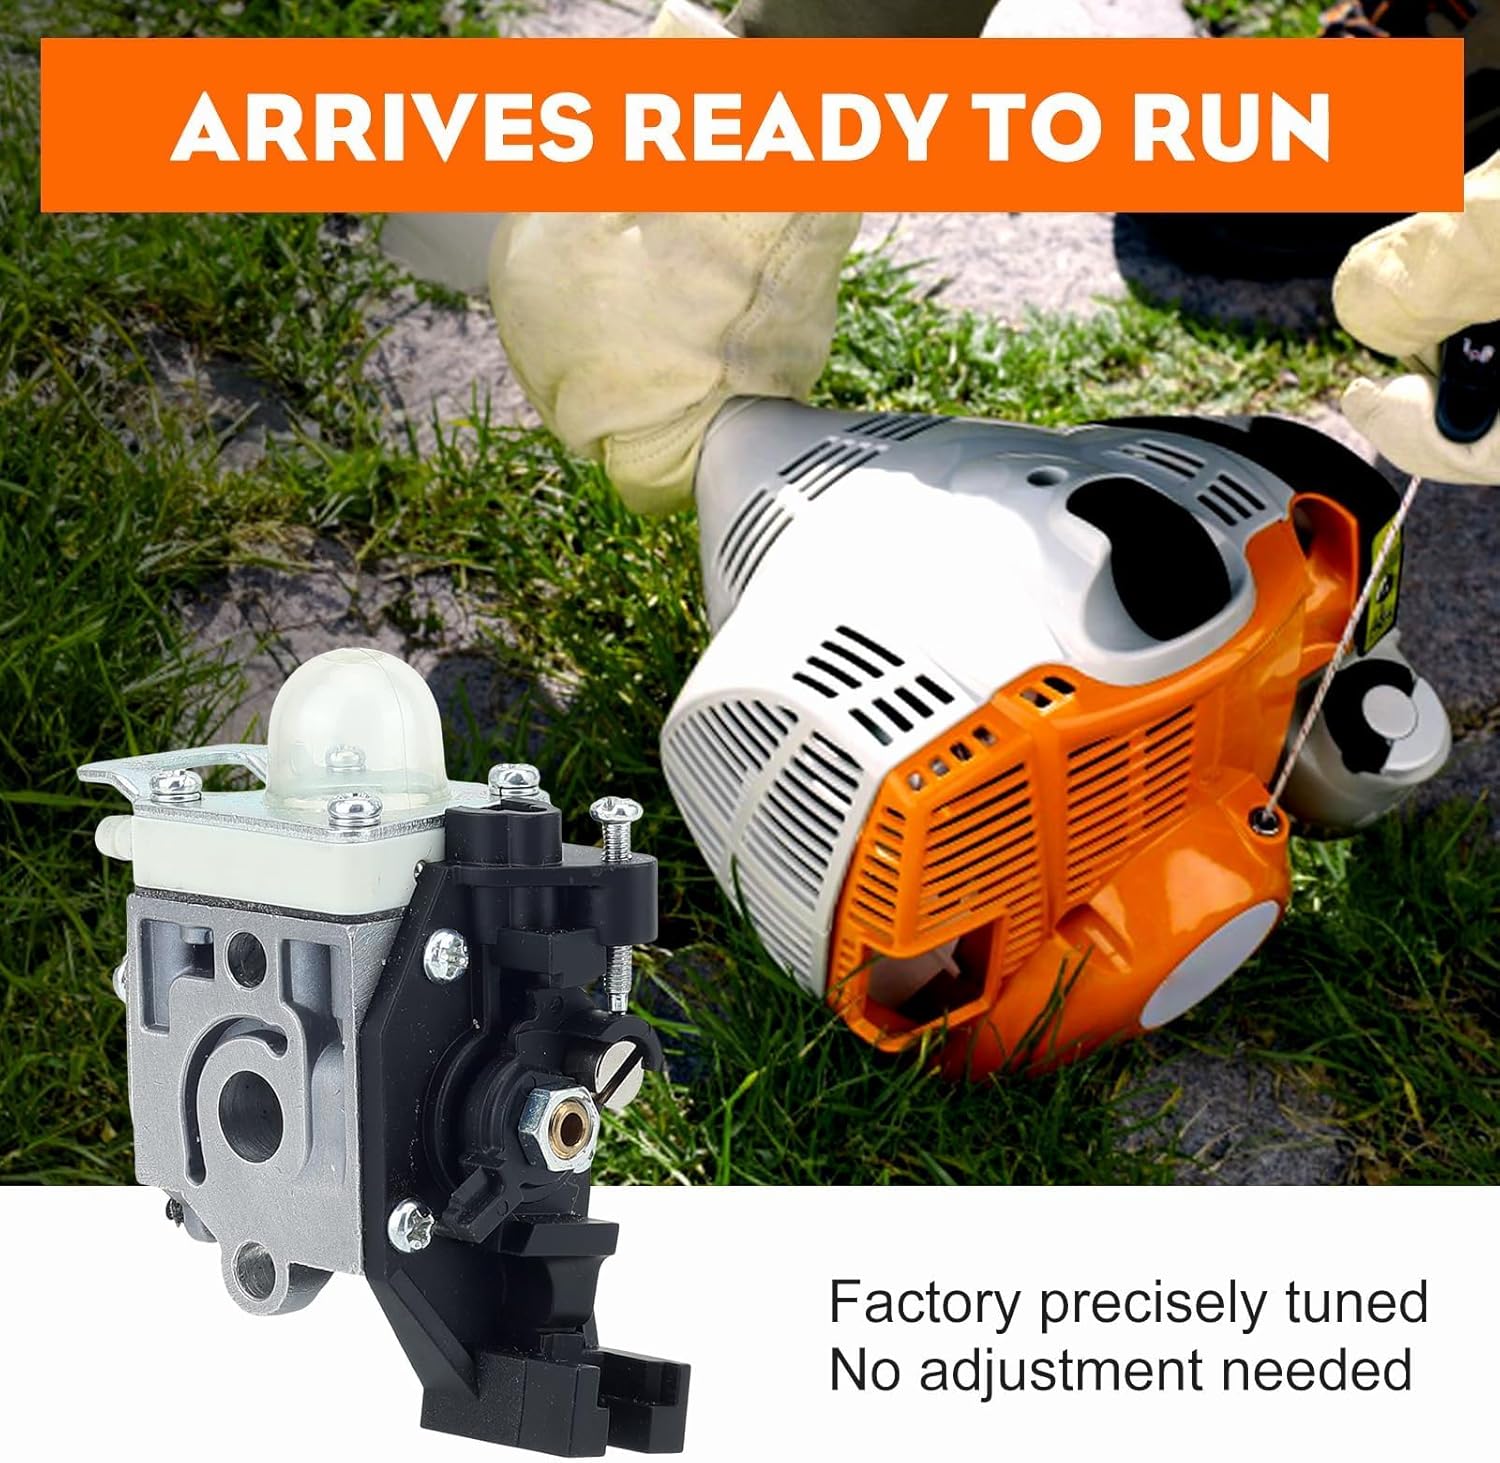
Image 6.1: Visual representation of improved engine performance metrics: quick start, smooth throttle response, stable RPM, and low fuel consumption.
7. Maintenance
Regular maintenance of your carburetor and associated components is crucial for prolonged equipment life and optimal performance.
7.1. Recommended Maintenance Schedule
- Air Filter: Inspect and clean or replace the air filter regularly, especially in dusty conditions. A clogged air filter can restrict airflow and affect carburetor performance.
- Fuel Filter: Replace the fuel filter annually or if signs of clogging (e.g., reduced fuel flow, engine sputtering) are observed.
- Spark Plug: Inspect the spark plug for wear and proper gap annually. Replace if electrodes are worn or fouled.
- Fuel Lines: Inspect fuel lines for cracks, hardening, or leaks. Replace as needed to prevent fuel delivery issues.
7.2. Carburetor Construction
The Hipa carburetor is constructed with quality materials to ensure durability and resistance to common wear factors:
- Brass Components: Used for high-speed and idle mixture screws, offering resistance to corrosion and wear.
- Anodized Aluminum Carburetor Body: Provides anti-corrosion and anti-oxidation properties.
- Composite Rubber Diaphragms: Designed for durability and consistent fuel delivery.

Image 7.1: Illustration of the quality materials used in the Hipa carburetor, including brass components, anodized aluminum, and composite rubber diaphragms, highlighting anti-corrosion, anti-oxidation, wear-resisting, and heat-resisting properties.
8. Troubleshooting
This section addresses common issues that may arise with your outdoor power equipment, particularly those related to the fuel system and carburetor.

Image 8.1: Visual guide to common machine failure symptoms: Won't Start, Starts then Stalls, Leaks Gas, Runs Rough.
| Symptom | Possible Cause | Solution |
|---|---|---|
| Won't Start | No fuel, clogged fuel filter, fouled spark plug, incorrect choke setting, air filter clogged. | Check fuel level and mixture. Replace fuel filter. Inspect/replace spark plug. Ensure choke is set correctly for starting. Clean/replace air filter. |
| Starts then Stalls | Insufficient fuel delivery, vacuum leak, carburetor not tuned correctly, clogged fuel filter. | Check fuel lines for kinks or leaks. Ensure carburetor is securely mounted. Verify idle speed adjustment. Replace fuel filter. |
| Leaks Gas | Loose fuel line connections, damaged fuel lines, faulty primer bulb, carburetor gasket issue. | Tighten all fuel line connections. Inspect and replace any damaged fuel lines or primer bulb. Ensure carburetor gaskets are properly seated and undamaged. |
| Runs Rough / Poor Performance | Clogged air filter, old fuel, incorrect fuel mixture, spark plug issue, carburetor needs fine-tuning. | Clean/replace air filter. Use fresh, correctly mixed fuel. Inspect/replace spark plug. Adjust carburetor idle speed or mixture screws if necessary (refer to section 5.2). |
If issues persist after following these troubleshooting steps, it is recommended to consult a qualified service technician or refer to your equipment's original service manual for more advanced diagnostics.
9. Support
For further assistance or inquiries regarding your Hipa SRM 225 Carburetor, please refer to the Hipa brand store on Amazon or contact Hipa customer support through their official channels. Always provide your product model and purchase details when seeking support.
You can visit the Hipa Store at: Hipa Store on Amazon


