
Better Homes and Gardens BH15-084-899-07
Better Homes and Gardens Oxford Square Blue TV Stand and Console Instruction Manual
Model: BH15-084-899-07
Introduction
Thank you for purchasing the Better Homes and Gardens Oxford Square Blue TV Stand and Console. This manual provides detailed instructions for assembly, operation, maintenance, and troubleshooting to ensure safe and proper use of your new furniture. Please read this manual thoroughly before beginning assembly and retain it for future reference.
Safety Information
- Always follow assembly instructions carefully.
- Do not exceed the maximum weight capacity of 135 lbs (61.2 kg) for the top surface.
- Ensure all hardware is securely tightened before use. Periodically check and re-tighten as needed.
- Place the TV stand on a flat, level surface to prevent tipping. Utilize the integrated floor levelers for stability.
- Keep small parts and packaging materials away from children during assembly.
- Do not stand or climb on the unit.
- Use caution when handling tempered glass doors to avoid breakage.
Package Contents
Before beginning assembly, verify that all parts and hardware are present. If any items are missing or damaged, contact customer support.

Main Unit Components: All wooden panels, tempered glass doors, and associated hardware for the TV stand structure.
Hardware Pack: Includes screws, dowels, cam locks, hinges, handles, and floor levelers necessary for assembly.
Assembly Instructions (Setup)
Assembly is required for this product. It is recommended to have two people for assembly. A Phillips head screwdriver is typically needed. Follow the numbered steps provided in the included assembly guide. Ensure you have ample space and protect your floor during assembly.
- Unpack and Identify Parts: Carefully remove all components from the packaging. Lay them out on a soft, clean surface to prevent scratches. Identify each part using the provided parts list.
- Assemble Side Panels: Attach the side panels to the base and top panels using the designated hardware (e.g., cam locks and dowels).
- Install Shelves: Insert shelf pins into the desired height holes and place the adjustable interior shelves.
- Attach Back Panels: Secure the ventilated rear panels to the back of the unit. Ensure proper alignment for cable management access.
- Mount Doors: Attach hinges to the tempered glass doors and then mount the doors to the main unit. Adjust hinges as needed for proper door alignment.
- Install Handles and Levelers: Attach the stylish handles to the doors. Screw in the floor levelers to the bottom of the unit and adjust them to ensure stability on uneven surfaces.
- Final Check: Verify all connections are secure and the unit is stable before placing any items on it.

Image: This diagram illustrates the overall dimensions of the assembled TV stand, which are approximately 47.75 inches in length, 21 inches in width (depth), and 30 inches in height. These measurements are crucial for planning placement in your home.
Operating Instructions (Usage)
The Oxford Square TV Stand and Console is designed for versatile use in your home entertainment area, dining room, or entryway.
- TV Placement: Place flat panel TVs up to 55 inches and weighing up to 135 lbs securely on the top surface. Ensure the TV base is fully supported.
- Component Storage: Utilize the adjustable interior shelves to store gaming consoles, DVD/Blu-ray players, cable boxes, and other media components.
- Cable Management: Route power cords and audio/video cables through the rear cable access openings to keep wires organized and out of sight.
- Ventilation: The ventilated rear panels help dissipate heat from electronic devices, ensuring optimal performance and longevity.
- Door Operation: The tempered glass doors protect contents from dust while allowing remote control signals to pass through. Open and close doors gently using the handles.

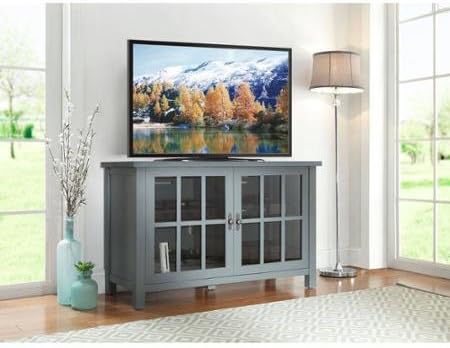
Image: This image demonstrates the versatility of the console, showcasing it as a stylish storage unit in a living space, adorned with a lamp, books, and decorative items. The tempered glass doors allow for display while protecting contents.
Maintenance and Care
- Cleaning: Wipe surfaces with a soft, damp cloth. Avoid harsh chemicals or abrasive cleaners, which can damage the finish. For glass, use a standard glass cleaner.
- Dusting: Regularly dust the unit to prevent buildup.
- Hardware Check: Periodically check all screws and fasteners to ensure they remain tight. Re-tighten if necessary.
- Sunlight Exposure: Avoid prolonged exposure to direct sunlight, which may cause fading or discoloration of the finish.
- Heat and Moisture: Keep the unit away from direct heat sources and excessive moisture. Use coasters under beverages to prevent water rings.
Troubleshooting
| Problem | Possible Cause | Solution |
|---|---|---|
| Unit is wobbly or unstable. | Uneven floor; loose hardware. | Adjust floor levelers on the bottom of the unit. Check and tighten all assembly hardware. |
| Doors do not align properly. | Hinges are not adjusted correctly. | Adjust the screws on the door hinges to align the doors vertically and horizontally. Refer to the hinge adjustment section in the main assembly guide. |
| Scratches or minor damage to finish. | Accidental impact; rough handling. | For minor scratches, a furniture touch-up marker (often included or available separately) can be used. For deeper damage, professional repair may be needed. |
Specifications
- Model Number: BH15-084-899-07
- Brand: Better Homes and Gardens
- Color: Blue
- Product Dimensions (L x W x H): 47.75" x 21" x 30" (121.3 cm x 53.34 cm x 76.2 cm)
- Weight Capacity (Top Surface): Up to 135 lbs (61.2 kg)
- Accommodates TVs: Up to 55 inches
- Features: Adjustable interior shelves, rear cable access, ventilated rear panels, floor levelers, tempered glass doors.
- Material: Wood composite, Tempered Glass, Metal (hardware)
- Assembly: Required
Warranty and Support
For warranty information or assistance with missing/damaged parts, please refer to the warranty card included with your product or contact Better Homes and Gardens customer support. Keep your purchase receipt for warranty claims.
Customer Support: Please visit the official Better Homes and Gardens website or refer to the contact information provided in your product packaging for support inquiries.
Ask a question about this manual
Ask about setup, troubleshooting, compatibility, parts, safety, or missing instructions. Manuals+ will review the question and use this page’s manual context to help answer it.