
1. Introduction
This manual provides comprehensive instructions for the installation, operation, and maintenance of your Toro T5 Rapid Set Gear Driven Rotor with 5-inch Pop-Up Riser and Check Valve. Please read this manual thoroughly before installation and use to ensure proper function and longevity of the product.
2. Safety Information
- Always turn off the water supply before performing any installation or maintenance on the sprinkler system.
- Wear appropriate personal protective equipment, such as gloves and eye protection, during installation.
- Ensure all connections are secure to prevent leaks and water damage.
- Keep children and pets away from the work area during installation and maintenance.
- Do not operate the sprinkler head if any parts are damaged.
3. Package Contents
Your package should contain the following items:
- 1 x Toro T5 Rapid Set Gear Driven Rotor with 5-inch Pop-Up Riser and Check Valve
- 1 x Factory-installed 3.0 GPM nozzle
- 8 x Standard nozzles (25° trajectory)
- 4 x Low angle nozzles (10° trajectory)
4. Setup and Installation
Follow these steps for proper installation of the Toro T5 Rapid Set Rotor:
- Prepare the Location: Dig a hole at the desired sprinkler location, ensuring it is deep enough to accommodate the rotor body and allow the top of the sprinkler head to be flush with the ground level when installed. Clear any dirt, grass, or debris from the area.
- Connect to Water Line: The rotor features a 3/4 inch (19 mm) inlet. Connect the rotor to your irrigation system's water line. Use appropriate fittings and thread sealant to ensure a watertight connection.
- Position the Rotor: Place the rotor in the prepared hole. The 5-inch pop-up riser ensures adequate clearance for watering. The factory-installed check valve prevents low-head drainage on slopes.
- Backfill: Carefully backfill the hole with soil, ensuring the rotor remains upright and the top is level with the surrounding ground. Avoid getting dirt into the rotor mechanism.
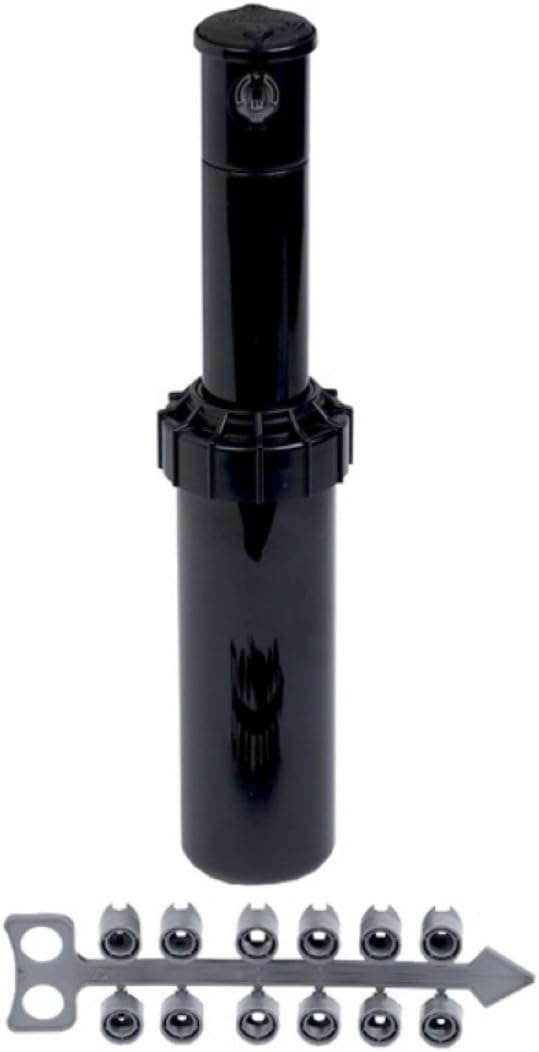
Figure 1: The Toro T5 Rapid Set Gear Driven Rotor shown with its 5-inch pop-up riser and the assortment of standard and low-angle nozzles provided for various spray patterns.
5. Operating Instructions
5.1. Arc Adjustment (RapidSet Feature)
The T5 Rapid Set rotor allows for quick and easy arc adjustments without the need for special tools. The arc can be set from 40 degrees to 360 degrees (full circle).
- Identify the Left Stop: The rotor has a fixed left stop. This is the starting point of the spray pattern.
- Adjust the Right Stop: With the water on and the rotor operating, grasp the top of the turret and rotate it clockwise to increase the arc or counter-clockwise to decrease the arc. The rotor will click as you adjust, indicating changes in the arc setting. Continue adjusting until the desired spray pattern is achieved.
- Full Circle Operation: For full 360-degree coverage, rotate the turret fully until it clicks into the full circle position.
5.2. Nozzle Selection and Installation
The T5 rotor comes with a pre-installed 3.0 GPM nozzle and a set of 8 standard (25° trajectory) and 4 low angle (10° trajectory) nozzles. Selecting the correct nozzle is crucial for optimal performance and water distribution.
- Remove Existing Nozzle: Gently pull up the pop-up riser. Use a small flat-head screwdriver to pry out the retaining screw located at the base of the nozzle opening. Once the screw is removed, the nozzle can be pulled out.
- Select New Nozzle: Choose a nozzle from the provided set based on your desired flow rate and spray trajectory. Standard nozzles are suitable for most applications, while low-angle nozzles are useful for areas under trees or where wind drift is a concern.
- Install New Nozzle: Insert the chosen nozzle into the nozzle opening. Ensure it is seated correctly. Reinsert the retaining screw to secure the nozzle in place.
6. Maintenance
Regular maintenance ensures the efficient operation and extends the lifespan of your rotor.
- Clean Nozzle: Periodically check the nozzle for any debris (dirt, grass, mineral deposits) that might obstruct the spray pattern. Clean with a soft brush or flush with water.
- Inspect for Damage: Regularly inspect the rotor head for any cracks, leaks, or physical damage. Replace damaged units promptly.
- Clear Around Head: Ensure that grass and landscaping do not grow over or obstruct the pop-up mechanism, preventing it from fully extending or retracting.
- Winterization: In colder climates, ensure your irrigation system, including the rotor, is properly winterized to prevent freeze damage. Consult local guidelines for winterization procedures.
7. Troubleshooting
| Problem | Possible Cause | Solution |
|---|---|---|
| Rotor not rotating or rotating slowly. | Debris in the gear drive; low water pressure; damaged internal mechanism. | Flush the system; check water pressure; replace the rotor if damaged. |
| Uneven spray pattern or reduced throw distance. | Clogged nozzle; incorrect nozzle selection; low water pressure. | Clean or replace nozzle; ensure correct nozzle for pressure; check system pressure. |
| Water leaking from the base of the rotor. | Loose connection; damaged seal. | Tighten connection; inspect and replace rotor if seal is damaged. |
| Rotor not popping up or retracting fully. | Debris around the riser; low water pressure; damaged spring. | Clear debris; check water pressure; replace rotor if spring is damaged. |
8. Specifications
- Brand: Toro (Manufacturer)
- Model Number: 4747
- Pop-Up Height: 5 inches (riser measured popped-up from top of cap to nozzle opening)
- Inlet Size: 3/4 inch (19 mm)
- Body Height: 7.5 inches
- Arc Adjustment: 40° to 360° (tool-free RapidSet)
- Nozzles Included: 1 pre-installed 3.0 GPM, 8 standard (25° trajectory), 4 low angle (10° trajectory)
- Check Valve: Factory installed
- Material: Plastic
- Maximum Flow Rate: 3 Gallons Per Minute (with pre-installed nozzle)
- Item Weight: 8.8 ounces
- Package Dimensions: 7.64 x 5.71 x 2.6 inches
9. Warranty and Support
For warranty information or technical support, please refer to the official Toro website or contact their customer service department. Keep your purchase receipt as proof of purchase. For product-specific inquiries, you may also contact the seller, Drip Depot.
- Manufacturer: Toro
- Seller: Drip Depot