1. Introduction
This manual provides comprehensive instructions for the safe and effective use, setup, operation, and maintenance of your Timbertech Professional Double Action Airbrush BD-130. Please read this manual thoroughly before operating the airbrush to ensure optimal performance and longevity of the product.
2. Safety Information
General safety warnings: Ensure eye protection is worn when using the product; do not spray towards people or animals; be aware of potential hazards associated with the product's contents; follow manufacturer instructions for proper handling, usage, maintenance, and disposal.
- Always work in a well-ventilated area to avoid inhaling paint fumes.
- Wear appropriate personal protective equipment (PPE), including safety glasses or goggles and a respirator, especially when using solvent-based paints.
- Keep the airbrush and all associated chemicals out of reach of children and pets.
- Ensure your air compressor is properly maintained and set to the recommended pressure range (15-50 PSI).
- Never point the airbrush at yourself or others.
- Disconnect the airbrush from the air supply before cleaning, disassembling, or performing any maintenance.
3. Package Contents
Verify that all items are present in your package:
- 1 x Timbertech Professional Double Action Airbrush BD-130
- 1 x Plastic Dropper
- 1 x Wrench
- 1 x Nozzle (0.3mm, mounted)
- 1 x Needle (0.3mm, mounted)

Image 3.1: Airbrush and accessories in original packaging.
4. Product Overview and Components
The Timbertech Professional Double Action Airbrush BD-130 is a gravity feed, dual-action airbrush designed for precise control over air and fluid mixture. It features a 0.3mm nozzle and needle, suitable for various applications including fine art, model painting, and cake decorating.
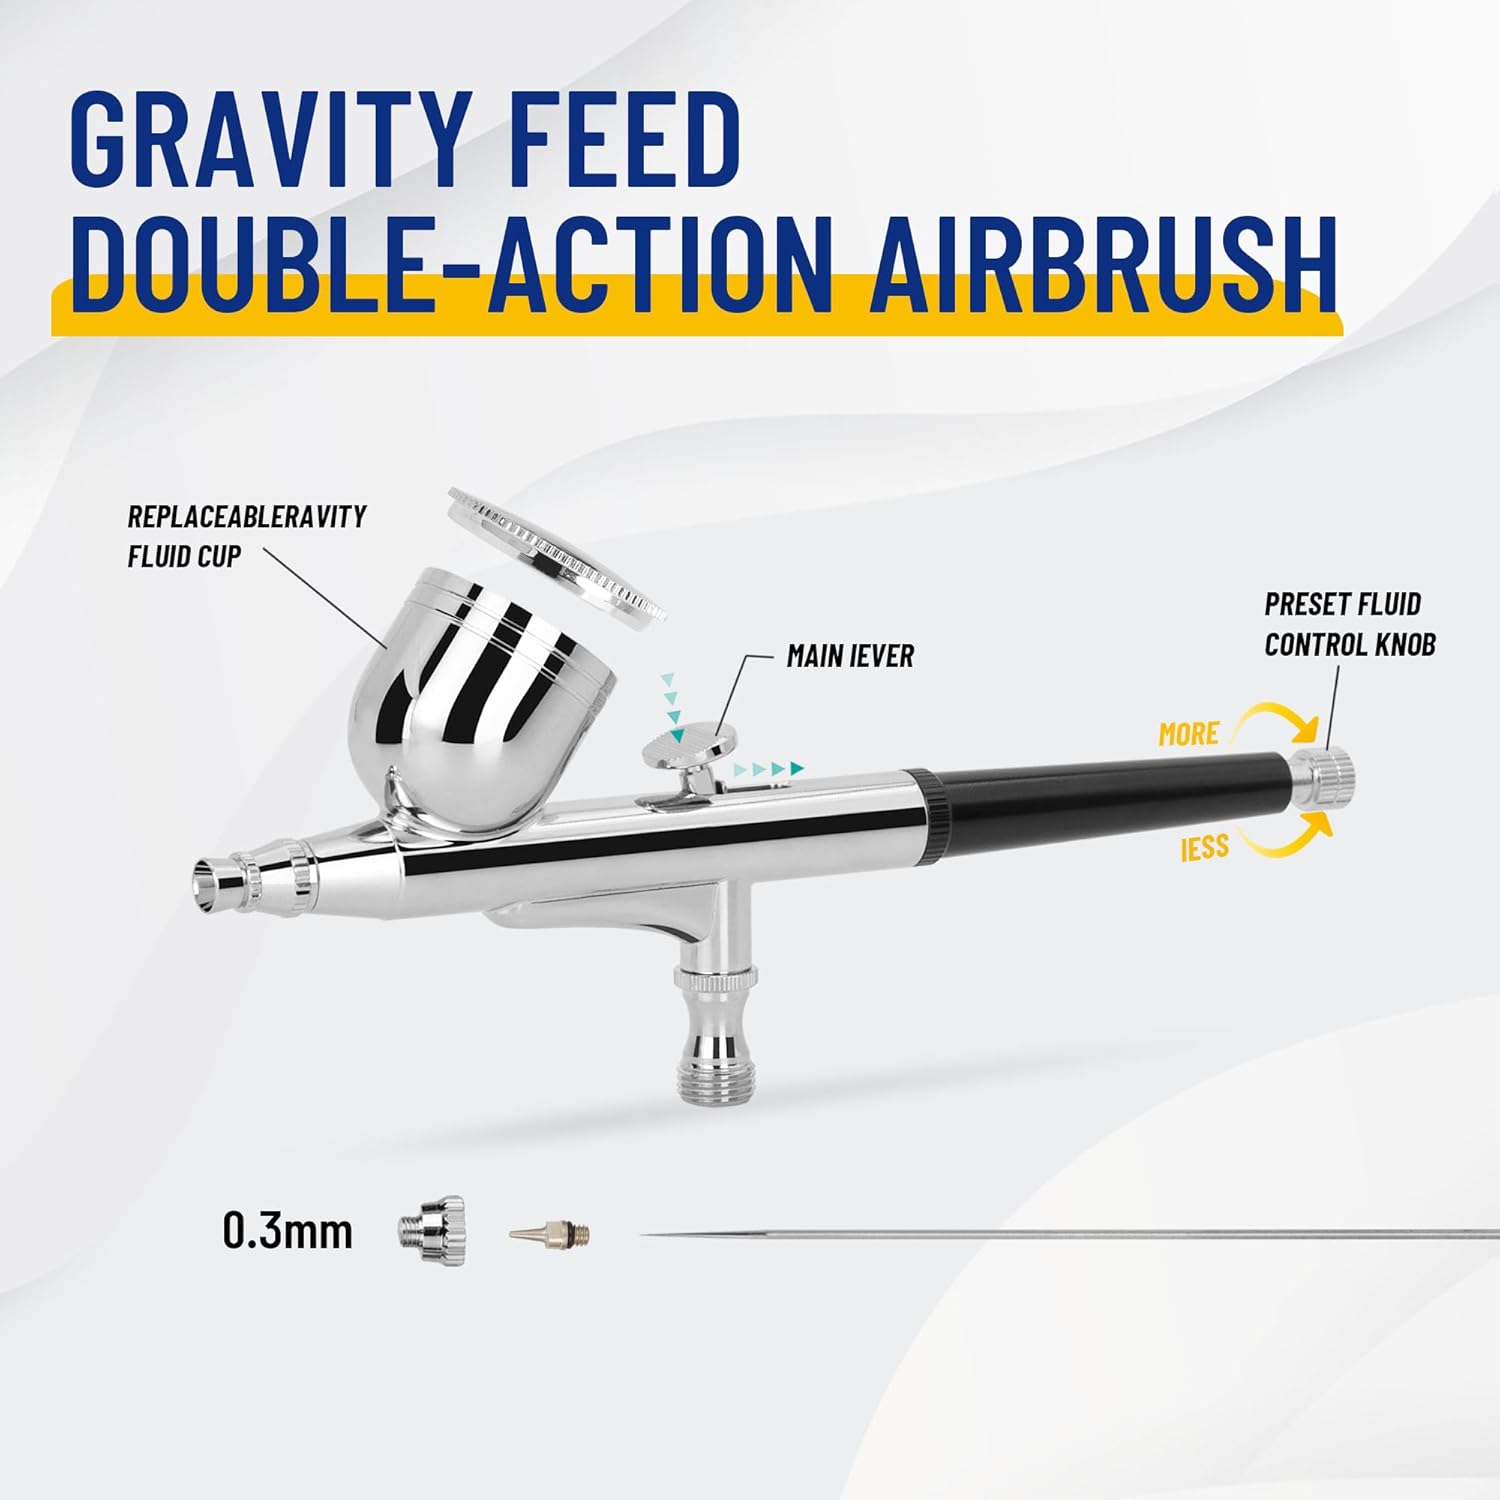
Image 4.1: Key components of the Timbertech BD-130 airbrush, including the replaceable fluid cup, main lever, and preset fluid control knob.
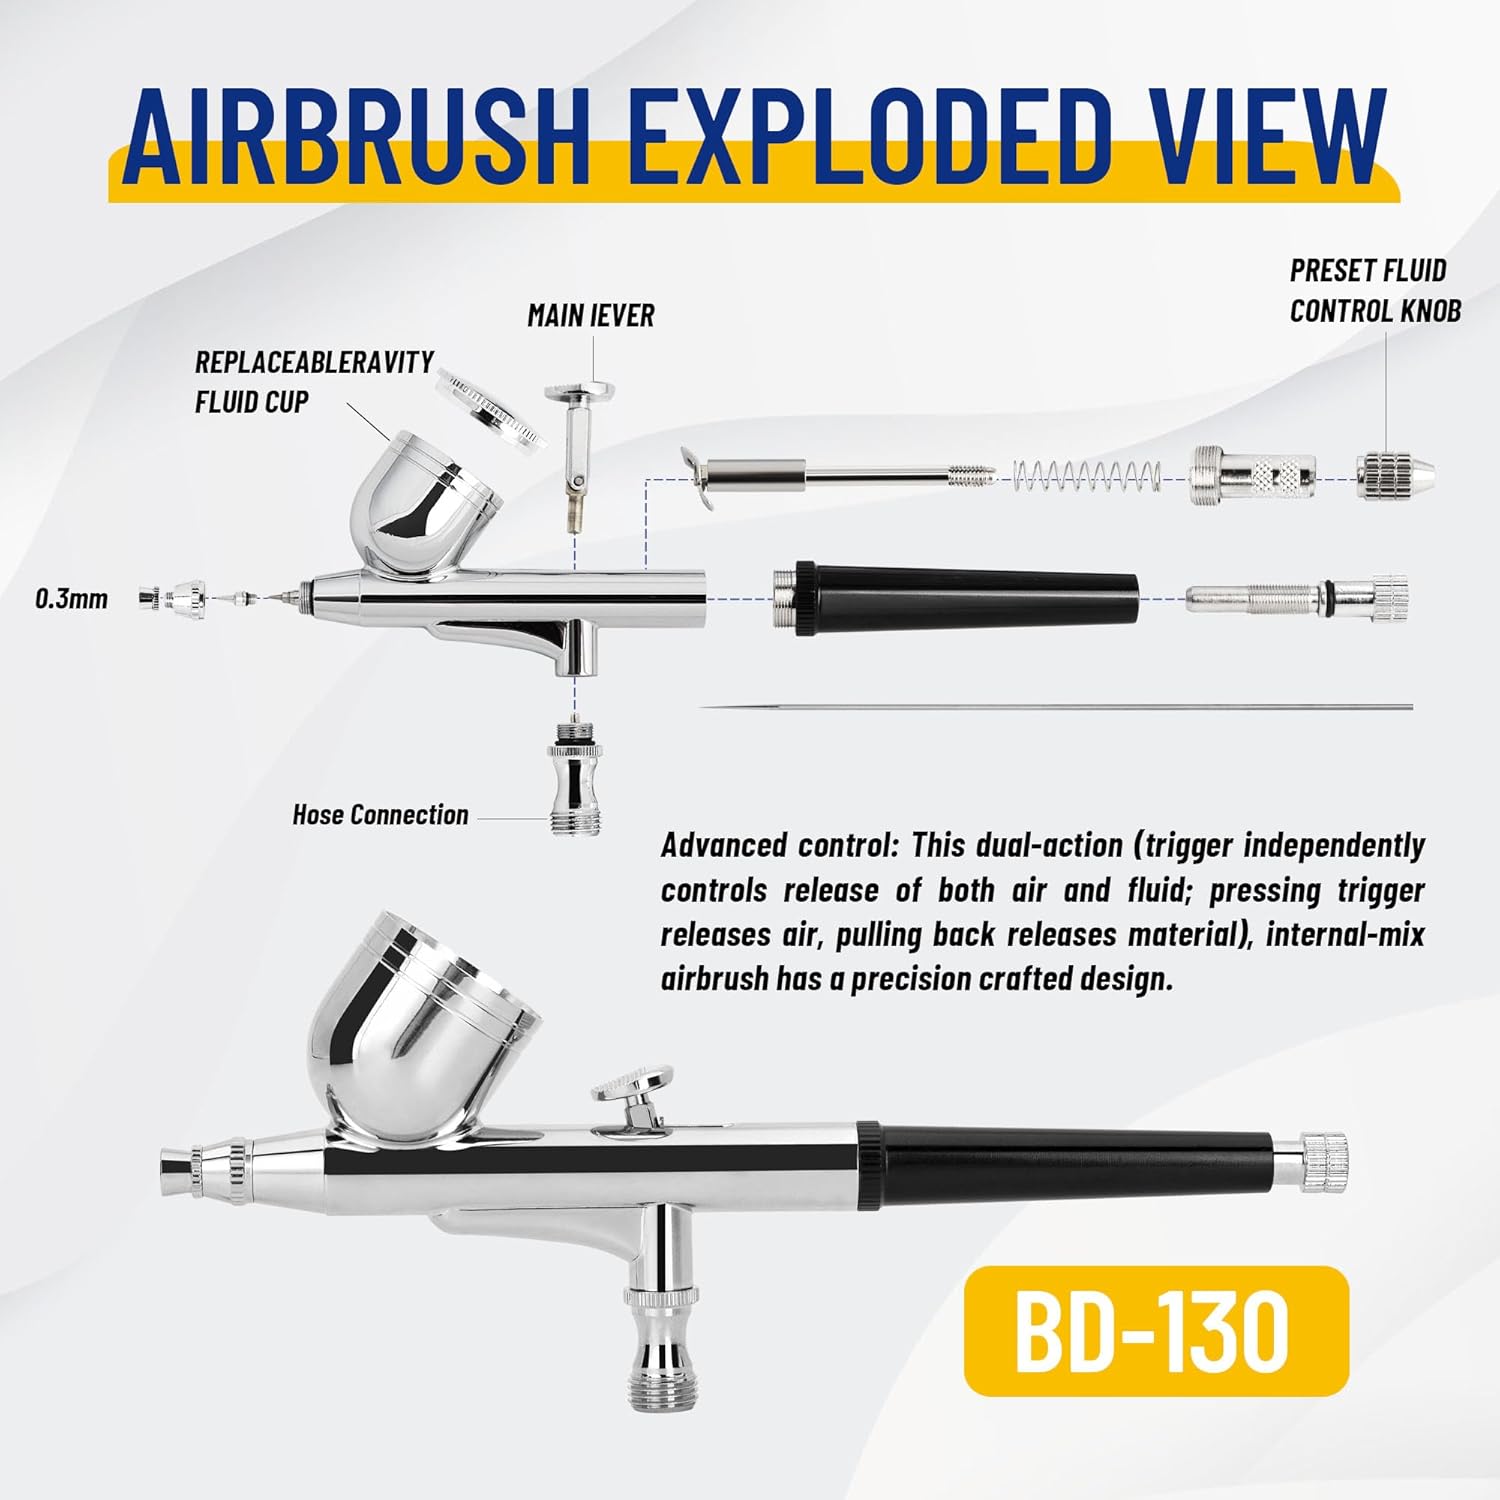
Image 4.2: Exploded view showing internal components such as the needle, nozzle, and air valve assembly. This dual-action airbrush allows independent control of air and fluid release.
Key Features:
- Double-Action Control: Allows for independent control of air and paint flow by pressing down for air and pulling back for paint.
- Gravity Feed: The 1/4 ounce (7ml) fluid cup is positioned on top, utilizing gravity for efficient paint flow.
- 0.3mm Nozzle & Needle: Provides fine detail capabilities and versatile spray patterns.
- Adjustable Fluid Control: A preset fluid control knob at the rear allows for precise adjustment of paint volume.
- Durable Construction: All-metal construction ensures longevity.
5. Setup
Before first use, ensure all components are clean and properly assembled.
- Unpack: Carefully remove the airbrush and all accessories from the packaging.
- Inspect: Check for any visible damage or loose parts.
- Connect Air Hose: Attach your air hose to the airbrush's hose connection point. Ensure a secure, airtight fit. The connection thread is 1/8''.
- Prepare Paint: Dilute your liquid medium (paint, ink, dye) to the appropriate consistency for airbrushing. The correct dilution is crucial for smooth operation and preventing clogs. Test the consistency on a scrap surface.
- Fill Fluid Cup: Use the plastic dropper to carefully fill the 1/4 ounce (7ml) fluid cup with your prepared liquid. Do not overfill.
6. Operation
The BD-130 is a double-action airbrush, meaning the trigger controls both air and fluid flow.
- Hold the Airbrush: Hold the airbrush lightly and comfortably in your hand.
- Initiate Airflow: Pressing the main lever (trigger) down creates an airflow.
- Control Fluid Atomization: While holding the lever down for air, pull it backwards gradually to release and atomize the color. The further back you pull, the more fluid is released.
- Adjust Spray Pattern: The spray pattern's size and intensity are influenced by the distance between the airbrush and your working surface.
- Fine Line Spray: For very fine lines, remove the needle cap and hold the airbrush closer to the work surface. This requires a steady hand and practice.

Image 6.1: Demonstrates various spray patterns achievable with the airbrush, including fine points, lines, and broader round sprays, indicating its versatility for different creative needs.
7. Maintenance
Proper and regular cleaning is essential for the longevity and performance of your airbrush.
- Initial Cleaning: After each use, empty any remaining liquid from the fluid cup.
- Flush with Cleaner: Add an appropriate cleaning solution (water for water-based paints, or a suitable solvent for other types) to the fluid cup.
- Back-Flush: Block the needle cap with your finger or a cloth and press the main lever down for air. This will cause the air to flow backwards into the nozzle, bubbling up in the fluid cup and helping to dislodge paint residue. Repeat this process until the cleaning solution runs clear.
- Spray Cleaner: Spray the cleaning solution through the airbrush until it sprays clear.
- Wipe Down: Use a soft cloth or cotton swab moistened with cleaner to wipe the inside of the fluid cup and the exterior of the airbrush.
- Deep Cleaning (Periodically): For thorough cleaning, disassemble the airbrush components (needle, nozzle, air cap). Use the provided wrench for the nozzle. Clean each part individually with appropriate brushes and cleaning solutions. Reassemble carefully, ensuring not to bend the needle or overtighten components.

Image 7.1: The gravity fluid cup features a smooth, mirror-like interior designed for easier cleaning of pigments.
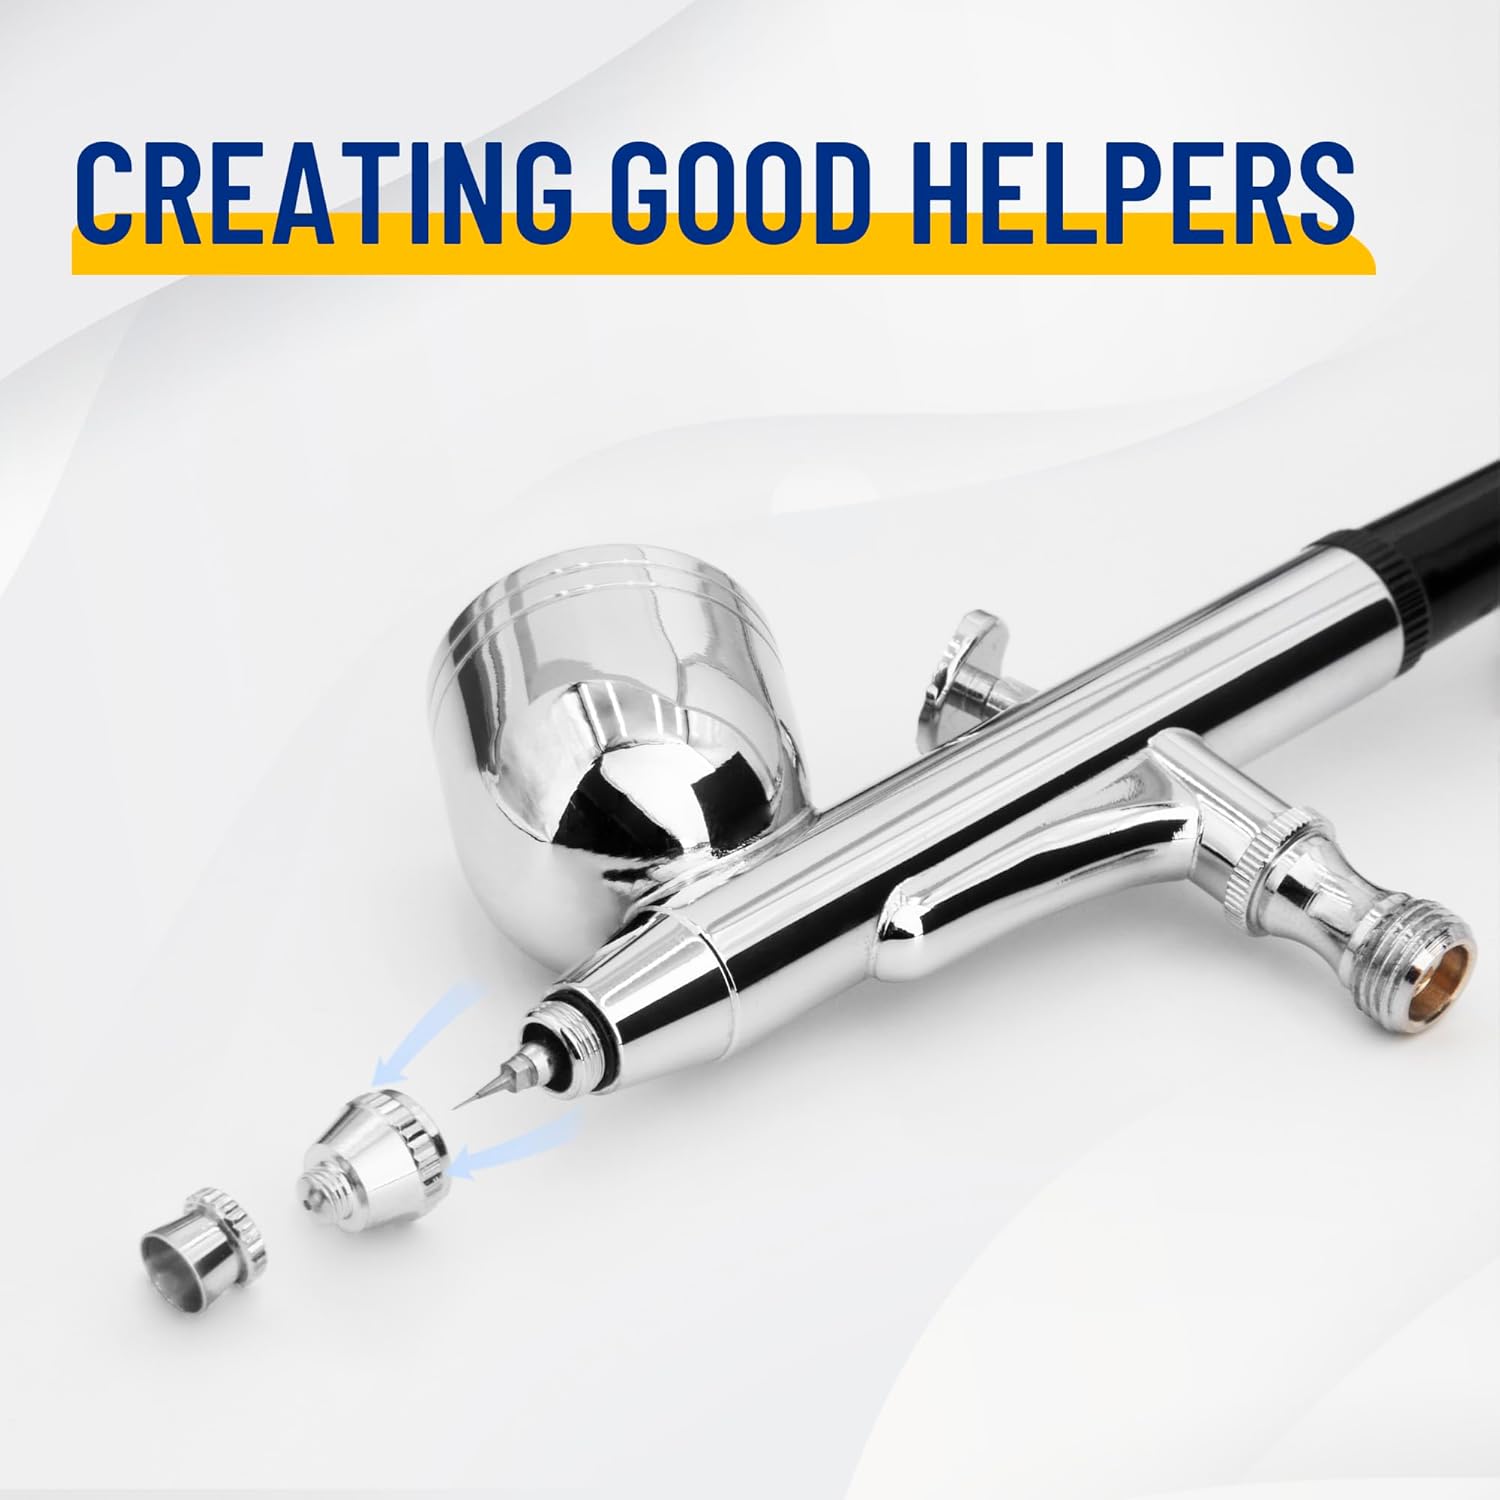
Image 7.2: Demonstrates the removal of the nozzle, a key step in deep cleaning to ensure all paint residue is cleared.
8. Troubleshooting
Refer to the following table for common issues and their solutions:
| Problem | Possible Cause | Solution |
|---|---|---|
| No paint flow or sputtering | Clogged nozzle/needle, paint too thick, insufficient air pressure, bent needle. | Clean nozzle/needle thoroughly. Dilute paint further. Increase air pressure (within 15-50 PSI). Inspect and replace bent needle. |
| Uneven spray pattern or overspray | Damaged nozzle, paint consistency issues, incorrect air pressure, dirty air cap. | Inspect and replace nozzle if damaged. Adjust paint dilution. Verify air pressure. Clean air cap. |
| Air bubbles in fluid cup | Loose nozzle, damaged nozzle, dried paint around nozzle. | Tighten nozzle gently with wrench. Inspect and replace nozzle if damaged. Clean nozzle area thoroughly. |
| Airbrush leaks | Loose components, worn O-rings, damaged seals. | Check all connections and tighten. Inspect O-rings and seals for wear and replace if necessary. |
9. Specifications
| Feature | Detail |
|---|---|
| Brand | Fengda |
| Model Name | Timbertech Professional (BD-130) |
| Item Model Number | AG-130 |
| Feeding Type | Gravity Feed |
| Nozzle Diameter | 0.30 mm |
| Fluid Cup Capacity | 1/4 OZ (7cc) |
| Working Pressure | 15-50 PSI |
| Airflow | Over 10 L/Min |
| Connection Thread | 1/8'' |
| Material | Metal |
| Color | Silver |
| Product Dimensions | 7.48"W x 4.33"H (approximate) |
| Item Weight | 8.1 ounces |
10. Warranty and Support
For warranty information, please refer to the documentation provided at the time of purchase or contact the seller directly. For technical support or inquiries regarding replacement parts, please reach out to the manufacturer or authorized distributor.


