
1. Introduction and Overview
This manual provides comprehensive instructions for the installation, operation, and maintenance of your FLEXIMOUNTS 4x8 Overhead Garage Storage Rack. This heavy-duty metal rack is designed to maximize your garage storage space by utilizing overhead areas, keeping items off the floor and protected from potential water damage.
The rack features a robust design, tested to withstand 1200 lbs and rated for a safe working load of 600 lbs. Its adjustable height (22" to 40" ceiling dropdown) offers up to 105 cubic feet of storage capacity. The integrated grid design and long ceiling brackets ensure stability and security.

Image: The FLEXIMOUNTS 4x8 Overhead Garage Storage Rack, fully installed and utilized for storing various items such as tires, plastic bins, and boxes, demonstrating its capacity and space-saving benefits.
2. Safety Information
Adherence to all safety guidelines is crucial during installation and use. Failure to do so may result in injury or damage to the product or property.
- Weight Capacity: The rack is rated for a maximum load of 600 lbs. Do not exceed this weight limit. While tested to 1200 lbs, the rated capacity ensures safe, long-term use.
- Secure Mounting: Ensure the ceiling brackets are securely attached to at least two ceiling studs. For concrete ceilings, use appropriate anchors and follow all installation instructions carefully.
- Proper Tools: Use appropriate tools for installation, including a stud finder, drill, level, and wrenches.
- Assembly Assistance: It is recommended to have at least two people for assembly and installation, especially when lifting the rack sections into place.
- Load Distribution: Distribute weight evenly across the rack surface. Avoid concentrating heavy items in one area.
- Regular Inspection: Periodically inspect all connections and hardware for tightness and signs of wear or damage.

Image: Visual representation highlighting the rack's heavy gauge steel construction, indicating a safe loading capacity of 600 pounds and a double load-bearing test of 1200 pounds.
3. Package Contents
Verify that all components are present before beginning assembly. The hardware kit is included.
- Ceiling Brackets
- Vertical Posts (6 total)
- Rack Sections (grid panels)
- M8 Screws and other necessary hardware
- Installation Template
Note: Hooks for hanging items are sold separately.
4. Setup and Installation
Proper installation is critical for the safety and stability of your overhead storage rack. Follow these steps carefully.
4.1 Planning the Installation Location
Before starting, plan the exact location for your rack. Consider the following:
- Ceiling Type: The rack is designed for wood joists or solid concrete ceilings.
- Joist Spacing: The rack fits all ceiling joist spacing ≤ 24 inches. If joist spacing is > 24 inches, it only fits spacing of 48 inches.
- Clearance: Ensure sufficient space for installation and access to stored items. Avoid installing too close to walls if it impedes assembly.
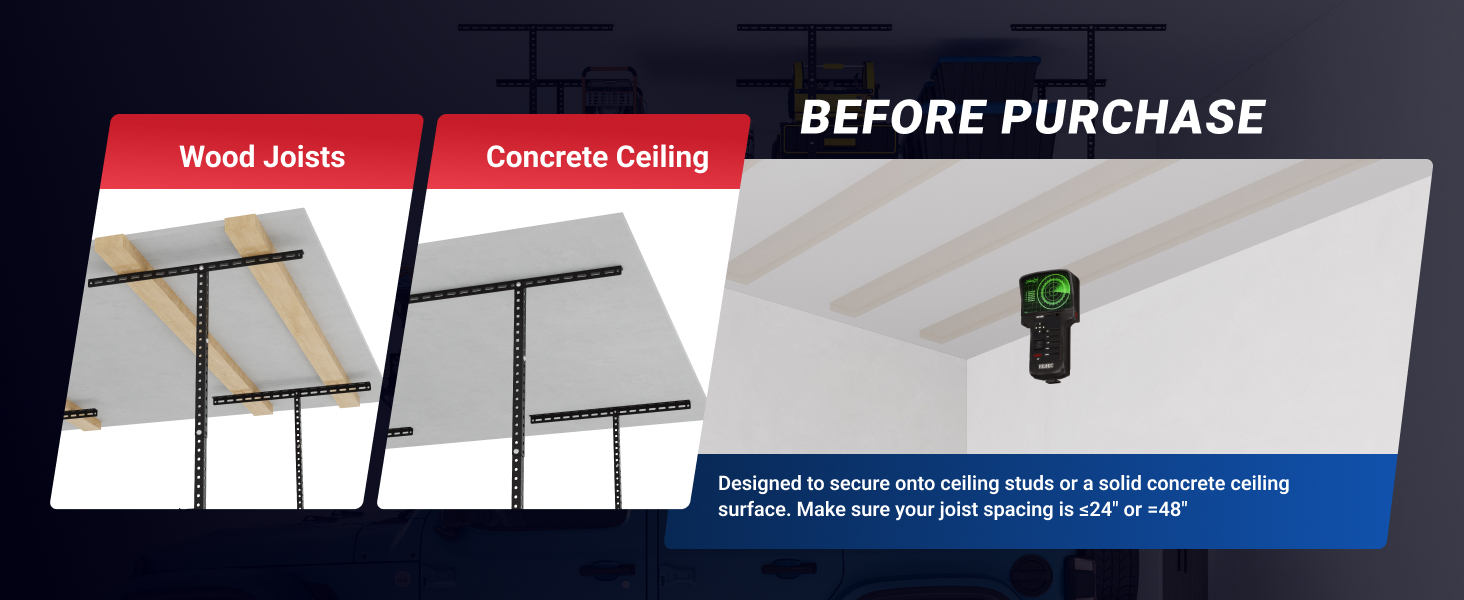
Image: Illustration detailing compatibility with wood joists and concrete ceilings, emphasizing the requirement for joist spacing to be ≤24 inches or exactly 48 inches.

Image: Detailed diagram showing how the ceiling brackets align with joist spacing, confirming compatibility for joists ≤24 inches apart or exactly 48 inches apart.
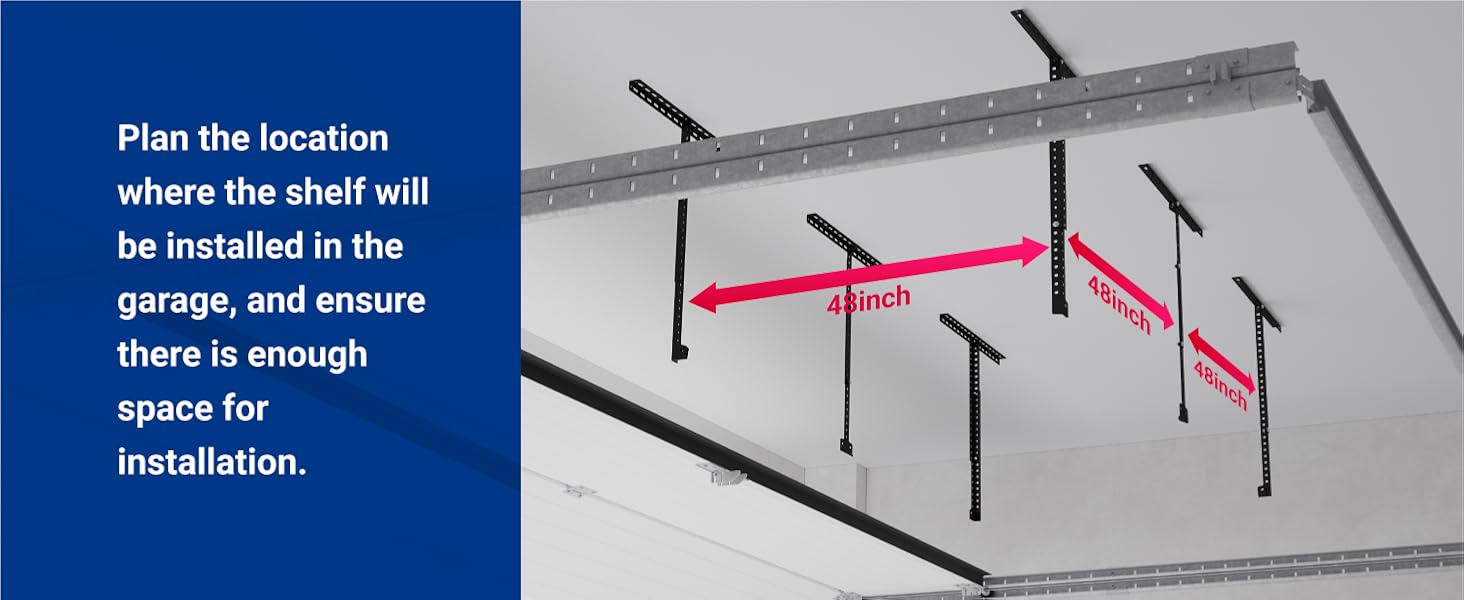
Image: A visual guide for planning the installation, demonstrating the importance of measuring and marking the 48-inch distances for mounting points on the ceiling.
4.2 Assembly Steps
- Locate Joists/Mounting Points: Use a stud finder to accurately locate ceiling joists. Mark the drilling points according to the installation template and your planned layout.
- Install Ceiling Brackets: Secure the long ceiling brackets to the marked joists or concrete ceiling using the provided hardware. Ensure they are level and firmly attached.
- Attach Vertical Posts: Connect the six vertical posts to the ceiling brackets. Adjust the length of the posts to achieve your desired dropdown height (22" to 40").
- Assemble Rack Sections: Connect the grid rack sections together. It is often easier to assemble the rack in two 4x4 sections if working alone, then join them.
- Lift and Secure Rack: With assistance, carefully lift the assembled rack sections and attach them to the vertical posts. Secure all connections with the M8 screws and other hardware. Ensure all bolts are tightened, but avoid over-tightening with power tools to prevent stripping.
5. Operating Instructions (Usage)
Once installed, your FLEXIMOUNTS overhead rack provides convenient storage. Follow these guidelines for optimal use:
- Loading Items: Place items onto the rack, distributing weight as evenly as possible. The integrated grid design prevents small items from falling through.
- Item Placement: Store seasonal items, bulky boxes, tires, and other less frequently used goods overhead to free up floor space.
- Accessibility: Use a sturdy step ladder or stool to safely access items on the rack.
- Optional Accessories: Consider purchasing compatible hooks (sold separately) to hang items like bicycles, kayaks, or ladders from the rack's underside.

Image: A comparison demonstrating the efficient use of ceiling space, showing a cluttered garage 'Before' and a clean, organized garage 'After' installing the overhead storage rack.

Image: The overhead rack in use, storing various items and demonstrating the ability to hang a kayak beneath it, further optimizing garage space.
6. Maintenance
Regular maintenance ensures the longevity and safety of your storage rack.
- Check Fasteners: Periodically (e.g., every 6-12 months) check all screws, bolts, and connections to ensure they remain tight. Re-tighten if necessary.
- Inspect for Damage: Look for any signs of rust, bending, or structural fatigue on the metal components. Address any issues promptly.
- Cleaning: Wipe down the rack with a damp cloth as needed to remove dust and grime. Avoid harsh chemicals that could damage the finish.
7. Troubleshooting
If you encounter issues with your FLEXIMOUNTS overhead rack, refer to the following common problems and solutions:
| Problem | Possible Cause | Solution |
|---|---|---|
| Rack feels unstable or wobbly | Loose fasteners; improper installation; uneven load distribution. | Check and tighten all bolts and screws. Review installation steps to ensure correct mounting to joists/ceiling. Redistribute items for even weight. |
| Difficulty aligning rack sections during assembly | Minor manufacturing tolerances; working alone. | Ensure all vertical posts are at the same height. Apply gentle pressure or use a rubber mallet to align holes. Consider assembling in smaller sections (e.g., 4x4) before joining. Seek assistance. |
| Rack does not fit ceiling joist spacing | Joist spacing outside specified range. | Verify joist spacing is ≤24 inches or exactly 48 inches. If not, the rack may not be compatible with your ceiling structure without modifications by a professional. |
8. Specifications
- Model Number: FBA_GR48B
- Product Dimensions: 96 in. L x 48 in. W x 22-40 in. H (Adjustable Height)
- Material: Metal, Steel
- Color: Black
- Shelf Type: Overhead Shelf
- Number of Shelves: 1
- Weight Capacity: 600 lbs (Rated), 1200 lbs (Tested)
- Storage Volume: Up to 105 cu.ft (with 40" dropdown)
- Mounting Type: Ceiling Mount (Wood Joists or Concrete Ceiling)
- Joist Spacing Compatibility: ≤24 inches or =48 inches
- Assembly Required: Yes
- Included Components: Hardware kit
- Item Weight: 59.7 Pounds
- Indoor/Outdoor Usage: Indoor
- UPC: 810072823656
9. Warranty Information
The FLEXIMOUNTS 4x8 Overhead Garage Storage Rack comes with a Limited Lifetime Warranty. For specific terms and conditions, please refer to the warranty documentation included with your product or contact customer support.
10. Customer Support
For further assistance, questions, or to report any issues, please contact FLEXIMOUNTS customer support. Contact information can typically be found on the manufacturer's website or on the packaging materials.


