Introduction
This manual provides detailed instructions for the installation, operation, and maintenance of your Sunding SD 548 B 14 Function Waterproof Bicycle Computer. This device is designed to accurately track various cycling metrics, enhancing your riding experience.
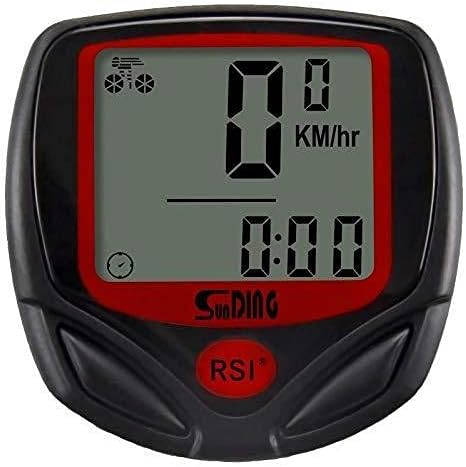
Figure 1: Front view of the Sunding SD 548 B Bicycle Computer, showing the LCD display and control buttons.
Key Features
The Sunding SD 548 B Bicycle Computer offers 14 essential functions for comprehensive ride tracking:
- SPD (Current Speed)
- ODO (Total Odometer)
- DST (Trip Distance)
- MXS (Maximum Speed)
- AVS (Average Speed)
- TM (Elapsed Time)
- CLK (Clock: 12H/24H)
- SCAN (Automatic Cycle Function)
- KM/M (Kilometer/Mile Setting)
- SET CIRCUMFERENCE (Tire Circumference Setting)
- SET ODO (Total Odometer Initial Value Setting)
- FREEZE FRAME MEMORY (Traffic Data Sampling Function)
- MAINTENANCE ALERT (Maintenance Reminder Function)
- AUTO ON/OFF (Automatic Power On/Off)
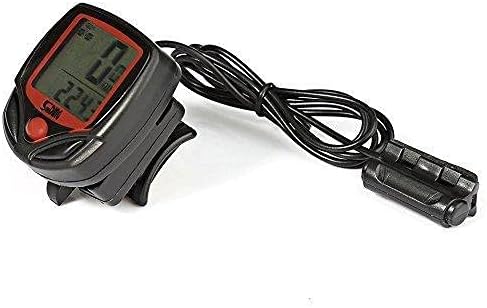
Figure 2: Side view of the bicycle computer, showing the wired sensor and mounting bracket.
Installation and Setup
Follow these steps to properly install your bicycle computer. Refer to the installation diagram for visual guidance.

Figure 3: Comprehensive installation diagram illustrating the mounting of the computer, sensor, and magnet on a bicycle.
- Mounting the Computer: Secure the computer base to your handlebar or stem using the provided cable ties. Ensure it is firmly attached and positioned for easy readability. (Refer to step 1 in Figure 3).
- Installing the Sensor: Attach the wired sensor to the front fork of your bicycle. Use the provided ties to secure it. The sensor head should be positioned to align with the path of the wheel spoke. (Refer to step 2 in Figure 3).
- Attaching the Magnet: Fasten the magnet to a spoke on your front wheel. It is critical that the magnet passes by the sensor head with a small gap, ideally around 2mm. Ensure the magnet and sensor are aligned horizontally. (Refer to step 3 and 4 in Figure 3, noting the 2mm gap).
- Cable Management: Route the sensor wire neatly along the fork and frame, securing it with additional ties to prevent it from interfering with moving parts or getting snagged.
- Initial Settings:
- Tire Circumference (CIRC): Accurate speed and distance readings depend on this setting. Find your tire size on the sidewall of your bicycle tire and locate the corresponding circumference value in the "Tire Size Chart" below.
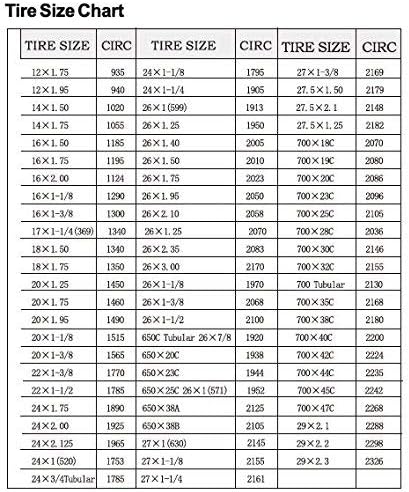
Figure 4: Tire Size Chart, providing circumference values (CIRC) for various tire sizes to ensure accurate calibration of the computer.
To set the circumference: When the computer is in setting mode (usually by long-pressing the MODE button), navigate to the CIRC setting. Use the SET button to adjust the value. Press MODE again to confirm and proceed.
- KM/M Setting: Select your preferred unit of measurement (Kilometers or Miles) during the initial setup.
- Clock Setting: Set the current time and choose between 12-hour or 24-hour format.
- Initial Odometer (ODO) Setting: This allows you to input a starting total mileage value if you are transferring from another device or wish to continue a previous count.
- Tire Circumference (CIRC): Accurate speed and distance readings depend on this setting. Find your tire size on the sidewall of your bicycle tire and locate the corresponding circumference value in the "Tire Size Chart" below.
Operation
The Sunding SD 548 B features two main buttons for operation: MODE and SET.
- MODE Button: Short press to cycle through different display modes (SPD, ODO, DST, MXS, AVS, TM, CLK, SCAN). Long press to enter setting mode or confirm settings.
- SET Button: Used to adjust values when in setting mode.
Display Modes:
- SPD (Current Speed): Displays your real-time cycling speed.
- ODO (Total Odometer): Shows the cumulative distance traveled by the bicycle. This value is stored even when the battery is removed.
- DST (Trip Distance): Displays the distance covered during the current trip. This can be reset.
- MXS (Maximum Speed): Records the highest speed achieved during the current trip.
- AVS (Average Speed): Calculates the average speed for the current trip.
- TM (Elapsed Time): Shows the duration of the current ride.
- CLK (Clock): Displays the current time (12H or 24H format).
- SCAN (Automatic Cycle Function): Automatically cycles through ODO, DST, MXS, AVS, and TM displays every few seconds.
Resetting Trip Data:
To reset trip-specific data (DST, MXS, AVS, TM), long press the SET button while in any of these modes. The ODO (Total Odometer) cannot be reset directly through this method.
Maintenance
- Cleaning: Wipe the computer and sensor with a soft, damp cloth. Do not use abrasive cleaners or solvents.
- Battery Replacement: The computer uses an AG13 battery. When the display becomes dim or erratic, replace the battery. Carefully open the battery compartment on the back of the unit, replace the old battery with a new one, ensuring correct polarity, and close the compartment securely.
- Water Resistance: The unit is waterproof, but avoid submerging it in water for extended periods or exposing it to high-pressure water jets.
- Sensor/Magnet Alignment: Periodically check that the sensor and magnet remain properly aligned (approx. 2mm gap) and securely fastened to ensure accurate readings.
Troubleshooting
| Problem | Possible Cause | Solution |
|---|---|---|
| No display or dim display | Dead battery | Replace AG13 battery. |
| No speed reading / Inaccurate speed | Sensor/magnet misalignment or too large gap | Adjust sensor and magnet to ensure a 2mm gap and proper alignment. Check sensor wire connection. |
| Incorrect distance readings | Incorrect tire circumference setting | Verify and correct the tire circumference (CIRC) setting using the provided chart. |
| Unit not turning on automatically | Sensor not detecting wheel rotation | Check sensor and magnet alignment. Ensure the magnet passes the sensor correctly. |
Specifications
- Model: Sunding SD 548 B
- Functions: 14
- Display: LCD
- Sensor Type: Wired Speed Sensor
- Power Source: 1 x AG13 Battery (included)
- Dimensions (L x W x H): Approximately 46 x 45 x 19 mm
- Weight: Approximately 40 g
- Material: Engineering Plastic
- Color: Black
- Water Resistance: Yes (Waterproof)
- Included Components: LCD Bicycle Computer, Watch Seat (Mount), Magnet Sensor, Nylon Blinding Wires, AG13 Battery.
Warranty and Support
For warranty information or technical support, please refer to the documentation provided at the point of purchase or contact your retailer. Specific warranty terms may vary by region and seller.