
1. Introduction
This manual provides essential information for the safe and efficient operation of your NISSEI NS-30SD 30A Power Supply Unit. Please read this manual thoroughly before using the device and keep it for future reference.
The NISSEI NS-30SD is a high-performance switching power supply designed for various applications requiring a stable DC power source. It features a digital display for simultaneous voltage and current readings, adjustable output voltage, and multiple output terminals.

Figure 1: Front view of the NISSEI NS-30SD Power Supply Unit. This image shows the digital display, control knobs, power switch, and various output ports.
2. Safety Instructions
To ensure safe operation and prevent damage to the unit or injury to yourself, always observe the following safety precautions:
- Power Source: Connect the unit only to an AC power source that matches the voltage specified on the unit's rear panel (typically 220V 50Hz).
- Ventilation: Ensure adequate ventilation around the unit. Do not block the cooling fan or vents. Maintain at least 10 cm (4 inches) clearance on all sides.
- Environment: Do not expose the unit to rain, moisture, direct sunlight, or extreme temperatures. Avoid operating in dusty or corrosive environments.
- Overload: Do not exceed the maximum rated output current for any terminal. Overloading can cause damage to the power supply and connected devices.
- Grounding: Ensure the unit is properly grounded. The power cord provided has a grounding pin.
- Servicing: Do not attempt to open or service the unit yourself. Refer all servicing to qualified personnel. There are no user-serviceable parts inside.
- Children: Keep the unit out of reach of children.
3. Product Features
- Digital Voltmeter and Ammeter for simultaneous display of output voltage and current.
- Adjustable DC output voltage from 9V to 15V, or fixed 13.8V DC.
- Maximum output current of 30A from the main rear terminals.
- Front panel low-power output terminals (max 3A).
- Front panel cigarette lighter socket output (max 10A).
- Forced cooling fan for efficient heat dissipation and quiet operation.
- Noise offset control to minimize interference.
4. Controls and Indicators
4.1 Front Panel
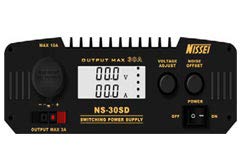
Figure 2: Front Panel Controls and Indicators. This diagram labels the various components on the front of the power supply.
- (1) Power Switch: Turns the unit ON or OFF.
- (2) Digital Display: Shows output voltage (V) and current (A) simultaneously.
- (3) Voltage Adjust Knob: Adjusts the output voltage from 9V to 15V DC when the rear voltage switch is set to "ADJUST".
- (4) Noise Offset Knob: Adjusts the noise reduction level.
- (5) Cigarette Lighter Socket (DC Output MAX 10A): Provides up to 10A DC output for compatible devices.
- (6) Low Power Output Terminals (Output MAX 3A): Provides up to 3A DC output for low-power devices.
4.2 Rear Panel
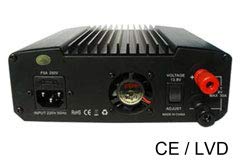
Figure 3: Rear Panel Connections. This diagram labels the input and main output connections on the back of the power supply.
- (8) Main DC Output Terminals (OUT MAX 30A): High current output terminals for devices requiring up to 30A. Connect positive (+) to red terminal and negative (-) to black terminal.
- (9) Voltage Select Switch (13.8V / ADJUST):
- Set to 13.8V for a fixed 13.8V DC output. The front voltage adjust knob will be inactive.
- Set to ADJUST to enable variable voltage output (9V-15V DC) using the front Voltage Adjust Knob (3).
- (10) Cooling Fan: Automatically operates to dissipate heat from the unit. Ensure this area is not obstructed.
- (11) AC Input Socket (INPUT 220V 50Hz): Connect the provided AC power cord here. Includes a fuse holder (F5A 250V).
5. Setup
- Unpacking: Carefully remove the power supply from its packaging. Inspect for any signs of damage.
- Placement: Place the unit on a stable, flat surface in a well-ventilated area. Ensure there is sufficient space around the unit for airflow, especially around the cooling fan (10).
- AC Power Connection:
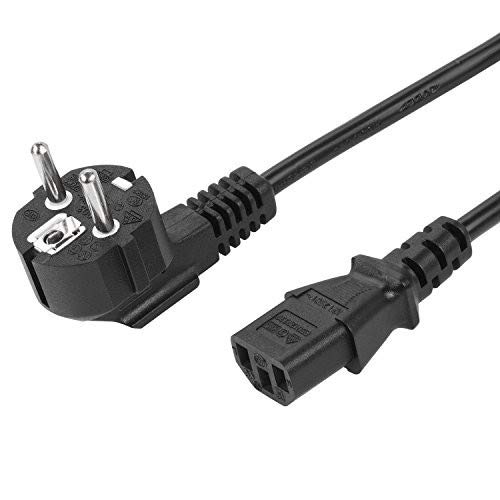
Figure 4: Standard AC Power Cord. This cord connects the power supply to the mains electricity.
Connect the provided AC power cord to the AC Input Socket (11) on the rear panel of the power supply. Then, plug the other end into a suitable grounded AC outlet (220V 50Hz).
- DC Output Connection:
- For high-power devices (up to 30A), connect to the Main DC Output Terminals (8) on the rear panel. Ensure correct polarity: red for positive (+), black for negative (-).
- For low-power devices (up to 3A), connect to the Low Power Output Terminals (6) on the front panel.
- For devices with a cigarette lighter plug (up to 10A), connect to the Cigarette Lighter Socket (5) on the front panel.
Ensure all connections are secure before powering on the unit.
6. Operating Instructions
- Power On: Ensure all connections are correct and secure. Flip the Power Switch (1) to the "ON" position. The digital display (2) will illuminate, showing the current voltage and amperage.
- Setting Output Voltage:
- Fixed 13.8V: Set the Voltage Select Switch (9) on the rear panel to "13.8V". The output voltage will be fixed at 13.8V DC, and the front Voltage Adjust Knob (3) will not function.
- Adjustable Voltage (9V-15V): Set the Voltage Select Switch (9) on the rear panel to "ADJUST". Use the front Voltage Adjust Knob (3) to set the desired output voltage between 9V and 15V DC. Observe the digital display (2) for the precise voltage reading.
- Connecting Devices: Once the desired voltage is set, connect your device to the appropriate output terminals. The digital display (2) will show the current drawn by the connected device.
- Noise Offset: If you experience electrical noise or interference with sensitive equipment, adjust the Noise Offset Knob (4) to minimize it.
- Monitoring: Continuously monitor the digital display (2) for voltage and current readings to ensure your device is operating within safe limits.
- Power Off: Before disconnecting any devices, flip the Power Switch (1) to the "OFF" position.
7. Maintenance
- Cleaning: Disconnect the power supply from the AC outlet before cleaning. Use a soft, dry cloth to wipe the exterior of the unit. Do not use liquid cleaners or solvents.
- Ventilation: Regularly check that the cooling fan (10) and ventilation openings are free from dust and obstructions. Use compressed air to gently clear any dust buildup.
- Fuse Replacement: The AC input socket (11) contains a fuse (F5A 250V). If the unit fails to power on, check and replace the fuse with one of the same type and rating if necessary. Refer to qualified personnel for fuse replacement if unsure.
- Storage: When not in use for extended periods, store the unit in a cool, dry place, away from direct sunlight and extreme temperatures.
8. Troubleshooting
- Unit does not power on:
- Check if the AC power cord is securely connected to both the unit and the wall outlet.
- Verify that the wall outlet has power.
- Check the fuse in the AC input socket (11). Replace if blown (F5A 250V).
- Ensure the Power Switch (1) is in the "ON" position.
- No output voltage/current:
- Ensure the unit is powered on.
- Check all DC output connections for proper polarity and secure contact.
- If using adjustable voltage, ensure the Voltage Select Switch (9) is set to "ADJUST" and the Voltage Adjust Knob (3) is not set to minimum.
- The unit may have entered protection mode due to overload. Disconnect the load, power cycle the unit, and reconnect with a lower load or check for short circuits.
- Output voltage is fixed at 13.8V, cannot adjust:
- Ensure the Voltage Select Switch (9) on the rear panel is set to "ADJUST" for variable voltage control.
- Excessive noise/interference:
- Adjust the Noise Offset Knob (4) on the front panel.
- Ensure proper grounding of the power supply and connected equipment.
9. Specifications
| Feature | Specification |
|---|---|
| Model | NS-30SD |
| Input Voltage | 220V AC, 50Hz |
| Output Voltage | Adjustable 9V - 15V DC or Fixed 13.8V DC |
| Output Current (Main) | Max 30A |
| Output Current (Front Low Power) | Max 3A |
| Output Current (Cigarette Lighter) | Max 10A |
| Display | Digital Voltmeter and Ammeter |
| Cooling System | Forced Cooling Fan |
| Fuse Rating | F5A 250V |
10. Warranty and Support
Warranty information for the NISSEI NS-30SD Power Supply Unit is not explicitly provided in the product details. Please refer to your point of purchase or the manufacturer's official website for specific warranty terms and conditions.
For technical support or service inquiries, please contact the retailer or the manufacturer directly. Ensure you have your model number (NS-30SD) and purchase details available when seeking support.