1. Product Overview
This instruction manual provides essential information for the safe and effective use of your Thermos 4019.205.100 Vacuum Flask. This powerful thermos bottle features efficient Thermos insulation technology, designed to keep beverages hot for up to 12 hours (1 liter up to 24 hours) or cold for up to 24 hours. Its handy, slim design includes a 2-part drain plug for drip-free pouring. The bottle is constructed from puristically shaped stainless steel, has no inner coating, is dishwasher-safe, and features a dismountable automatic closure for easy cleaning.

Figure 1: Thermos 4019.205.100 Vacuum Flask, Matte Stainless Steel.
2. Key Features
- Superior Insulation: Double-walled stainless steel insulation technology keeps drinks hot for up to 24 hours or cold for up to 24 hours.
- Light and Compact Design: Allows for a larger capacity within a smaller, portable bottle.
- Drip-Free Pouring: Equipped with a one-push button automatic closing mechanism and a 2-part drain plug for controlled, mess-free pouring.
- Easy to Clean: The automatic closure can be dismantled for thorough cleaning, and the entire flask is top-rack dishwasher safe.
- Durable Construction: Made from high-quality stainless steel with no inner coating.
- Extended Warranty: Comes with a 5-year warranty on insulation performance.

Figure 2: Visual representation of key features including 12 hours hot, 24 hours cold, leak-proof, dishwasher-safe, 1.00 liter capacity, 526 gram weight, 18/8 stainless steel, and BPA-free construction.
3. Setup and First Use
- Unpack: Carefully remove the Thermos flask and all its components from the packaging.
- Initial Cleaning: Before first use, wash all parts of the flask (bottle, stopper, and cup) with warm soapy water. Rinse thoroughly. The flask is top-rack dishwasher safe.
- Pre-heating/Pre-cooling (Optional but Recommended):
- For hot beverages: Fill the flask with hot water, attach the stopper, and let it sit for 5-10 minutes. Empty the hot water before filling with your desired beverage.
- For cold beverages: Fill the flask with cold water or ice, attach the stopper, and let it sit for 5-10 minutes. Empty before filling with your desired beverage.

Figure 3: The Thermos flask with its removable cup and two-part stopper, illustrating components for cleaning and use.
4. Operating Instructions
- Filling: Unscrew the outer cup and then the inner stopper. Pour your pre-heated or pre-cooled beverage into the flask. Do not overfill; leave some space at the top for the stopper.
- Sealing: Securely screw the inner stopper back onto the flask. Ensure it is tight to maintain insulation and prevent leaks. Then, screw the outer cup back on.
- Pouring (Drip-Free): To pour, slightly unscrew the inner stopper (approximately one or two turns) without removing it completely. This activates the 2-part drain plug, allowing liquid to flow out through the designated pour spouts without fully exposing the contents to air, thus minimizing heat loss.

Figure 4: Close-up of the push-button pour lid, showing the mechanism for controlled pouring.
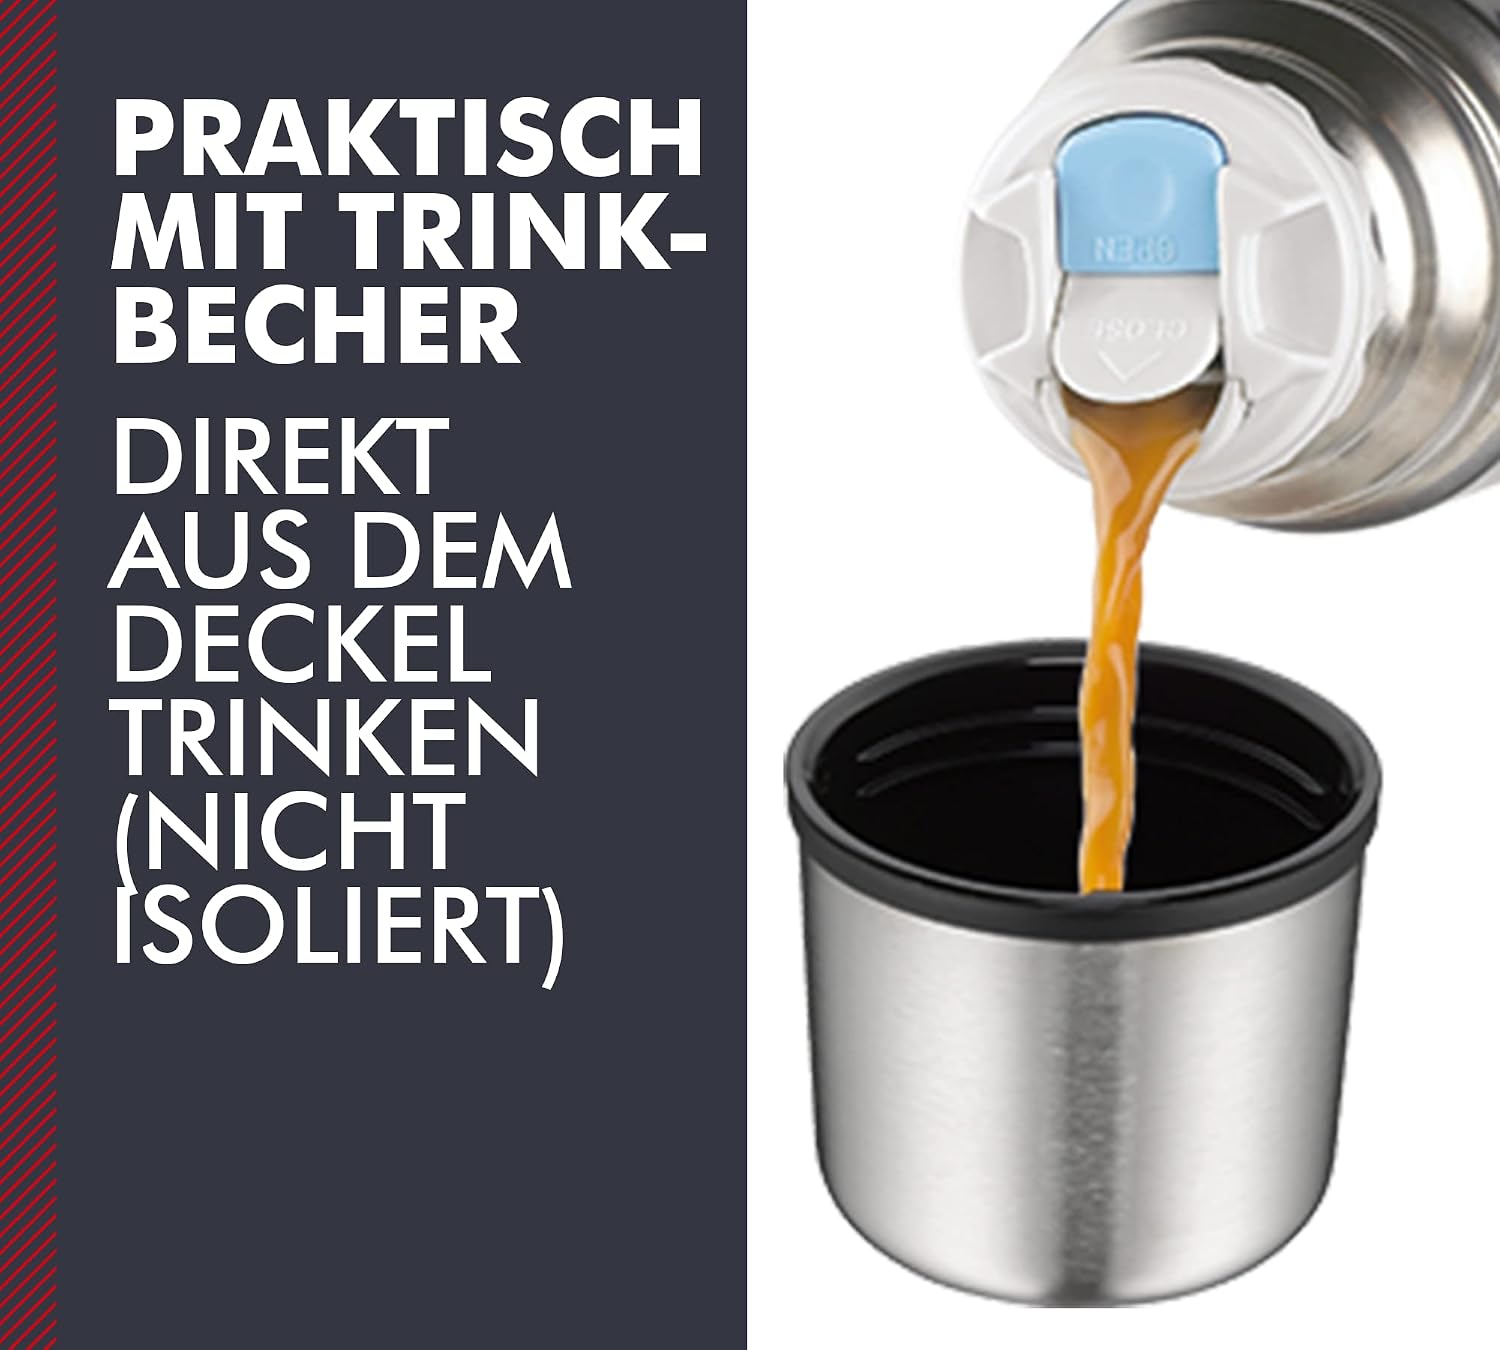
Figure 5: Demonstrates pouring a beverage into the integrated cup from the flask's pour spout.
- Drinking: The outer cap doubles as a convenient drinking cup.
5. Maintenance and Cleaning
- Regular Cleaning: For best results and hygiene, clean your flask after each use.
- Dishwasher Safe: The Thermos flask is designed to be top-rack dishwasher safe. Ensure all components (bottle, stopper, cup) are placed securely.
- Hand Washing: If hand washing, use warm water and mild dish soap. A bottle brush may be helpful for reaching the bottom of the flask.
- Dismantling the Stopper: The automatic closure mechanism can be dismantled for thorough cleaning. Refer to the diagrams on the stopper for instructions on how to separate its parts. Ensure all parts are dry before reassembling.
- Drying: Allow all parts to air dry completely before reassembling and storing to prevent odors and mildew.
- Storage: Store the flask with the stopper slightly loosened to allow air circulation.
6. Troubleshooting
- Liquid Not Staying Hot/Cold:
- Ensure the stopper is securely tightened.
- Verify that the pre-heating or pre-cooling steps were followed.
- Check for any damage to the flask or stopper that might compromise the vacuum seal.
- Leaking:
- Confirm the stopper is fully screwed on and the pour mechanism is in the "closed" position.
- Inspect the rubber seals on the stopper for wear or damage.
- Difficulty Pouring:
- Ensure the stopper is slightly unscrewed to activate the pour function.
- Check for any blockages in the pour spouts.
7. Specifications
| Attribute | Detail |
|---|---|
| Brand | THERMOS |
| Model Name | Thermos Isolierflasche Light&Compact, Edelstahl mattiert 1,0 l |
| Model Number | 4019.205.100 |
| Capacity | 1 Litre |
| Color | Stainless Steel |
| Material | Stainless Steel |
| Product Dimensions | 3.35"W x 12.01"H |
| Item Weight | 0.55 Kilograms (1.21 pounds) |
| Special Feature | Dishwasher Safe |
| Product Care Instructions | Dishwasher safe |
| Cap Type | Screw Cap |
| Included Components | Thermo bottle |
| Manufacturer | Thermos |
| Date First Available | September 5, 2012 |
8. Warranty and Support
The Thermos 4019.205.100 Vacuum Flask comes with a 5-year warranty on its best insulation performance. For warranty claims or technical support, please refer to the official THERMOS website or contact their customer service department. Keep your proof of purchase for warranty validation.
For more information, visit the Official THERMOS Store.


