
1. Introduction and Overview
This manual provides essential instructions for the setup, operation, and maintenance of your Bunker Hill Security Motion Detector Alarm Set. This system is designed to enhance security by detecting motion within its monitored area and alerting users with an alarm. It features a main alarm unit with an integrated keypad, a keychain remote for convenient arming and disarming, and a power adapter.
Key features include:
- Infrared motion detection up to 16 feet away within a 60-degree arc.
- Integrated keypad for security code entry.
- Keychain remote for arming and disarming.
- Panic button for immediate alarm activation.
- Intrusion memory function.
- Low battery indicator.
- Selectable alarm or chime option, suitable for various applications including business doorways.
- Recommended for indoor use only.
2. Package Contents
Please verify that all items listed below are present in your package:
- 1 x Bunker Hill Security Motion Detector Alarm Unit (with integrated keypad and motion sensor)
- 1 x Keychain Remote Control
- 1 x Power Adapter
- Mounting Screws (for alarm unit installation)
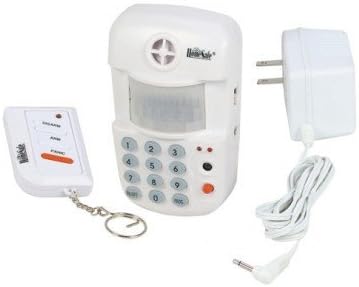
Image 1: Components of the Bunker Hill Security Motion Detector Alarm Set. Shown are the main alarm unit with an integrated keypad and motion sensor, a compact keychain remote control, and a power adapter for the main unit.
3. Safety Information
Read all safety instructions before operating the device. Failure to follow these instructions may result in electric shock, fire, or serious injury.
- Indoor Use Only: This device is designed for indoor environments. Do not expose it to rain, moisture, or extreme temperatures.
- Power Source: Use only the provided power adapter. Ensure the power outlet voltage matches the adapter's specifications.
- Battery Safety: If using batteries for backup (not included), ensure correct polarity. Do not mix old and new batteries or different types of batteries. Dispose of used batteries responsibly.
- Placement: Mount the unit securely to prevent it from falling. Avoid placing it near heat sources, direct sunlight, or areas with high vibration.
- Cleaning: Disconnect power before cleaning. Use a soft, dry cloth. Do not use liquid cleaners or aerosols.
- Servicing: Do not attempt to open or repair the device yourself. Refer all servicing to qualified personnel.
4. Setup
4.1 Powering the Alarm Unit
- Unpack the main alarm unit and power adapter.
- Connect the power adapter cable to the DC input jack on the alarm unit.
- Plug the power adapter into a standard electrical outlet. The unit will power on.
- If desired, install 9V batteries (not included) for backup power. Open the battery compartment on the back of the unit, insert batteries with correct polarity, and close the compartment.
4.2 Mounting the Alarm Unit
The alarm unit is designed for wall mounting to optimize motion detection coverage.
- Choose a suitable location, typically in a corner or on a wall, where the unit can cover the desired area without obstruction. Ensure it is within range of the keychain remote.
- Mark the positions for the mounting screws on the wall.
- Drill pilot holes if necessary.
- Secure the alarm unit to the wall using the provided mounting screws.
- Ensure the unit is stable and the motion sensor lens is unobstructed.
4.3 Setting the Security Code
The default security code is typically 0000. It is highly recommended to change this code immediately for security purposes.
- With the unit disarmed, enter the current security code (default
0000). - Press the
*button. - Enter your new 4-digit security code.
- Press the
#button to confirm. The unit will emit a confirmation tone.
5. Operating Instructions
5.1 Arming the System
You can arm the system using either the keypad on the main unit or the keychain remote.
- Using the Keypad: Enter your 4-digit security code and press the
ARMbutton. The unit will beep, indicating a delay period (typically 30-60 seconds) before the system is fully armed. Exit the protected area during this delay. - Using the Remote: Press the
ARMbutton on the keychain remote. The unit will beep, indicating the arming delay period.
5.2 Disarming the System
You can disarm the system using either the keypad on the main unit or the keychain remote.
- Using the Keypad: Upon entering the protected area, the unit will start beeping (entry delay). Enter your 4-digit security code and press the
DISARMbutton within the delay period to prevent the alarm from sounding. - Using the Remote: Press the
DISARMbutton on the keychain remote. The unit will confirm with a tone.
5.3 Panic Function
In an emergency, you can instantly trigger the alarm.
- Using the Keypad: Press the
PANICbutton on the main unit. - Using the Remote: Press the
PANICbutton on the keychain remote.
The alarm will sound immediately. To stop the panic alarm, disarm the system using your security code or the remote.
5.4 Alarm/Chime Option
The unit can be set to either an alarm sound or a chime sound, useful for monitoring entries without a full alarm.
- Refer to your unit's specific buttons or settings for switching between alarm and chime modes. This is typically a dedicated button or a sequence entered via the keypad.
5.5 Intrusion Memory
If the alarm has been triggered while you were away, the unit's intrusion memory feature will indicate this upon your return. Check the unit for a specific light or indicator that signals a past alarm event. Disarming the system will usually clear this memory.
6. Maintenance
6.1 Cleaning
To maintain optimal performance, keep the unit clean.
- Disconnect the power adapter before cleaning.
- Wipe the exterior of the unit with a soft, dry cloth.
- Do not use abrasive cleaners, solvents, or spray directly onto the unit.
- Ensure the motion sensor lens is free from dust and obstructions.
6.2 Battery Replacement (if applicable)
If your unit uses backup batteries, replace them when the low battery indicator illuminates.
- Disconnect the power adapter.
- Open the battery compartment on the back of the unit.
- Remove the old batteries and dispose of them properly.
- Insert new batteries, ensuring correct polarity.
- Close the battery compartment and reconnect the power adapter.
6.3 Testing the System
Regularly test your alarm system to ensure it is functioning correctly.
- Arm the system and intentionally trigger the motion sensor to verify the alarm sounds.
- Test the keychain remote's arm, disarm, and panic functions.
7. Troubleshooting
| Problem | Possible Cause | Solution |
|---|---|---|
| Alarm does not arm/disarm. | Incorrect security code entered; Remote battery low; Unit not receiving power. | Verify security code; Replace remote battery; Check power adapter connection and outlet. |
| False alarms. | Unit placed near heat sources (vents, direct sunlight); Pets or moving objects in detection zone; Loose mounting. | Relocate unit away from heat sources; Adjust placement to avoid pets/objects; Securely mount the unit. |
| Low battery indicator is on. | Backup batteries are low. | Replace backup batteries (if installed). |
| Remote control not working. | Remote battery low; Out of range. | Replace remote battery; Move closer to the main alarm unit. |
8. Specifications
| Brand | Bunker Hill Security |
| Model Number | 4331032114 |
| Detection Range | Up to 16 feet (approx. 4.8 meters) |
| Detection Arc | 60 degrees |
| Power Source | AC Adapter (included) / 9V Battery Backup (batteries not included) |
| Mounting Type | Wall Mount |
| Item Weight | Approximately 12 ounces (0.34 kg) |
| Package Dimensions | Approximately 9.6 x 7.1 x 3.3 inches (24.4 x 18 x 8.4 cm) |
| Recommended Use | Indoor |
9. Warranty and Support
For warranty information and customer support, please refer to the documentation provided with your purchase or contact Bunker Hill Security directly. Keep your purchase receipt as proof of purchase.
For technical assistance or inquiries, please visit the manufacturer's official website or contact their customer service department.