
1. Introduction
Thank you for purchasing the iRULU BL20 Video Projector. This manual provides essential information for the safe and efficient operation of your device. Please read it thoroughly before use and retain it for future reference.
2. Safety Information
- Do not block the ventilation openings. Ensure adequate space around the projector for proper airflow.
- Use only the power adapter supplied with the projector.
- Avoid direct eye exposure to the projector lens when the lamp is on.
- Do not place the projector on unstable surfaces.
- Keep the projector away from water or other liquids.
- Unplug the projector during lightning storms or when unused for long periods.
- Refer all servicing to qualified service personnel.
3. Package Contents
Verify that all items listed below are included in your package:
- iRULU BL20 Video Projector
- Power cable
- AV cable
- Remote control (batteries not included)
- User Manual (this document)
- Lens cleaner
- Screws

4. Product Overview
4.1. Front Panel and Lens
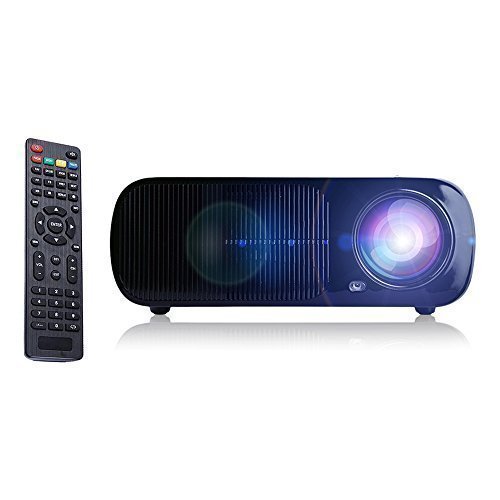
The front of the projector features the projection lens and an infrared receiver for the remote control.

4.2. Rear Panel and Connections
The rear panel provides various input and output ports for connecting external devices.

- USB (x2): Connect USB storage devices for media playback.
- HDMI (x2): Connect devices such as laptops, gaming consoles, or streaming sticks.
- TV/DTV: Connect to a television antenna for broadcast channels.
- VGA: Connect to computers or laptops.
- AV: Connect to devices using a composite video and stereo audio cable.
- YPbPr: Connect to devices using component video cables.
- Audio In/Out: Connect external audio systems or headphones.
5. Setup
5.1. Placement Options
The projector supports multiple projection methods:
- Front Projection: Place the projector in front of the screen.
- Rear Projection: Place the projector behind a translucent screen.
- Ceiling Projection: Mount the projector upside down on the ceiling (bracket not included).

5.2. Connecting Devices
Connect your desired source device to the appropriate port on the projector.

5.3. Power On/Off
Connect the power cable to the projector and a power outlet. Press the power button on the projector or the remote control to turn the unit on or off.
6. Operation
6.1. Basic Controls
The projector can be controlled using the buttons on the unit or the included remote control.

6.2. Focus and Keystone Correction
Adjust the focus ring on the lens to achieve a clear image. Use the keystone correction dial on the rear panel to correct trapezoidal distortion if the projector is not perfectly perpendicular to the screen. The keystone correction allows for approximately ±15° manual vertical adjustment.
6.3. Projection Distance and Screen Size
The optimal projection distance ranges from 1.2 to 6 meters, yielding screen sizes from 32 to 200 inches. Refer to the chart below for guidance:
6.4. Input Source Selection
Press the 'Source' button on the remote control or projector to cycle through available input sources (HDMI1, HDMI2, USB1, USB2, AV, VGA, YPbPr, TV).
6.5. Audio Output
The projector has built-in speakers. For enhanced audio, connect external speakers or a sound system to the audio output port.
7. Maintenance
- Cleaning the Lens: Use the provided lens cleaner cloth or a soft, lint-free cloth to gently wipe the lens. Avoid abrasive materials.
- General Cleaning: Wipe the projector's exterior with a soft, dry cloth. Do not use liquid or aerosol cleaners.
- Lamp Life: The LED lamp has an estimated lifespan of 20,000 hours. No user replacement is required.
- Ventilation: Regularly check that the ventilation openings are clear of dust and debris to prevent overheating.
8. Troubleshooting
- No Image: Ensure the power cable is securely connected and the projector is turned on. Verify the correct input source is selected. Check the connection cable to the source device.
- Blurry Image: Adjust the focus ring on the lens. Ensure the projection distance is within the recommended range.
- Trapezoidal Image: Adjust the keystone correction dial on the rear panel.
- No Sound: Check the volume settings on both the projector and the source device. Ensure external speakers are properly connected if used.
- Remote Control Not Working: Ensure batteries are correctly inserted and not depleted. Point the remote directly at the projector's IR receiver.
- Overheating: Ensure ventilation openings are not blocked. Operate the projector in a well-ventilated area.
9. Specifications
| Feature | Specification |
|---|---|
| Brand | iRULU |
| Model Name | BL20 |
| Native Resolution | 800 x 480 |
| Supported Resolution | Up to 1080p |
| Lamp Type | LED |
| Light Source Operating Life | 20,000 hours |
| Contrast Ratio | 2000:1 |
| Aspect Ratio | 4:3 / 16:9 |
| Projection Size | 32-200 inches |
| Projection Distance | 1.2 to 6 meters |
| Keystone Correction | ±15° Manual Vertical |
| Connectivity Technology | HDMI, USB, VGA, AV, YPbPr, TV |
| Built-in Speaker | 3W Audio Output |
| Power Consumption | 110 W |
| Power Supply | AC 110V - 240V (± 10%), 50/60 Hz |
| Item Weight | 4.8 Pounds |
10. Warranty and Support
The iRULU BL20 Video Projector comes with a 1-year warranty. For any issues concerning the remote control, lamp, or general product performance, please contact iRULU customer service for assistance, replacement, or refund.
For customer service and technical support, please refer to the contact information provided on the official iRULU website or your purchase documentation.

