Introduction
The Carvin X100B is a versatile guitar combo amplifier designed to deliver a wide range of tones suitable for various musical styles. This amplifier features a robust tube-driven preamp section utilizing three AX7 tubes and a power section driven by four 6L6 tubes, ensuring rich, dynamic sound. Its solid construction and comprehensive control set make it a reliable choice for musicians seeking quality amplification.
Important Safety Instructions
- Read these instructions thoroughly before operating the amplifier.
- Keep these instructions for future reference.
- Heed all warnings on the product and in the operating instructions.
- Follow all instructions.
- Do not use this apparatus near water.
- Clean only with a dry cloth.
- Do not block any ventilation openings. Install in accordance with the manufacturer's instructions.
- Do not install near any heat sources such as radiators, heat registers, stoves, or other apparatus (including amplifiers) that produce heat.
- Protect the power cord from being walked on or pinched, particularly at plugs, convenience receptacles, and the point where they exit from the apparatus.
- Only use attachments/accessories specified by the manufacturer.
- Unplug this apparatus during lightning storms or when unused for long periods of time.
- Refer all servicing to qualified service personnel. Servicing is required when the apparatus has been damaged in any way, such as power-supply cord or plug is damaged, liquid has been spilled or objects have fallen into the apparatus, the apparatus has been exposed to rain or moisture, does not operate normally, or has been dropped.
Setup
Unpacking and Inspection
Carefully remove the amplifier from its packaging. Inspect the unit for any signs of damage that may have occurred during shipping. If any damage is found, contact your dealer immediately.
Placement
Place the amplifier on a stable, level surface. Ensure adequate ventilation around the unit to prevent overheating. Avoid placing the amplifier in direct sunlight or near heat sources.
Connections
- Power Connection: Connect the supplied power cord to the amplifier's AC inlet and then to a grounded electrical outlet. Ensure the voltage matches the amplifier's requirements.
- Instrument Input: Plug your guitar cable into the "INPUT" jack on the front panel.
- Speaker Connection: If using an external speaker cabinet, connect it to the appropriate speaker output jack on the rear panel. Ensure the impedance of the speaker cabinet matches the amplifier's output impedance setting.
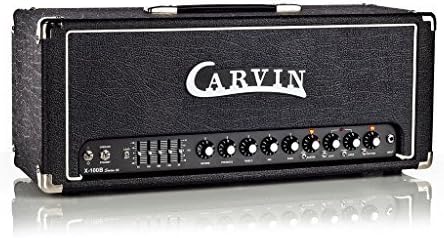
Figure 1: Front view of the Carvin X100B Guitar Combo Amplifier, showing the input, EQ sliders, and control knobs.
Operating Instructions
Turning On/Off
To turn on the amplifier, ensure all volume controls are set to minimum, then flip the power switch to the "ON" position. Allow a few moments for the tubes to warm up. To turn off, reverse the process, turning off the power switch before unplugging.
Front Panel Controls
- Input Jack: Connect your instrument here.
- Drive: Controls the amount of gain and distortion in the drive channel. Higher settings produce more saturated tones.
- 4 Band EQ (75Hz, 300Hz, 1.2kHz, 3kHz): Adjusts the frequency response of the amplifier. Each slider boosts or cuts specific frequency ranges, allowing for precise tone shaping.
- Reverb: Controls the amount of built-in spring reverb effect.
- Master Volume: Controls the overall output volume of the amplifier.
- Additional controls may include presence, channel switching, and effects loop send/return, depending on the specific model revision.
Tube Information
The X100B utilizes three AX7 tubes in its preamp section for tone shaping and gain, and four 6L6 tubes in the power section for output amplification. These tubes are crucial to the amplifier's characteristic sound. Refer to the maintenance section for tube care.
Maintenance
Cleaning
Clean the amplifier's exterior with a soft, dry cloth. Do not use abrasive cleaners or solvents, as they may damage the finish. Ensure the amplifier is unplugged before cleaning.
Tube Replacement
Vacuum tubes have a finite lifespan and will eventually need replacement. If you notice a decrease in performance, loss of volume, or unusual noise, it may be time to replace the tubes. Tube replacement should ideally be performed by a qualified technician. If replacing tubes yourself, ensure the amplifier is unplugged and completely cooled down. Handle tubes carefully, avoiding contact with the glass, and ensure they are inserted correctly into their sockets.
Storage
When not in use for extended periods, store the amplifier in a cool, dry place, away from direct sunlight and extreme temperatures. Covering the amplifier with a dust cover can help protect it from dust and debris.
Troubleshooting
| Problem | Possible Cause | Solution |
|---|---|---|
| No Sound |
|
|
| Distorted Sound |
|
|
| Hum or Buzz |
|
|
Specifications
- Model: X100B
- Brand: Carvin
- Output Wattage: 100 Watts
- Power Source: Corded Electric
- Compatible Devices: Guitar
- Preamp Tubes: 3 x AX7
- Power Tubes: 4 x 6L6
- Equalization: 4 Band EQ (75Hz, 300Hz, 1.2kHz, 3kHz)
- Effects: Reverb, Drive
- Item Weight: 29 Pounds (approx. 13.15 kg)
- Product Dimensions: 13 x 29 x 14 inches (approx. 33 x 73.7 x 35.6 cm)
Warranty and Support
For warranty information and technical support, please refer to the official Carvin website or contact your authorized Carvin dealer. Keep your purchase receipt as proof of purchase for warranty claims.
Note: Specifications are subject to change without notice.


