1. Introduction and Overview
The BLUEAIR Pro XL Air Purifier is designed to provide clean air in large office spaces, lobbies, and other extensive environments. Utilizing advanced HEPASilent Technology, it effectively removes airborne pollutants to improve air quality and promote a healthier environment.
Key Features:
- True HEPA Performance: HEPASilent Technology with particle filtration and electrostatic charge captures 99.97% of airborne pollutants, including allergens, mold, dust, pet dander, smoke particles, and pollen.
- German Engineered Fans: Provides quiet yet powerful operation for peak performance and maximum airflow.
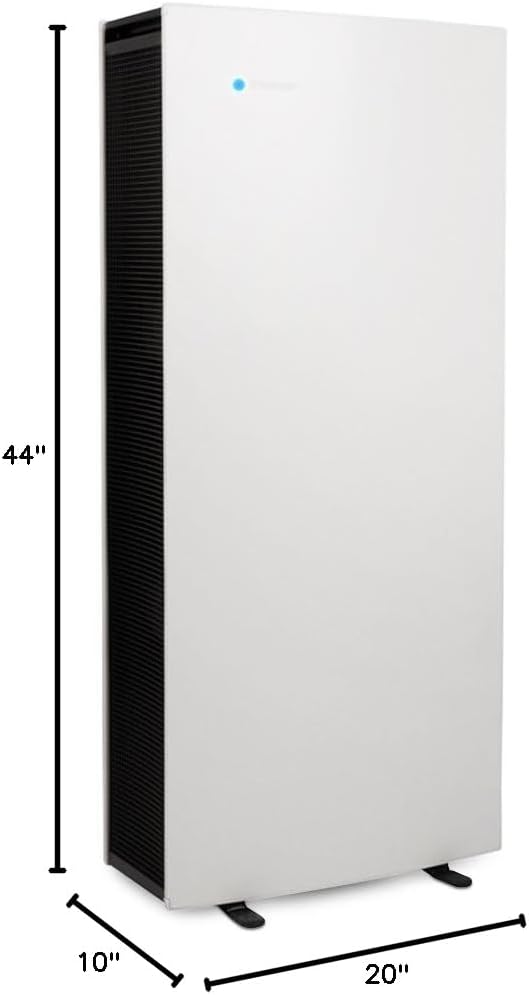
- Sleek Swedish Design: Professional and elegant design suitable for any office, workspace, business, or home environment.
- Revolutionary Filtration: Advanced filter media and an encapsulated particle-charging chamber deliver more clean air in less time.
- Large Coverage Area: Effectively purifies air in environments between 1000 and 1200 square feet, AHAM rated at 1184 square feet.
- Air Intelligence Module: Features an automatic mode that adjusts fan speed based on detected particle and gas levels.


Official Product Video:
Video 1: An overview of the Blueair Pro Series Purifiers, showcasing their design and functionality.
Understanding Air Purifiers:
Video 2: Informative video explaining key factors to consider when choosing an air purifier, including filter types and technologies.
2. Setup
Setting up your Blueair Pro XL Air Purifier is straightforward. Follow these steps to ensure proper installation and operation:
- Unboxing: Carefully remove the air purifier and all included components from the packaging.
- Filter Preparation: Before connecting the unit to power, open the filter compartment and remove any plastic packaging from the filters. Ensure filters are correctly seated.
- Placement: Position the air purifier in a suitable location. Ensure there is at least 6 inches of clear space around all sides (especially the back and sides where air is drawn in) to allow for optimal airflow. Avoid placing it directly next to windows or balconies that are frequently open, as this can reduce efficiency.
- Power Connection: Plug the power cord into a grounded electrical outlet.
- Initial Calibration: Upon first power-up, the unit may take up to 24 hours to fully calibrate its air quality sensors and display accurate readings. During this period, the PM2.5 display might show dashes or inconsistent numbers. Allow the unit to operate continuously for 24 hours for optimal calibration.
3. Operating Instructions
The Blueair Pro XL features an intuitive control panel and can also be managed via a mobile application.
Control Panel Functions:

- Power Button: Press to turn the unit On or Off.
- Night Mode: Activates a quieter operation mode, ideal for undisturbed environments.
- Auto Mode (A): The purifier automatically detects air quality and adjusts fan speed accordingly to maintain optimal air purification.
- Fan Speed Control: Manually adjust the fan speed to your preference.
- PM Display: Toggles between different particulate matter (PM) readings (e.g., PM2.5, PM10). A higher number indicates poorer air quality.
- Air Quality Indicator Light: A light bar on the front changes color based on real-time air quality:
- Green: Excellent air quality.
- Blue: Good air quality.
- Yellow: Moderate air quality.
- Red: Poor air quality.
Mobile App Control:
The Blueair Pro XL can be controlled remotely via a dedicated mobile application. This allows you to monitor air quality, adjust settings, and receive notifications even when you are not near the unit. The app provides convenience and enhanced control over your air purification system.
4. Maintenance
Regular maintenance ensures your Blueair Pro XL operates efficiently and effectively.
Filter Replacement:
- The Blueair Pro XL filters are designed for long-lasting performance. Typically, filters need to be replaced approximately once a year (every 8 to 12 months), depending on usage and air quality.
- The unit will indicate when filter replacement is due. Refer to the manual for specific instructions on how to replace the filters.
Cleaning:
- The exterior of the unit can be wiped clean with a soft, damp cloth.
- The mesh pre-filters (if applicable) can be cleaned more frequently (e.g., monthly) by vacuuming or gently wiping them to remove larger dust and pet dander particles.
5. Troubleshooting
If you encounter any issues with your Blueair Pro XL, refer to the following common troubleshooting tips:
- No PM Reading on Display: If the PM2.5 display shows dashes or an inaccurate reading after initial setup, allow up to 24 hours for the sensors to calibrate.
- Unit Not Turning On: Ensure the power cord is securely plugged into both the unit and a working electrical outlet. Check the power button on the control panel.
- Air Quality Indicator Always Red/Yellow: This indicates consistently poor air quality. Ensure the unit is placed optimally for airflow and that filters are not excessively dirty or due for replacement. If using in a very large or open space, consider closing doors/windows to improve efficiency.
- Unusual Noises: Check for any obstructions in the fan or filter compartments. Ensure filters are correctly installed. If the issue persists, contact customer support.
6. Specifications
| Feature | Specification |
|---|---|
| Brand | BLUEAIR |
| Model Number | Pro XL |
| Color | White |
| Product Dimensions | 10"D x 20"W x 44"H |
| Item Weight | 77 pounds |
| Floor Area Coverage | 1000 - 1200 Square Feet (AHAM rated at 1184 sq ft) |
| Noise Level | 31 Decibels |
| Controller Type | Button Control |
| Wattage | 256 watts |
| Filter Class | SmokeStop |
| Special Feature | Air Intelligence Module with Auto Mode |
| Included Components | Blueair Pro XL air purifier, 3 particle filters, product documentation |
| Power Source | AC/DC |
| UPC | 689122002200, 759005341952 |
7. Warranty and Support
For warranty information, product registration, or technical support, please refer to the official Blueair website or contact their customer service department. Keep your purchase receipt as proof of purchase for any warranty claims.


