
Introduction
The Garmin Striker 4 is a 3.5-inch GPS fishfinder equipped with CHIRP sonar and ClearVü scanning technology. This device is designed to assist users in locating fish, marking fishing spots, and navigating effectively on the water. Its user-friendly interface and robust features make it suitable for various fishing environments.
Key features include:
- ClearVü Scanning Sonar: Provides near-photographic images of structure and fish below the boat.
- CHIRP Sonar: Delivers crisp fish arches and improved target separation.
- GPS Functionality: Allows marking waypoints, creating routes, and viewing boat speed.
- Waypoint Map: Navigate to marked locations such as brush piles, stumps, and docks.
- Built-in Flasher: Presents sonar data in a classic flasher format, ideal for ice fishing or vertical jigging.
Package Contents
Verify that all items are present in the package:
- STRIKER 4 fishfinder unit
- Power/data cable
- Tilt/swivel mount
- Transducer
- Transom and trolling motor mounts
- Documentation
Setup and Installation
Proper installation is crucial for optimal performance. This section outlines general steps for setting up your Garmin Striker 4.
1. Mounting the Device
The Striker 4 unit can be mounted using the included tilt/swivel mount. Choose a location that provides clear visibility and easy access to the controls.
- Select a flat surface for mounting.
- Secure the tilt/swivel mount base using appropriate fasteners (not included).
- Attach the Striker 4 unit to the mount.

Figure 1: Front view of the Garmin Striker 4 fishfinder unit, showing the display, control buttons, and tilt/swivel mount base.
2. Transducer Installation
The transducer can be installed on the transom or a trolling motor using the provided mounts. Ensure the transducer is positioned correctly for an unobstructed view of the water.
- Choose the appropriate mount (transom or trolling motor).
- Follow the specific instructions provided in the transducer documentation for secure attachment.
- Route the transducer cable away from electrical interference and sharp objects.
3. Power Connection
Connect the power/data cable to a 12V DC power source. Ensure proper polarity (red to positive, black to negative).
- Connect the red wire from the power cable to the positive terminal of your 12V battery.
- Connect the black wire from the power cable to the negative terminal of your 12V battery.
- Plug the power/data cable into the back of the Striker 4 unit.
Operating Instructions
This section details the basic operation of your Striker 4 fishfinder.
Powering On/Off
Press and hold the Power button (usually marked with a circle and a vertical line) to turn the device on or off.
Menu Navigation
The Striker 4 features a keyed interface with dedicated buttons for easy navigation.
- Use the Arrow buttons to scroll through menus and adjust settings.
- Press the Checkmark button to select an option or confirm a setting.
- Press the Back button to return to the previous screen or menu.
- The Menu button (three horizontal lines) provides access to additional options for the current screen.
- The Waypoint button (pin icon) allows quick access to waypoint functions.
Sonar Display
The device offers various sonar views, including traditional CHIRP sonar, ClearVü scanning sonar, and a flasher view.
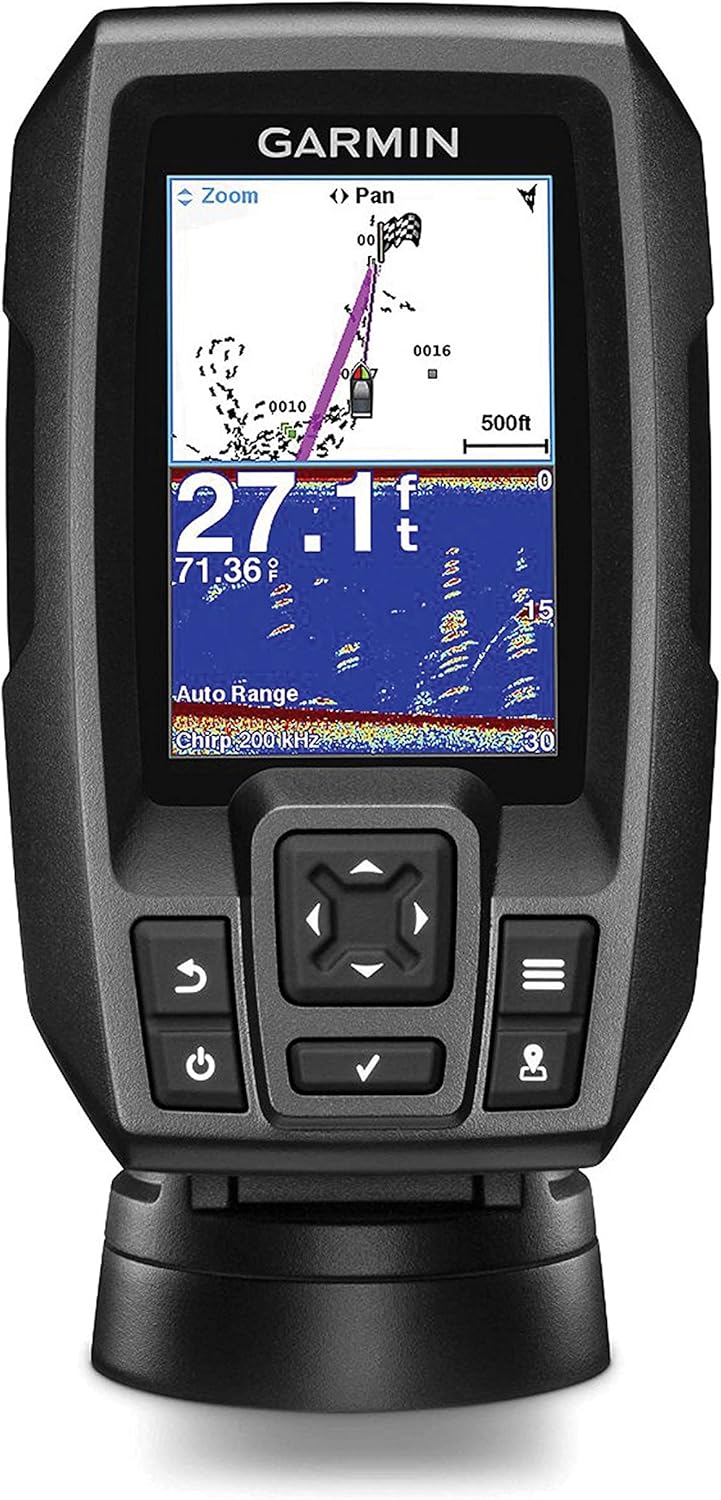
Figure 2: Garmin Striker 4 display showing a split screen with GPS map on top and traditional sonar on the bottom, indicating depth and fish targets.
- Traditional Sonar: Displays fish arches and bottom contours. Adjust gain and range for optimal viewing.
- ClearVü Sonar: Provides a detailed, photographic representation of structure and fish.
- Flasher View: Presents sonar data in a circular flasher format, commonly used for ice fishing or vertical jigging.
GPS and Waypoint Management
The built-in GPS allows you to mark and navigate to specific locations.
- Marking a Waypoint: Press the Waypoint button to mark your current location. You can then edit the waypoint name and symbol.
- Navigating to a Waypoint: Select a saved waypoint from the Waypoint Map and choose "Go To" to initiate navigation. The device will display a course line and distance to your destination.
- Viewing Speed: The GPS also provides accurate boat speed over ground.
Maintenance
Regular maintenance ensures the longevity and performance of your Garmin Striker 4.
- Cleaning the Display: Use a soft, clean, lint-free cloth to wipe the screen. For stubborn dirt, use a mild glass cleaner. Avoid abrasive cleaners or solvents.
- Transducer Care: Periodically inspect the transducer for marine growth or damage. Clean with a soft brush and mild soap if necessary. Ensure the transducer cable is free from kinks or cuts.
- Storage: When not in use for extended periods, store the device in a dry environment, away from extreme temperatures. Disconnect from power.
Troubleshooting
This section addresses common issues you might encounter with your Striker 4.
| Problem | Possible Solution |
|---|---|
| Device does not power on. |
|
| No sonar readings or inaccurate depth. |
|
| GPS not acquiring satellites. |
|
If issues persist, refer to the official Garmin support resources or contact customer service.
Specifications
| Feature | Detail |
|---|---|
| Brand | Garmin |
| Model Name | 010-01550-00 |
| Power Source | Battery Powered (12V DC) |
| Screen Size | 3.5 Inches |
| Display Type | LCD |
| Item Weight | 8 ounces |
| Product Dimensions | 3.6"L x 1.6"W x 5.9"H |
| Maximum Measuring Depth | 1600 Feet (Freshwater), 750 Feet (Saltwater) |
| Mounting Type | Transom & Trolling Motor Mounts |
| Display Resolution | 480 x 320 pixels |
| Human Interface Input | Buttons |
| Color | Black |
Warranty and Support
For information regarding product warranty, please refer to the warranty card included with your product or visit the official Garmin website. Garmin provides customer support and resources for product registration, software updates, and technical assistance.
For further assistance, visit: Garmin Support