
1. Introduction
This manual provides essential information for the safe and efficient use of your InFocus IF195a Touch Pad. Please read this manual thoroughly before operating the device and retain it for future reference.
2. Safety Information
- Do not expose the device to extreme temperatures, direct sunlight, or high humidity.
- Avoid dropping or subjecting the device to strong impacts.
- Use only the charger provided or approved by InFocus.
- Do not attempt to disassemble or repair the device yourself. Refer all servicing to qualified personnel.
- Keep the device away from water and other liquids.
- Dispose of the device and its battery responsibly according to local regulations.
3. Product Overview
The InFocus IF195a is a 20-inch Android-powered touch pad designed for interactive use. Familiarize yourself with its components.
3.1 Front View

Figure 1: Front view of the InFocus IF195a Touch Pad. This image shows the large 20-inch display with the Android operating system interface, including various app icons and the Google search bar. The device features a sleek bezel around the screen.
- Display: 20-inch multi-touch screen.
- Front Camera: Located at the top center bezel.
- Microphone: Integrated for voice input.
3.2 Side View and Ports
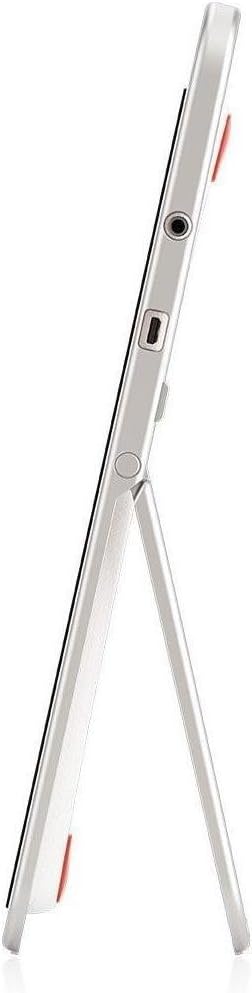
Figure 2: Side view of the InFocus IF195a Touch Pad. This image highlights the device's slim profile and the integrated kickstand, which allows for upright positioning. Visible ports include a headphone jack and a USB port.
- Power Button: Used to turn the device on/off or put it to sleep.
- Volume Buttons: Adjust the device's audio output.
- Headphone Jack (3.5mm): For connecting external audio devices.
- Micro-USB Port: For charging and data transfer.
- Integrated Kickstand: Allows the device to stand upright.
4. Setup
4.1 Unboxing and Initial Charge
- Carefully remove the InFocus IF195a Touch Pad and all accessories from the packaging.
- Connect the provided power adapter to the Micro-USB port on the device and plug it into a power outlet. Allow the device to charge fully before first use. The charging indicator will typically show a full battery when complete.
4.2 Powering On/Off
- To Power On: Press and hold the Power button until the InFocus logo appears on the screen.
- To Power Off: Press and hold the Power button until a power-off menu appears. Select "Power off" and confirm.
- To Sleep/Wake: Briefly press the Power button to put the device into sleep mode or wake it up.
4.3 Initial Setup Wizard
Upon first power-on, the device will guide you through an initial setup process:
- Language Selection: Choose your preferred language.
- Wi-Fi Connection: Select your Wi-Fi network from the list and enter the password. A stable internet connection is required for many features.
- Google Account: Sign in with an existing Google account or create a new one. This is necessary to download apps from the Google Play Store and access Google services.
- Date and Time: Set the correct date and time or allow the device to set it automatically via the network.
- Privacy Settings: Review and adjust privacy settings as desired.
5. Operating the Device
5.1 Touch Gestures
- Tap: Touch the screen once to select an item or open an application.
- Touch & Hold: Press and hold an item to access contextual menus or drag items.
- Swipe: Drag your finger across the screen to scroll through lists or switch between home screens.
- Pinch-to-Zoom: Use two fingers to zoom in or out on images, maps, or web pages.
5.2 Home Screen and Navigation
- Home Button: Returns you to the main home screen.
- Back Button: Returns to the previous screen or closes the current application.
- Recent Apps Button: Displays a list of recently used applications for quick switching.
- Notification Panel: Swipe down from the top of the screen to access notifications and quick settings.
5.3 Installing and Managing Applications
- Google Play Store: Open the "Play Store" app to browse and download applications. A Google account is required.
- Installing Apps: Select an app and tap "Install." Follow on-screen prompts for permissions.
- Uninstalling Apps: Go to Settings > Apps, select the desired app, and tap "Uninstall." Alternatively, touch and hold an app icon on the home screen and drag it to the "Uninstall" option (if available).
5.4 Connecting to External Devices
- Headphones: Plug 3.5mm headphones into the headphone jack.
- USB Devices: Connect compatible USB devices (e.g., flash drives, keyboards) to the Micro-USB port using an appropriate adapter if necessary. The device supports USB On-The-Go (OTG).
6. Maintenance
6.1 Cleaning the Device
- Use a soft, lint-free cloth to clean the screen and body of the device.
- For stubborn marks, slightly dampen the cloth with water or a screen cleaner specifically designed for electronics.
- Avoid using harsh chemicals, abrasive cleaners, or aerosol sprays.
6.2 Battery Care
- To prolong battery life, avoid fully discharging the battery frequently.
- Do not leave the device connected to the charger for extended periods after it is fully charged.
- Store the device in a cool, dry place if not used for a long time, with the battery charged to about 50%.
6.3 Software Updates
Periodically check for software updates to ensure optimal performance and security. Go to Settings > About tablet > System updates to check for and install available updates. Ensure your device is connected to Wi-Fi and has sufficient battery charge before starting an update.
7. Troubleshooting
| Problem | Possible Solution |
|---|---|
| Device will not power on. | Ensure the device is charged. Connect the charger and wait a few minutes before attempting to power on again. If unresponsive, perform a hard reset by holding the power button for 10-15 seconds. |
| Wi-Fi connection issues. | Check if Wi-Fi is enabled in settings. Restart your Wi-Fi router. Forget the network and reconnect. Ensure you are within range of the Wi-Fi signal. |
| Applications are crashing or freezing. | Close and restart the application. Clear the app's cache (Settings > Apps > [App Name] > Storage > Clear cache). If the problem persists, uninstall and reinstall the app. |
| Screen is unresponsive. | Restart the device. Ensure the screen is clean and free of debris. If the issue continues, contact support. |
| Slow performance. | Close unnecessary background applications. Clear cache for frequently used apps. Check available storage (Settings > Storage) and free up space if needed. Consider a factory reset as a last resort. |
7.1 Factory Reset
A factory reset will erase all data from your device and restore it to its original factory settings. Back up all important data before proceeding.
- Go to Settings > Backup & reset > Factory data reset.
- Read the warning message carefully.
- Tap "Reset tablet" and then "Erase everything" to confirm.
- The device will restart and begin the reset process.
8. Technical Specifications
| Feature | Specification |
|---|---|
| Model | IF195a |
| Brand | InFocus |
| Display Size | 20 Inches |
| Maximum Resolution | 1600 x 900 |
| Processor | ARM Cortex-A15 Quad-Core 1.8 GHz |
| RAM Capacity | 2 GB |
| Storage Capacity | 16 GB |
| Operating System | Android 4.4 KitKat |
| Rear Camera Resolution | 5 MP |
| Dimensions (L x W x H) | 61.6 x 47 x 8.6 cm |
| Weight | 3.7 kg |
| Color | Grey |
9. Warranty and Support
For warranty information, please refer to the warranty card included with your product or visit the official InFocus website. For technical support, product registration, or service inquiries, please contact InFocus customer service through their official channels.
Please note that warranty terms may vary by region and retailer. Keep your proof of purchase for warranty claims.