1. Introduction
This manual provides essential information for the safe and efficient operation, assembly, and maintenance of your Broil King Regal S 590 Pro Natural Gas Grill. Please read all instructions thoroughly before assembly and use to ensure proper function and safety.
Front view of the Broil King Regal S 590 Pro Natural Gas Grill with lid closed. This image displays the overall design and appearance of the grill.

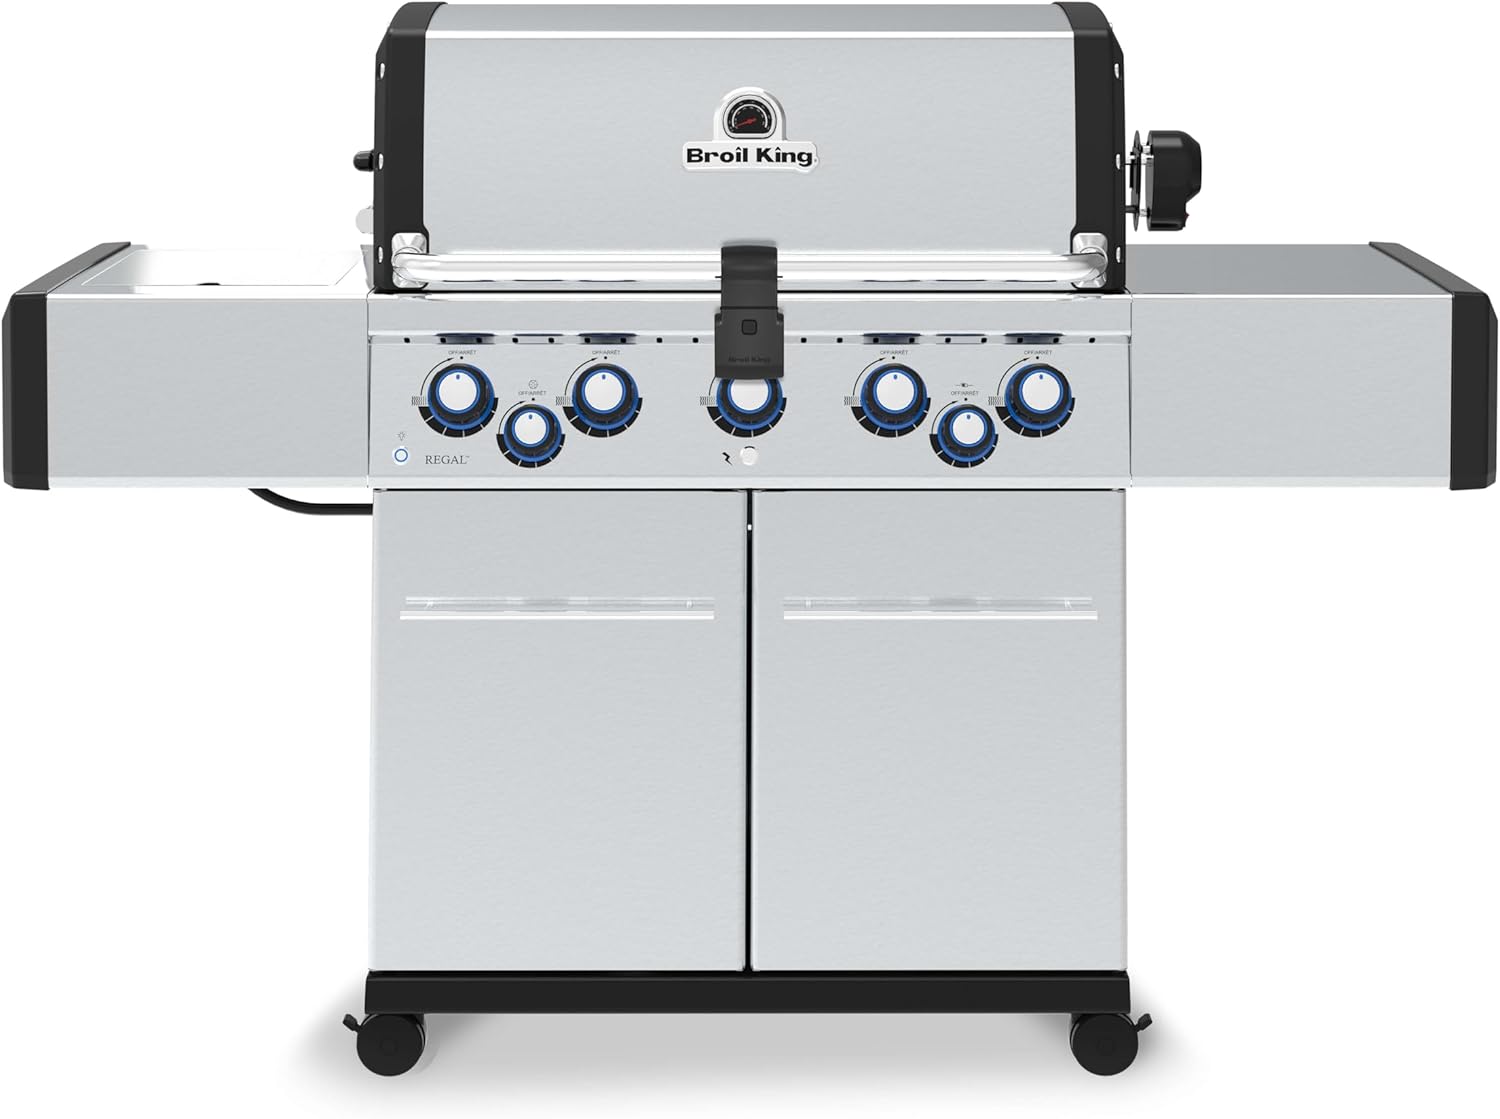
Frontal view of the Broil King Regal S 590 Pro Natural Gas Grill, highlighting the control panel and cabinet doors.

Angled view of the Broil King Regal S 590 Pro Natural Gas Grill, showcasing the side shelves and overall footprint.
2. Important Safety Information
WARNING: For outdoor use only. Do not store or use gasoline or other flammable vapors and liquids in the vicinity of this or any other appliance.
WARNING: This product can expose you to chemicals including carbon monoxide, which is known to the State of California to cause birth defects or other reproductive harm. For more information go to www.P65Warnings.ca.gov.
- Always ensure adequate ventilation when operating the grill.
- Keep children and pets away from the grill during operation.
- Do not attempt to move the grill while it is in use or hot.
- Ensure all gas connections are secure and leak-free before each use.
- Never leave a lit grill unattended.
3. Product Components
The Broil King Regal S 590 Pro is equipped with several key components designed for optimal grilling performance:
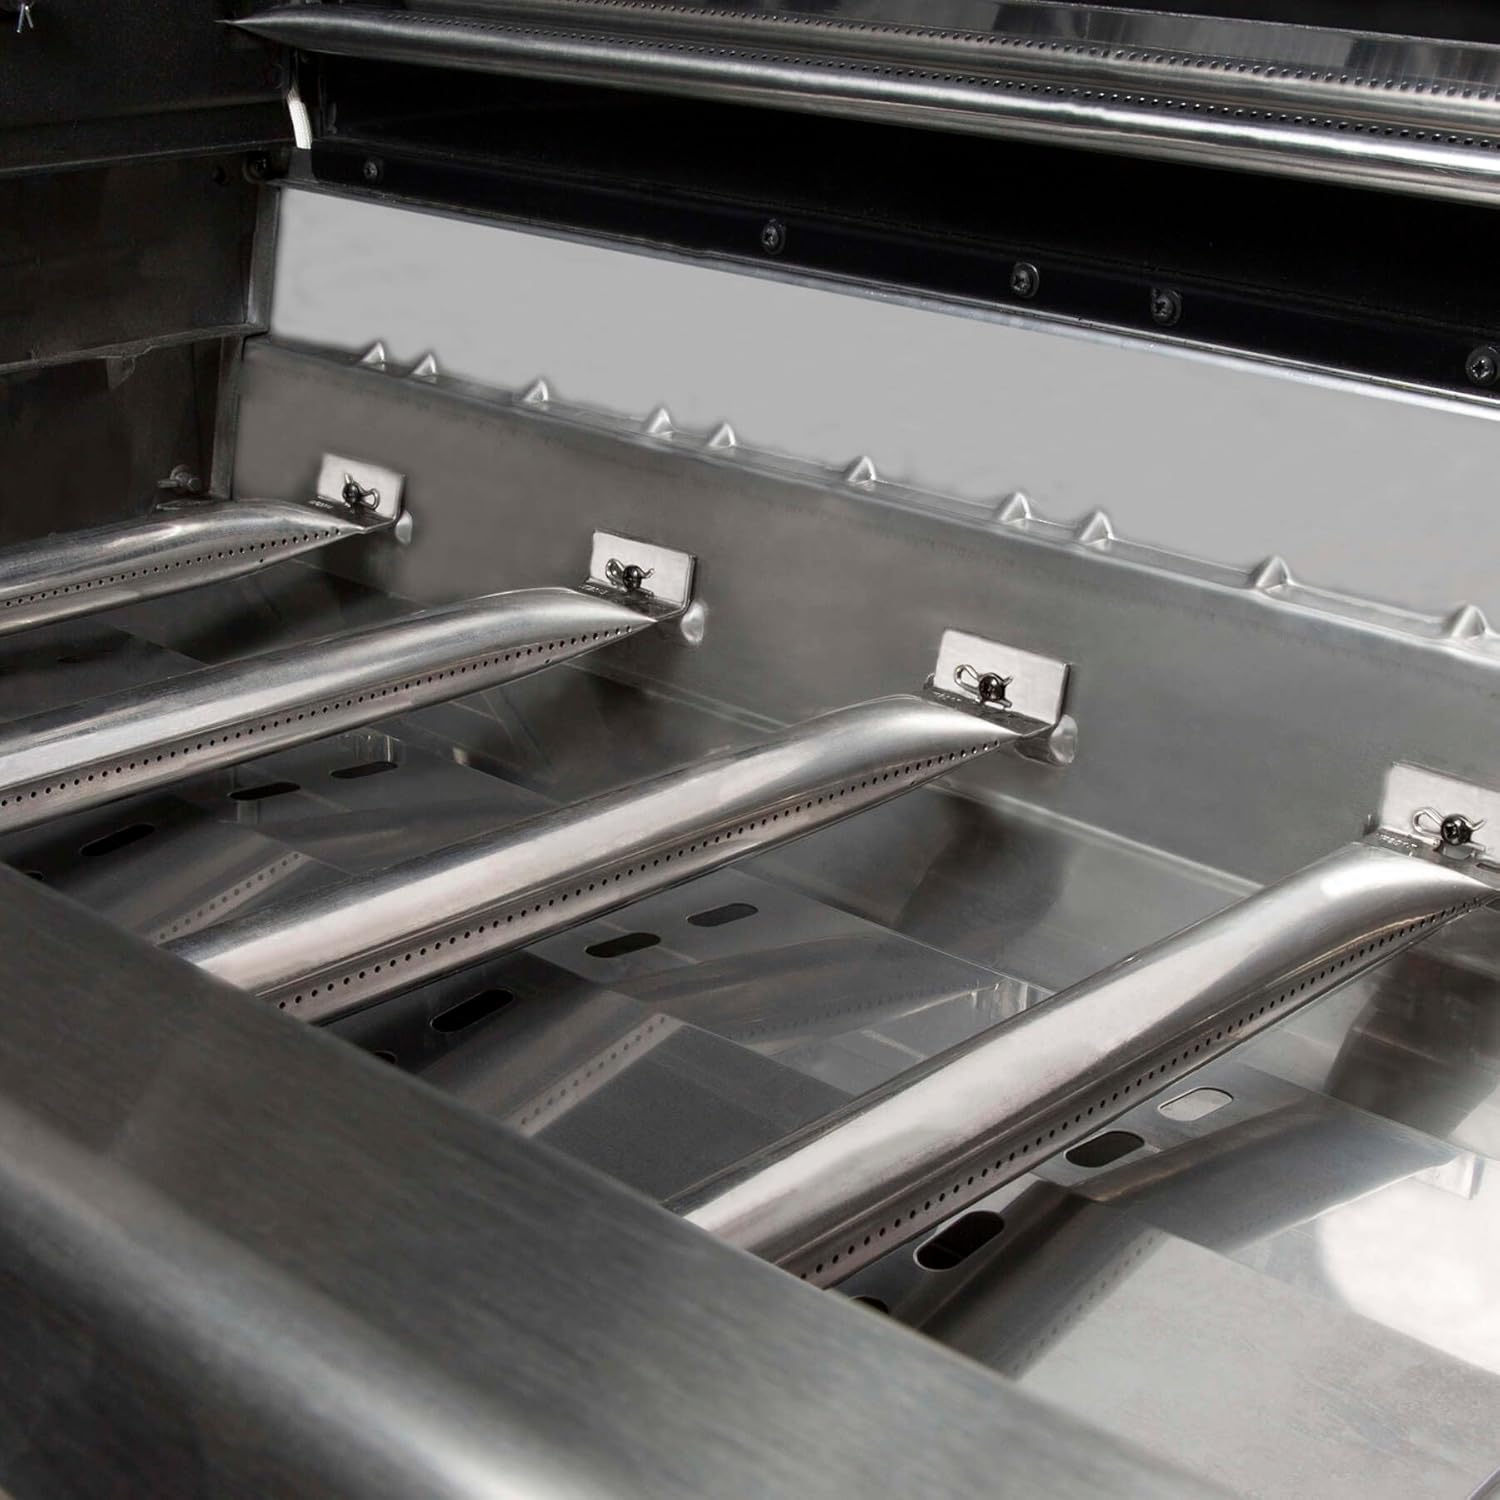
- Dual-Tube Burners: Five stainless steel Dual-Tube burners provide up to 55,000 BTUs, ensuring even heat distribution across the cooking surface.
- Flav-R-Wave Cooking System: Stainless steel Flav-R-Wave plates vaporize drippings, infusing food with barbecue flavor and reducing flare-ups.
- Reversible Stainless Steel V-Grids: Heavy-duty cooking grids offer a pointed side for searing and a V-channel side for basting.
- Side Burner: A 10,000 BTU side burner is ideal for preparing side dishes or searing.
- Rotisserie Burner & Kit: A 15,000 BTU rear burner with a premium rotisserie kit and auto-reversing motor for versatile cooking.
- Enclosed Cook Box: Stainless steel cook box with cast aluminum end caps for superior heat retention.
- LED-Lit Control Knobs: Blue LED-lit control knobs enhance visibility for nighttime grilling.
- Side Shelves: Stainless steel side shelves with integrated tool hooks provide convenient workspace.

Interior view of the grill, showing the five stainless steel Dual-Tube burners and the Flav-R-Wave heat distribution system.

Diagram illustrating the patented Dual-Tube burners, showing how two rows of flames provide even heat and exceptional searing power.

Diagram explaining the Stainless Steel Flav-R-Wave system, showing how it vaporizes drippings to infuse food with flavor and reduce flare-ups.

Diagram illustrating the reversible premium cooking grids, highlighting the pointed side for searing and the V-channel side for basting.

Diagram illustrating the enclosed cook box design, which prevents cold air entry for better heat retention and cooking results.
4. Setup and Assembly
Assembly of the Broil King Regal S 590 Pro grill typically takes approximately two hours with assistance. Due to the grill's weight, a two-person lift is recommended for certain steps.
4.1 Unpacking and Preparation
- Carefully remove all components from the packaging.
- Sort all screws and fasteners before beginning assembly. Some parts may not be numbered, requiring careful identification based on the instruction diagrams.
- Ensure all parts are present according to the packing list.
4.2 Assembly Steps
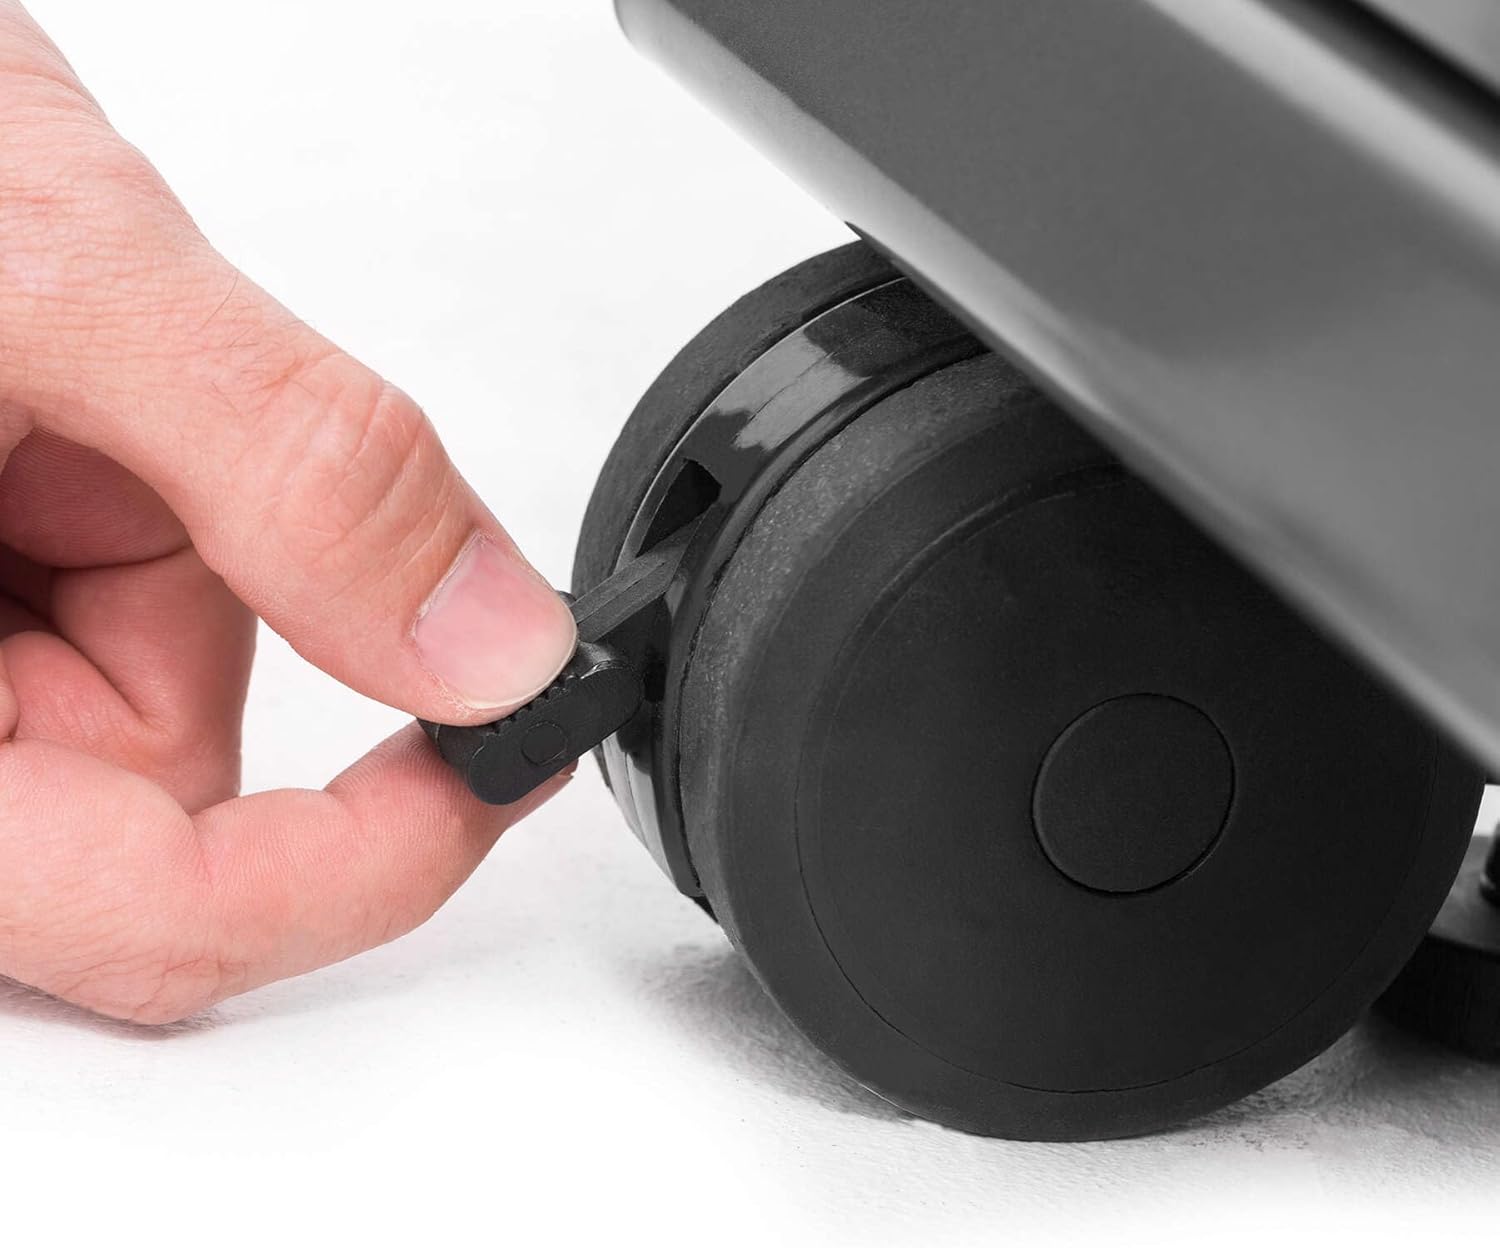
- Assemble the base cabinet and attach the caster wheels. Ensure the locking casters are engaged during assembly for stability.
- Mount the main cook box onto the assembled base.
- Install the side shelves, ensuring all connections are secure.
- Connect the natural gas hose to the grill and to your natural gas supply line. A 10ft natural gas hose is included. Ensure all gas connections are tightened and checked for leaks using a soapy water solution.
- Install the cooking grids, Flav-R-Wave plates, and burners.
- Attach any remaining accessories, such as the rotisserie motor and tool hooks.

A hand engaging the locking mechanism on one of the grill's caster wheels, demonstrating how to secure the grill in place.
Close-up of the stainless steel cabinet doors and handles on the grill base, providing access to storage or the gas connection.

Side shelf of the grill with grilling tools hanging from hooks and a cutting board on top, illustrating the integrated workspace.
5. Operating Instructions
5.1 Pre-Use Checks
Before each use, ensure:
- The grill is clean and free of debris.
- All gas connections are secure.
- There are no obstructions to the gas flow or burner ports.
5.2 Lighting the Main Burners
- Open the grill lid.
- Turn on the natural gas supply.
- Push and turn one main burner control knob to the HIGH position.
- Press the electronic ignition button. You should hear a clicking sound and see the burner ignite.
- Once the first burner is lit, you can light additional burners by turning their control knobs to HIGH.
- Close the lid and preheat the grill to the desired temperature.
Close-up of a finger pressing the ignition button on the grill control panel to initiate burner ignition.
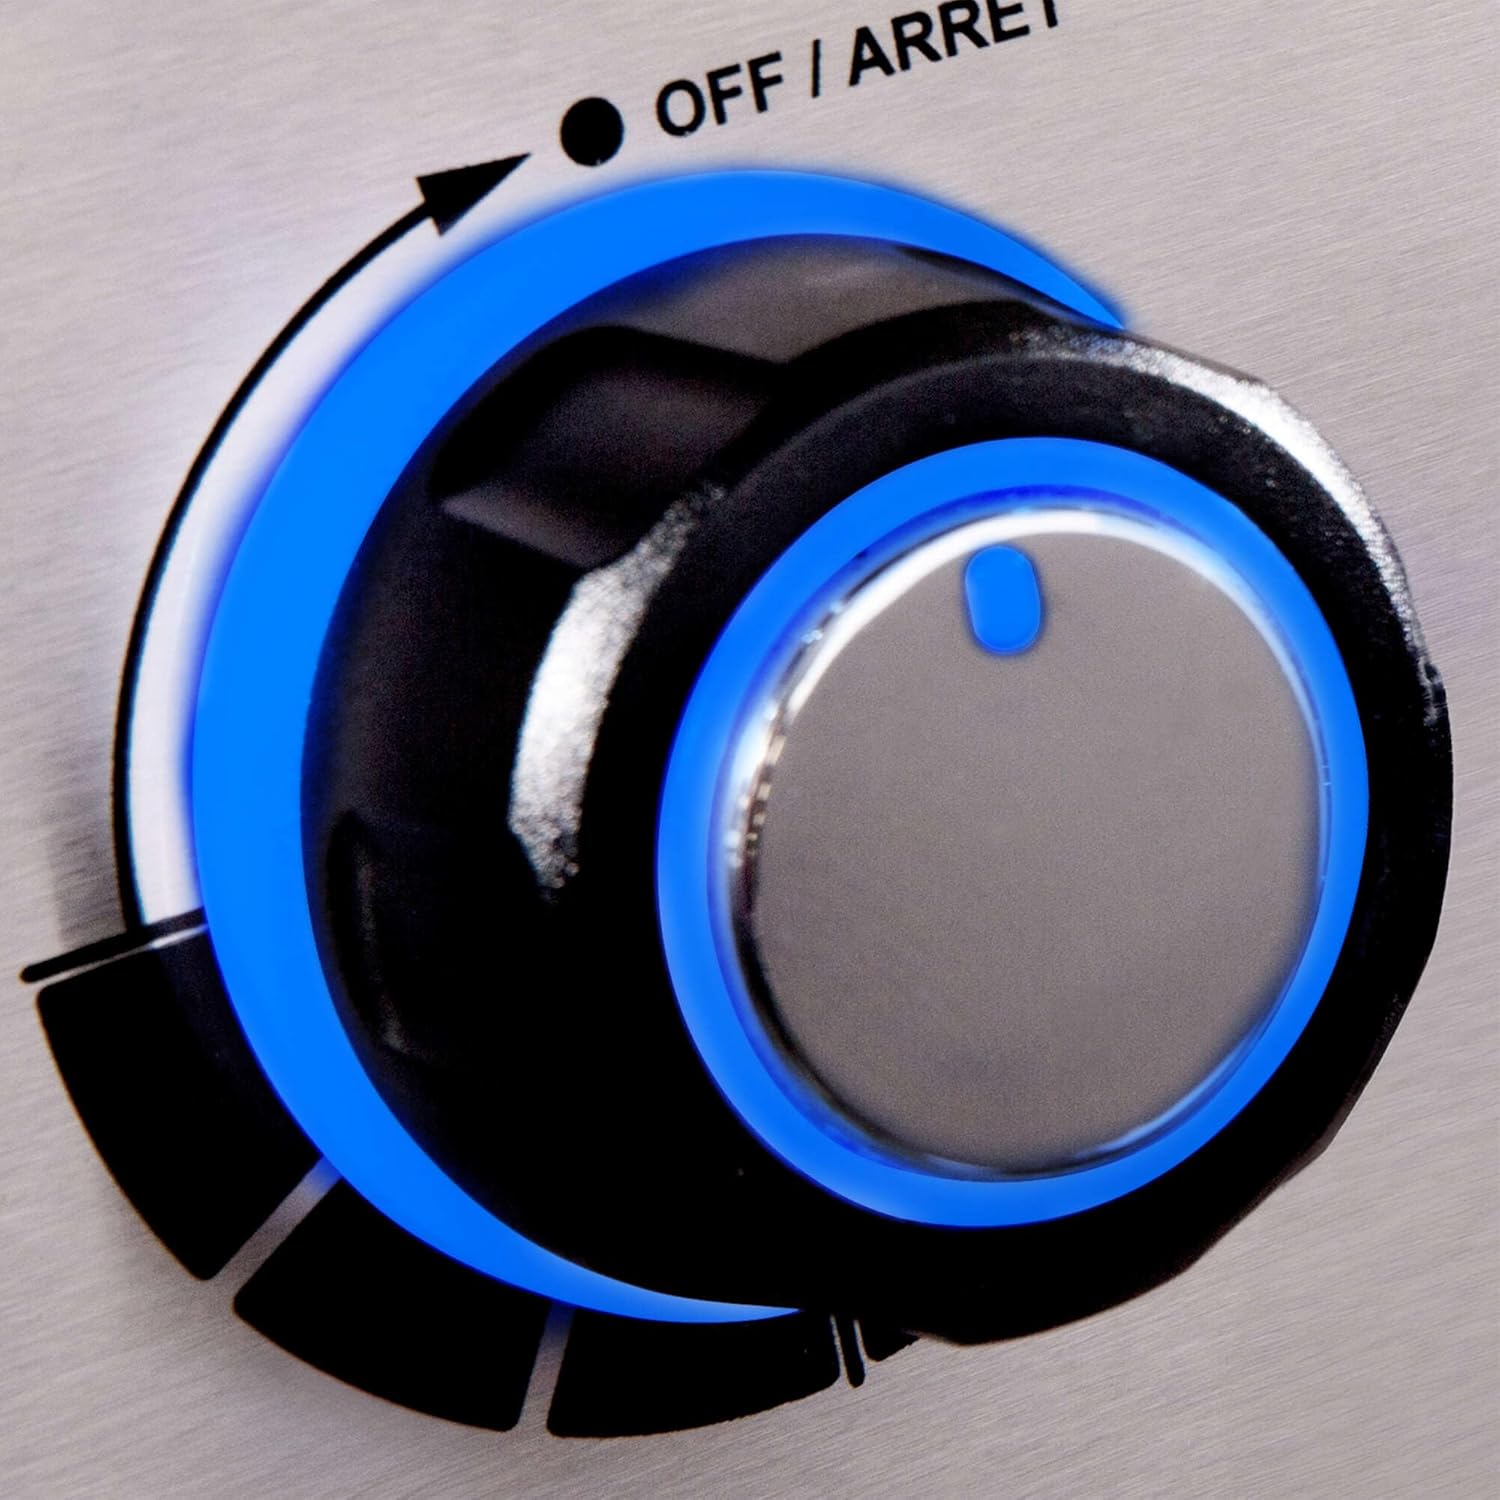
Close-up of an illuminated blue LED control knob on the grill, indicating the burner is active and providing visibility in low light.
5.3 Using the Side Burner
- Open the side burner lid.
- Push and turn the side burner control knob to the HIGH position.
- Press the electronic ignition button until the burner lights.
- Adjust the flame as needed.

Close-up of the side burner with blue flames visible, indicating it is operational for cooking side dishes or searing.
5.4 Using the Rotisserie Burner
The 15,000 BTU rear rotisserie burner is designed for indirect cooking. Do not use the main burners simultaneously with the rotisserie burner to avoid grease fires from drippings.
- Prepare your food on the rotisserie spit.
- Ensure main burners are off.
- Push and turn the rotisserie burner control knob to the HIGH position.
- Press the electronic ignition button until the burner lights.
- Place the rotisserie spit with food onto the grill and engage the auto-reversing motor.
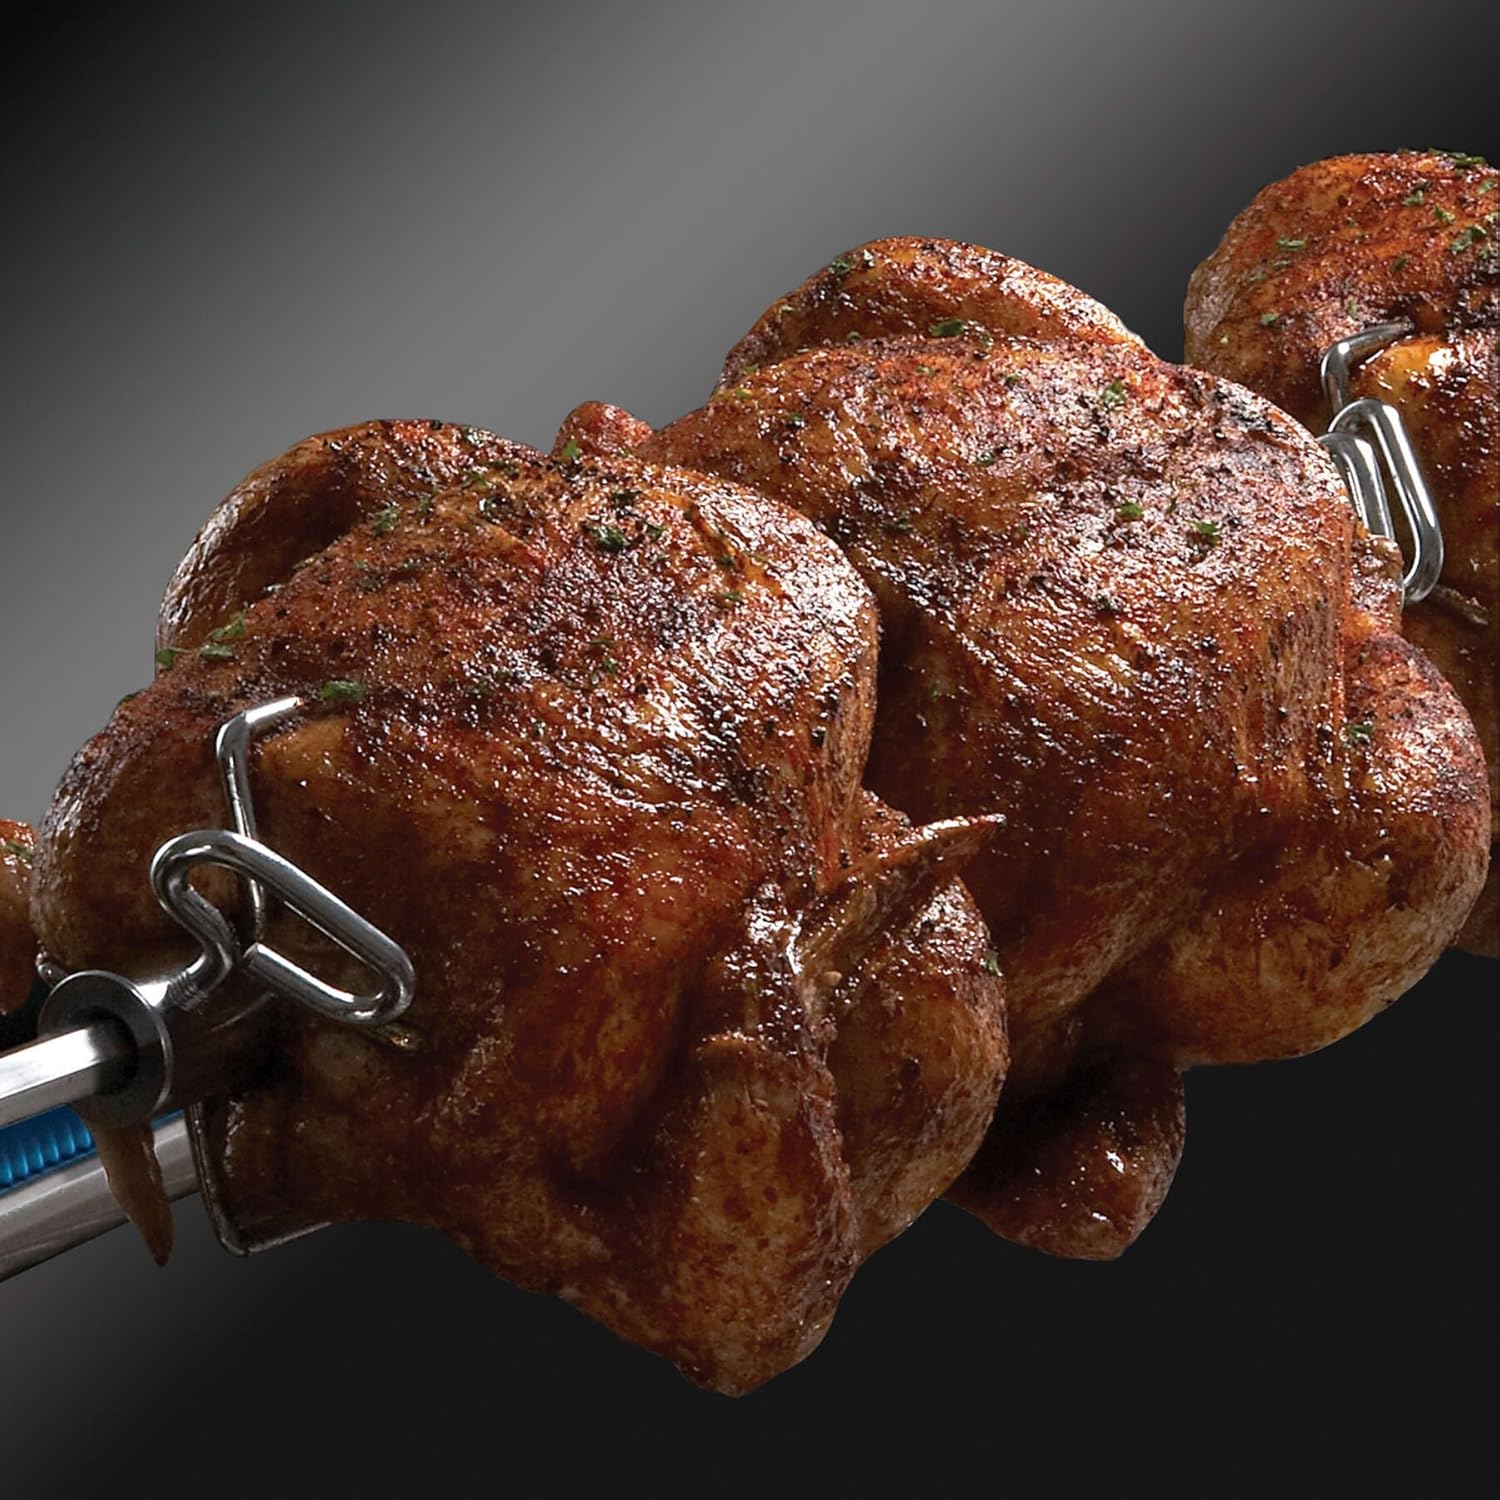
Rotisserie chickens cooking on the grill's rotisserie spit, demonstrating the grill's rotisserie capability.
5.5 Temperature Control and Warming Rack
Adjust burner knobs to achieve desired cooking temperatures. The grill's design allows for precise temperature management. The 250 sq. in. stainless steel warming rack is ideal for keeping cooked food warm or for indirect cooking.

Grilled sausages and pineapple slices on the upper warming rack of the grill, illustrating its use for keeping food warm.

Grilled steak with prominent sear marks on the main cooking grates, showcasing the grill's searing capability.
6. Care and Maintenance
Regular cleaning and maintenance will extend the life and performance of your grill.
- Cooking Grids: Clean cooking grids after each use with a grill brush. For stubborn residue, remove and wash with warm soapy water.
- Flav-R-Wave System: Periodically remove and clean the Flav-R-Wave plates to prevent grease buildup.
- Burners: Inspect burner ports for blockages (e.g., spider webs) and clean as necessary to ensure even flame.
- Grease Management: Regularly empty and clean the grease tray and catch pan to prevent grease fires.
- Exterior: Wipe down stainless steel surfaces with a mild cleaner and soft cloth to maintain appearance.
- Cover: Use a grill cover when not in use to protect against weather elements.
7. Troubleshooting
This section addresses common issues you might encounter with your grill.
- Burner Not Lighting: Check gas supply, ensure ignition button is pressed correctly, and verify burner ports are clear. If issues persist, consult a qualified technician.
- Uneven Heat: Ensure Flav-R-Wave plates are correctly positioned and burners are clean. The Dual-Tube burner design is intended to provide even heat.
- Excessive Flare-ups: This can be caused by excessive grease buildup. Clean the Flav-R-Wave system and grease tray. Trim excess fat from meats before grilling.
- Critter Problems: If small animals or insects are entering the grill, consider screening any unrelated holes in the unit to prevent nesting or damage to components.
8. Specifications
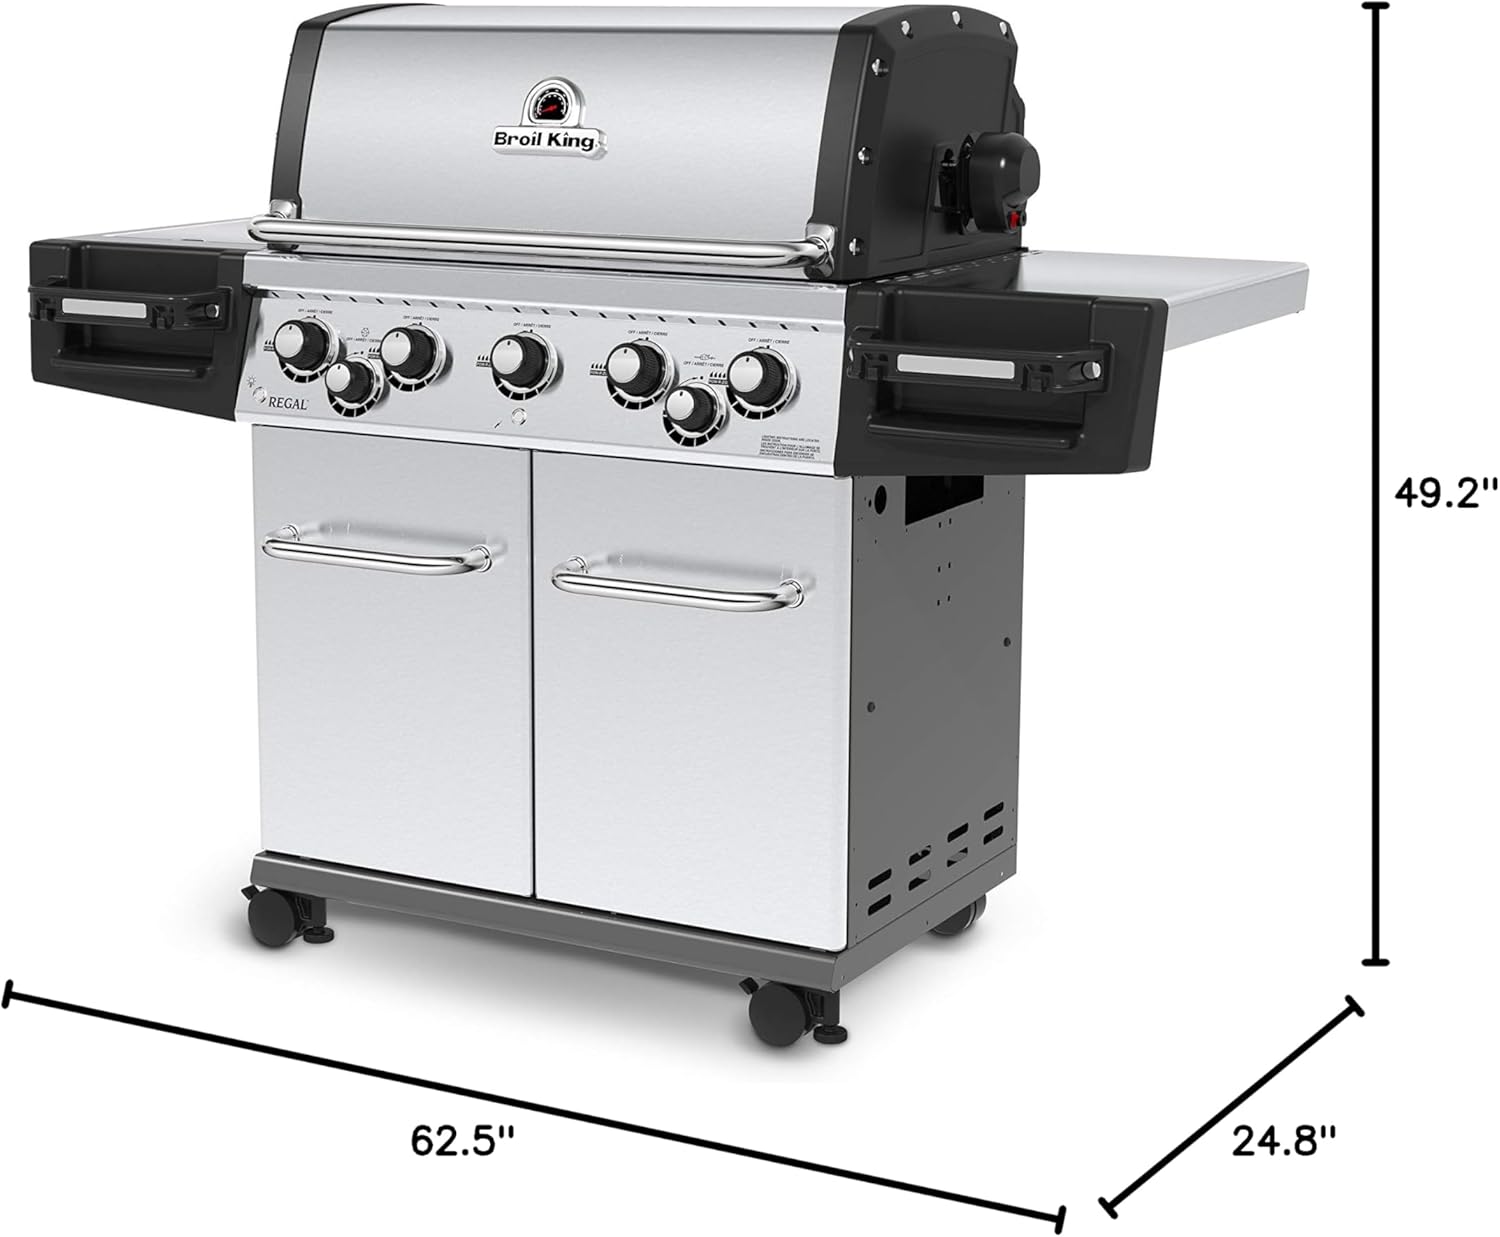
Diagram displaying the dimensions of the Broil King Regal S 590 Pro grill: 62.5 inches wide, 24.8 inches deep, and 49.2 inches high.
| Feature | Detail |
|---|---|
| Model Name | Regal S 590 Pro |
| Model Number | 958347 |
| Fuel Type | Natural Gas |
| Main Burners | 5 Dual-Tube Burners |
| Main Burner BTU | 55,000 BTU total |
| Side Burner BTU | 10,000 BTU |
| Rear Rotisserie Burner BTU | 15,000 BTU |
| Primary Cooking Area | 625 sq. in. |
| Warming Rack Area | 250 sq. in. |
| Total Cooking Area | 875 sq. in. |
| Dimensions (D x W x H) | 25" x 62.5" x 49" |
| Item Weight | 214 lbs |
| Material | Stainless Steel, Aluminum |
9. Warranty Information
The Broil King Regal S 590 Pro Natural Gas Grill comes with the following warranty:
- Cook Box: Limited Lifetime Warranty
- Remaining Parts and Paint: 15-Year Warranty
Please retain your proof of purchase for warranty claims. For full warranty terms and conditions, refer to the documentation included with your grill or visit the official Broil King website.
10. Customer Support
For technical assistance, replacement parts, or any questions regarding your Broil King Regal S 590 Pro Natural Gas Grill, please contact Broil King customer support. Contact information can typically be found on the manufacturer's website or in the packaging materials.


