1. Introduction and Overview
The ASUS H110M-K D3 is a Micro ATX motherboard designed to support 6th Generation Intel Processors. It features compatibility with DDR3/DDR3L memory and incorporates ASUS's 5X Protection II for enhanced hardware safeguards. This motherboard is suitable for various applications, from new system builds to corporate deployments, offering a balance of performance and cost-effectiveness.
Key features include:
- DDR3/DDR3L memory compatibility
- 5X Protection II for all-round hardware protection
- User-friendly UEFI BIOS with EZ Flash 3
- Fan Expert for precise fan control and optimized cooling
- Integrated DVI & VGA ports for multi-monitor setups
2. Setup and Installation
Before beginning installation, ensure your system is powered off and disconnected from the power source. Handle the motherboard by its edges to avoid static discharge.
2.1. Motherboard Layout
Familiarize yourself with the various components and connectors on the motherboard. Refer to the image below for a visual representation of the ASUS H110M-K D3 motherboard.
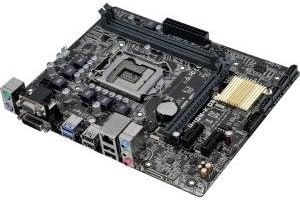
Image: Top-down view of the ASUS H110M-K D3 Micro ATX Motherboard, showing the LGA 1151 CPU socket, DDR3/DDR3L DIMM slots, PCIe slots, SATA ports, and various I/O connectors.
2.2. CPU Installation (LGA 1151)
- Locate the LGA 1151 socket on the motherboard.
- Gently push down the load lever and pull it out to the side to open the CPU socket.
- Align the triangular mark on the CPU with the mark on the socket. Carefully place the CPU into the socket, ensuring it sits flush. Do not force it.
- Close the load plate and push the load lever back into place until it clicks.
2.3. Memory (RAM) Installation
The H110M-K D3 supports DDR3/DDR3L memory. Ensure you use compatible memory modules.
- Open the clips at both ends of the DIMM slot.
- Align the notch on the memory module with the key in the DIMM slot.
- Insert the memory module firmly into the slot until the clips snap into place.
2.4. Storage Device Installation
Connect your SATA storage devices (HDDs, SSDs) to the SATA 6Gb/s ports on the motherboard using SATA data cables.
2.5. Power Connections
Connect the 24-pin ATX power connector and the 4-pin ATX 12V power connector from your power supply unit (PSU) to the corresponding ports on the motherboard.
2.6. Expansion Cards
Install any necessary PCIe expansion cards (e.g., graphics card, network card) into the available PCIe slots.
3. Operating the Motherboard
3.1. BIOS/UEFI Setup
The ASUS H110M-K D3 features a UEFI BIOS. To enter the BIOS setup utility, press the Delete key or F2 key during the Power-On Self-Test (POST) process.
- EZ Mode: Provides a simplified interface for common settings like boot priority, system information, and fan profiles.
- Advanced Mode: Offers comprehensive control over system settings, including overclocking, advanced power management, and peripheral configurations.
3.2. Fan Expert
Utilize the Fan Expert utility within the ASUS AI Suite 3 software or directly in the UEFI BIOS to control system fans. This allows for optimized cooling performance and reduced noise levels based on system temperature.
3.3. Dual Monitor Setup
The motherboard includes integrated DVI and VGA ports. You can connect two monitors simultaneously to these ports for an extended desktop environment. Ensure your operating system display settings are configured correctly.
4. Maintenance
Proper maintenance ensures the longevity and stable operation of your motherboard.
- Dust Removal: Regularly clean dust from the motherboard and system components using compressed air. Ensure the system is powered off and unplugged before cleaning.
- Cable Management: Ensure all cables are neatly routed and secured to promote better airflow and prevent accidental disconnections.
- BIOS Updates: Periodically check the ASUS support website for BIOS updates. Updates can improve stability, compatibility, and performance. Follow the instructions provided by ASUS carefully when updating the BIOS.
- Environmental Conditions: Operate the motherboard in a well-ventilated area with stable temperature and humidity to prevent overheating and component degradation.
5. Troubleshooting
If you encounter issues with your ASUS H110M-K D3 motherboard, consider the following troubleshooting steps:
- No Power/No Boot:
- Verify all power cables (24-pin ATX, 4-pin ATX 12V) are securely connected to the motherboard and PSU.
- Ensure the PSU is switched on and functioning correctly.
- Check front panel connections (power button, reset button) are correctly connected to the motherboard headers.
- No Display:
- Ensure the monitor is connected to the correct video output (DVI or VGA) on the motherboard.
- Verify the monitor is powered on and set to the correct input source.
- If using a discrete graphics card, ensure the monitor is connected to the graphics card's output and the card is properly seated and powered.
- Try reseating the RAM modules.
- System Instability/Crashes:
- Check for proper CPU and case fan operation to prevent overheating.
- Ensure RAM modules are correctly seated and compatible.
- Run memory diagnostic tools to check for RAM errors.
- Update BIOS to the latest version.
- Peripheral Not Detected:
- Ensure the peripheral is correctly connected to the appropriate port (USB, SATA, PCIe).
- Check device manager in your operating system for driver issues.
- Try connecting the peripheral to a different port.
If problems persist, consult the ASUS support website or contact their customer service.
6. Specifications
Below are the detailed specifications for the ASUS H110M-K D3 Motherboard:
| Feature | Specification |
|---|---|
| Brand | ASUS |
| Model Name | H110M-K |
| Item Model Number | H110M-K D3 |
| CPU Socket | LGA 1151 |
| Compatible Processors | 6th Gen Intel Core i3/i5/i7, Pentium, Celeron (LGA1151) |
| Chipset Type | Intel H110 |
| RAM Memory Technology | DDR3/DDR3L |
| Memory Speed | 1600 MHz (up to 1800 MHz O.C.) |
| Memory Storage Capacity | Max 16 GB (2 x DIMM) |
| Product Dimensions (LxWxH) | 9.8 x 2 x 9 inches (Micro ATX Form Factor) |
| Item Weight | 1.15 pounds |
| Integrated Graphics | Integrated Graphics Processor (DVI-D, VGA ports) |
| Expansion Slots | 1 x PCIe 3.0/2.0 x16, 2 x PCIe 2.0 x1 |
| Storage | 4 x SATA 6Gb/s ports |
| USB Ports | USB 3.0/2.0, USB 2.0/1.1 |
| Audio | Realtek ALC887 8-Channel High Definition Audio CODEC |
| LAN | Realtek RTL8111H Gigabit LAN Controller |
7. What's in the Box
The retail package for the ASUS H110M-K D3 Motherboard typically includes:
- ASUS H110M-K D3 Motherboard
- I/O Shield
- SATA 6Gb/s cables
- Support DVD
- User Manual (this document serves as a digital version)
8. Warranty and Support
For warranty information and technical support, please refer to the official ASUS website or the warranty card included with your product. ASUS provides comprehensive support resources, including drivers, FAQs, and contact information for customer service.
You can typically find support at: www.asus.com/support/
Please have your product model number (H110M-K D3) and serial number ready when contacting support.


