1. Introduction
This manual provides detailed instructions for the safe and efficient operation of your Mr. Coffee Cafe Barista Espresso and Cappuccino Maker, Model BVMC-ECMP1102. This semi-automatic 3-in-1 machine is designed to brew espresso and automatically froth milk for cappuccino and latte selections. Please read all instructions carefully before first use and retain for future reference.
2. Product Components
Familiarize yourself with the various parts of your Mr. Coffee Cafe Barista machine:
- Main Unit: The primary body of the espresso machine.
- Control Panel: Features one-touch buttons for Espresso, Cappuccino, Latte, Froth, and Clean functions.
- Portafilter: Holds the ground coffee for brewing.
- Single Shot Filter Basket: For brewing a single shot of espresso.
- Double Shot Filter Basket: For brewing a double shot of espresso.
- Coffee Scoop/Tamper: Used to measure and tamp ground coffee.
- Removable Water Reservoir: Located at the back, holds water for brewing.
- Removable Milk Reservoir: Holds milk for frothing, with adjustable froth control.
- Drip Tray: Collects excess liquid and is removable for cleaning.
- Adjustable Cup Tray: Can be removed to accommodate taller cups.

Figure 2.1: Overview of the Mr. Coffee Cafe Barista Espresso and Cappuccino Maker with all included components.
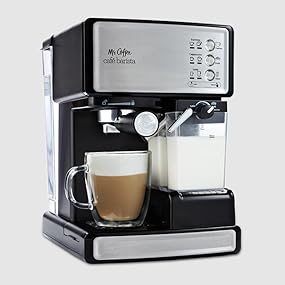
Figure 2.2: Front view of the machine with the milk reservoir in place.

Figure 2.3: Close-up of the portafilter, coffee beans, and filter basket.
3. Setup
- Unpack: Carefully remove all components from the packaging.
- Clean: Wash the water reservoir, milk reservoir, portafilter, and filter baskets with warm, soapy water. Rinse thoroughly and dry.
- Position: Place the machine on a flat, stable, heat-resistant surface near an electrical outlet.
- Fill Water Reservoir: Remove the water reservoir from the back of the machine. Fill it with fresh, cold water up to the MAX line. Replace the reservoir securely.
- Fill Milk Reservoir (Optional for initial setup): If preparing milk-based drinks, fill the milk reservoir with cold milk up to the MAX line. Ensure the frothing tube is properly inserted.
- Power On: Plug the power cord into a grounded electrical outlet. Press the power button (usually located on the side or back) to turn on the machine. The indicator lights on the control panel will illuminate.
- Prime the Machine: Before first use, or if the machine has not been used for a long time, prime it by running a cycle without coffee. Fill the water reservoir, place a large cup under the portafilter, and press the Espresso button. Let water run through until the reservoir is nearly empty. This cleans the internal system.
4. Operating Instructions
4.1 Preparing Espresso
- Select Filter: Choose either the single or double shot filter basket and place it into the portafilter.
- Add Coffee: Use the provided scoop to add ground espresso coffee to the filter basket. For a single shot, use one scoop; for a double shot, use two scoops.
- Tamp Coffee: Use the tamper end of the scoop to gently press the coffee grounds evenly.
- Attach Portafilter: Insert the portafilter into the brew head and turn it firmly to the right until it locks into place.
- Place Cup: Position your espresso cup(s) on the drip tray directly under the portafilter spouts. If using a taller cup, remove the adjustable cup tray.
- Brew: Press the 'Espresso' button for either a single or double shot. The machine will automatically brew and stop.

Figure 4.1: Control panel with one-touch buttons for various coffee selections.
4.2 Preparing Cappuccino or Latte
- Fill Milk Reservoir: Ensure the milk reservoir is filled with cold milk (dairy or non-dairy) up to the MAX line. Attach it to the machine.
- Adjust Froth Control: Turn the froth control knob on the milk reservoir to your desired level of froth (e.g., more froth for cappuccino, less for latte).
- Prepare Espresso: Follow steps 4.1.1 to 4.1.5 to prepare your espresso shot(s).
- Brew Milk-Based Drink: Press either the 'Cappuccino' or 'Latte' button for a single or double serving. The machine will first brew the espresso, then automatically froth and dispense the milk into your cup.
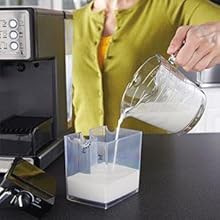
Figure 4.2: Filling the removable milk reservoir.
4.3 Frothing Milk Only
To froth milk without brewing espresso, hold down the 'Froth' button on the control panel for 5 seconds. The machine will begin frothing milk from the reservoir. Press the button again to stop.
4.4 Customizing Drink Volume
The machine allows for manual control over espresso and milk volume. To use manual mode, press the 'Manual' button. Press again to start brewing/frothing and press a third time to stop at your desired volume.
5. Maintenance
5.1 Daily Cleaning
- Milk System: After each milk-based drink, turn the froth control knob to the 'Clean' position. This will purge the milk frothing system with hot water/steam.
- Milk Reservoir: Remove the milk reservoir, empty any remaining milk, and wash with warm, soapy water. It can also be stored in the refrigerator with milk.
- Portafilter & Filter Basket: Remove the portafilter, discard used coffee grounds, and rinse the portafilter and filter basket with warm water.
- Drip Tray: Empty and clean the drip tray regularly to prevent overflow and bacterial growth.
- Exterior: Wipe the exterior of the machine with a soft, damp cloth.
5.2 Descaling
Over time, mineral deposits can build up in the machine, affecting performance. Descale your machine every 2-3 months, or more frequently if you have hard water.
- Prepare Descaling Solution: Mix a descaling solution according to the manufacturer's instructions (or use a vinegar-water solution: 1 part white vinegar to 2 parts water).
- Fill Water Reservoir: Pour the descaling solution into the empty water reservoir.
- Run Descaling Cycle: Place a large container under the brew head and frothing wand. Press and hold the 'Clean' button on the control panel for 5 seconds to start the descaling cycle. The machine will run the solution through its system.
- Rinse: After the descaling cycle, rinse the water reservoir and fill it with fresh water. Run 2-3 cycles with fresh water to thoroughly rinse out any remaining descaling solution.
6. Troubleshooting
- No Coffee Dispensed:
- Check if the water reservoir is filled.
- Ensure the portafilter is correctly inserted and locked.
- Clean the filter basket for any clogs.
- No Milk Froth/Poor Froth:
- Ensure the milk reservoir is filled with cold milk.
- Check if the froth control knob is set correctly.
- Run the 'Clean' cycle for the milk system to clear any blockages.
- Leaking from Portafilter:
- Ensure the portafilter is securely locked into the brew head.
- Check if the coffee grounds are tamped evenly.
- Clean the rim of the filter basket and brew head for any residual coffee grounds.
- Machine Not Turning On:
- Verify the power cord is securely plugged into a working outlet.
- Check the power button on the machine.
7. Specifications
| Brand | Mr. Coffee |
| Model Name | Cafe Barista Espresso and |
| Item Model Number | BVMC-ECMP1102 |
| Color | White |
| Product Dimensions | 8.86"D x 11.22"W x 12.6"H |
| Item Weight | 11 pounds |
| Capacity | 1 Liters |
| Coffee Maker Type | Espresso Machine |
| Operation Mode | Semi-Automatic |
| Special Feature | Milk Frother |
| Coffee Input Type | Ground |
| Power Source | AC adapter |
| Human Interface Input | Touchscreen |
| UPC | 072179234012 |
8. Warranty and Support
For warranty information, technical support, or service inquiries, please refer to the official Mr. Coffee website or contact their customer service directly. Keep your purchase receipt as proof of purchase for warranty claims.


