1. Introduction
Thank you for choosing the NuWave 6.5 Quart Stainless Steel Pressure Cooker. This manual provides essential information for the safe and effective use of your appliance. Please read all instructions carefully before first use and retain for future reference.
Important Safety Information
- Always ensure the lid is properly sealed before operating.
- Do not overfill the pressure cooker.
- Never force the lid open while the cooker is pressurized.
- Allow pressure to release completely before opening.
- Keep hands and face away from the steam release valve during operation and pressure release.
- Use caution when handling hot surfaces.
- This appliance is not intended for use by persons with reduced physical, sensory, or mental capabilities unless supervised.
2. Product Overview and Components
The NuWave 6.5 Quart Stainless Steel Pressure Cooker is designed for efficient cooking. Familiarize yourself with its main components:

Figure 2.1: The NuWave 6.5 Quart Stainless Steel Pressure Cooker, showcasing its main body and lid.
Key Components:
- Main Pot: Stainless steel construction.
- Lid: Features a sealing gasket, pressure indicator, and steam release valve.
- Main Handle: Ergonomic handle for safe handling and lid locking mechanism.
- Auxiliary Handle: For two-handed lifting.
- Pressure Release Valve: Controls steam release and pressure levels.
- Pressure Indicator: Visual cue for internal pressure status.

Figure 2.2: Close-up of the lid handles and the red locking button, which secures the lid to the pot.

Figure 2.3: Top view of the pressure release valve, showing settings for steam release and pressure levels (1 and 2).
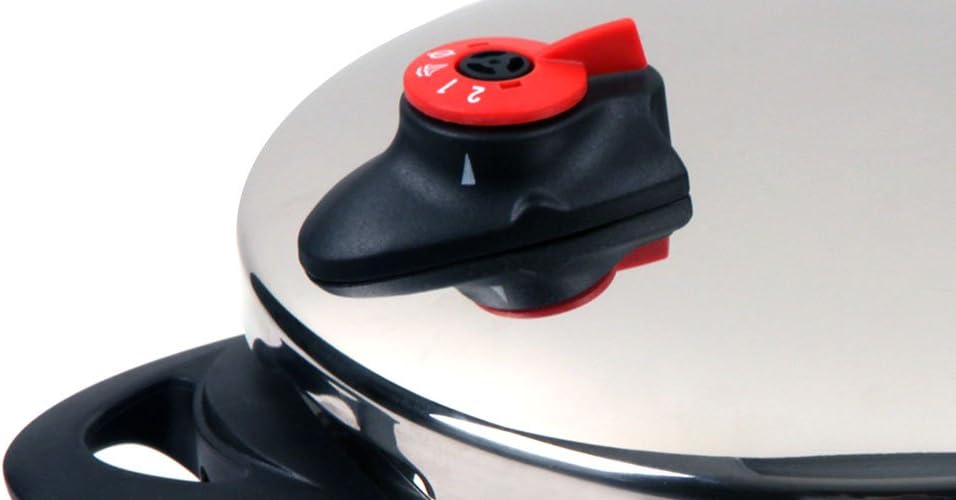
Figure 2.4: Side view of the pressure release valve, indicating its position on the lid.
3. Setup and First Use
3.1 Unpacking and Initial Cleaning
- Remove all packaging materials and labels from the pressure cooker.
- Wash the pot, lid, and all removable parts (sealing gasket, pressure release valve) with warm, soapy water.
- Rinse thoroughly and dry completely before assembly.
3.2 Assembling the Lid
- Ensure the sealing gasket is correctly seated inside the lid rim.
- Place the pressure release valve onto its designated post on the lid, ensuring it is securely fitted.
4. Operating Instructions
4.1 Filling the Pressure Cooker
- Add ingredients and liquid to the pot. Do not fill more than 2/3 full for most foods, and no more than 1/2 full for foods that expand (e.g., rice, beans).
- Ensure there is always a minimum amount of liquid (typically 1 cup) to generate steam.

Figure 4.1: Example of the pressure cooker filled with ingredients such as seafood and vegetables, ready for cooking.

Figure 4.2: The pressure cooker containing various types of rice, demonstrating its capacity for different food preparations.
4.2 Sealing the Lid
- Align the lid with the pot, ensuring the handles are offset.
- Lower the lid onto the pot and rotate the main handle until it locks securely into place with the auxiliary handle. You should hear a click.
- Ensure the pressure release valve is set to the desired pressure setting (e.g., 1 or 2) or to the sealed position, as per your recipe.
4.3 Cooking Under Pressure
- Place the pressure cooker on a suitable heat source (induction, gas, or electric stovetop).
- Heat on high until the pressure indicator rises and steam begins to escape from the valve.
- Reduce heat to maintain a steady, gentle stream of steam or a consistent wobble of the pressure regulator.
- Begin timing your recipe once full pressure is reached.
4.4 Releasing Pressure
There are two primary methods for releasing pressure:
- Natural Release: Remove the cooker from heat and allow it to cool down naturally. The pressure indicator will drop on its own. This method is suitable for foods that benefit from additional cooking time, such as stews and roasts.
- Quick Release: Carefully turn the pressure release valve to the "steam release" position. Steam will rapidly escape. This method is suitable for delicate foods like vegetables to prevent overcooking. Exercise extreme caution to avoid steam burns.
Only open the lid once the pressure indicator has fully dropped and no steam is escaping.
5. Maintenance and Cleaning
5.1 Daily Cleaning
- After each use, wash the pot and lid with warm, soapy water.
- Remove the sealing gasket and wash it separately. Inspect for cracks or damage.
- Clean the pressure release valve and pressure indicator thoroughly to ensure no food particles obstruct them.
- The pot is dishwasher safe. Hand washing is recommended for the lid and its components to prolong their lifespan.
- Dry all parts completely before storing.
5.2 Storage
Store the pressure cooker with the lid inverted or slightly ajar to allow air circulation and prevent odors.
6. Troubleshooting
| Problem | Possible Cause | Solution |
|---|---|---|
| Pressure not building up. | Lid not sealed properly; insufficient liquid; sealing gasket damaged; pressure release valve open. | Ensure lid is locked; add more liquid; inspect/replace gasket; close pressure release valve. |
| Steam leaking from lid. | Sealing gasket improperly seated or damaged; food debris on rim; lid not closed correctly. | Reposition/replace gasket; clean rim; re-lock lid. |
| Lid cannot be opened after cooking. | Internal pressure still present. | Do not force. Allow pressure to release fully (natural or quick release) until the pressure indicator drops. |
7. Specifications
- Model: 31201
- Capacity: 6.5 Quarts
- Material: Stainless Steel
- Color: Silver
- Dimensions: 18 x 16 x 10 inches
- Item Weight: 9.48 pounds
- Compatibility: Electric Stovetop, Gas Stovetop, Induction Compatible Base
- Dishwasher Safe: Pot only (hand wash lid components)
8. Warranty and Support
For warranty information and customer support, please refer to the documentation included with your purchase or visit the official NuWave website. Keep your proof of purchase for warranty claims.


