
Viper 5305V
Viper 5305V 2-Way LCD Vehicle Security and Remote Start System User Manual
Model: 5305V
1. Introduction
This manual provides comprehensive instructions for the installation, operation, and maintenance of your Viper 5305V 2-Way LCD Vehicle Security and Remote Start System. Please read this manual thoroughly before attempting any installation or operation to ensure proper functionality and safety.
The Viper 5305V system offers advanced vehicle security, keyless entry, and remote start capabilities, providing convenience and protection for your vehicle.
2. Package Contents
Verify that all components are present in your package:
- Viper 5305V Control Module
- 2-Way LCD Remote Control (P/N 5305V)
- 1-Way 4-Button Remote Control
- Siren
- Wiring Harnesses
- Shock Sensor
- Alarm Antenna
- LED Indicator
- Reset Switch
- Engine Cut-Off Relay
- User Manual (this document)
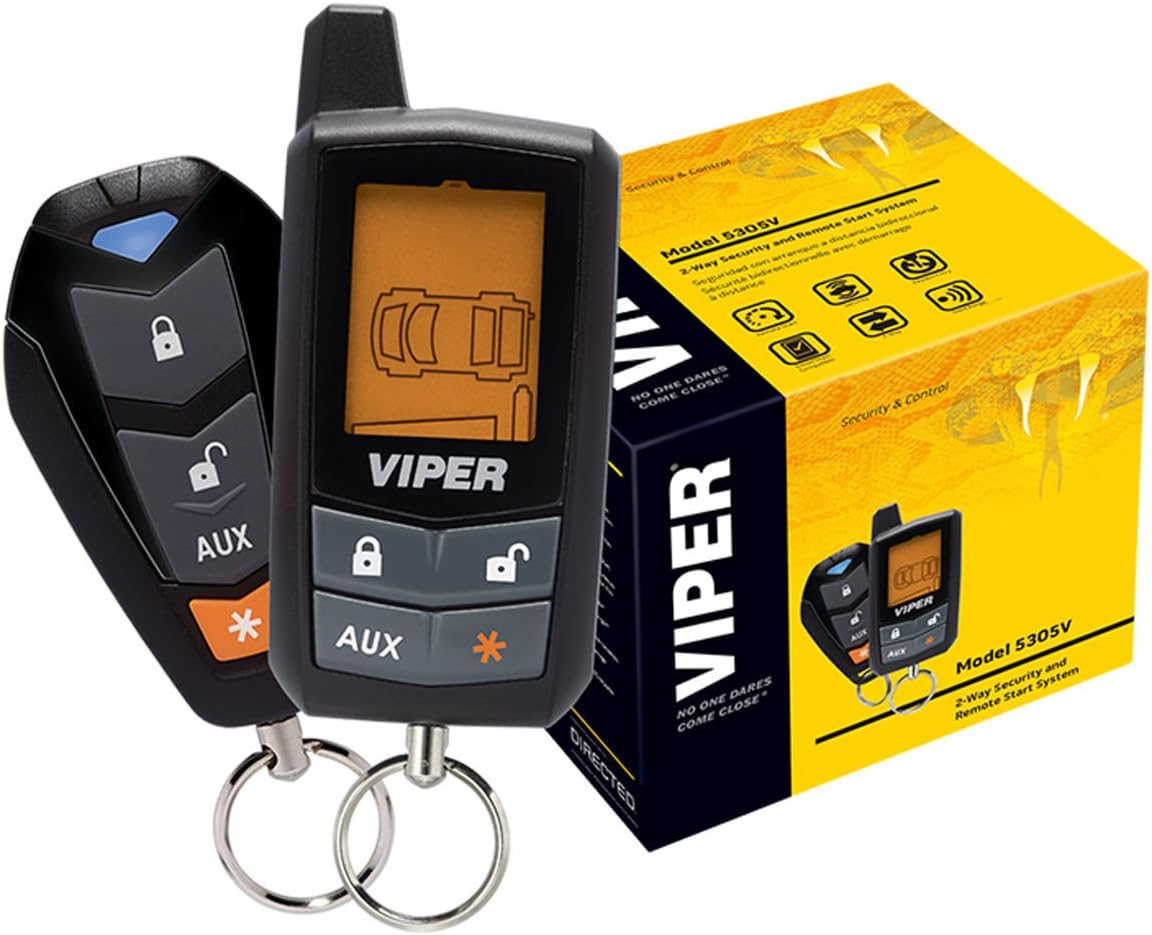
Figure 1: Viper 5305V 2-Way LCD Remote and 1-Way Remote with product box. The 2-way remote features an LCD screen displaying vehicle status, while the 1-way remote offers basic functions. The product box is yellow with Viper branding.

Figure 2: Viper 5305V Control Module and various wiring harnesses. The central black module is the main control unit, surrounded by multiple colored wires for different connections within the vehicle's electrical system.

Figure 3: Viper 5305V Siren. This black siren unit is designed to produce loud audible alerts when the alarm is triggered, featuring a red speaker cone and attached wiring.
3. Setup and Installation
Professional Installation Recommended: Due to the complexity of vehicle electrical systems, professional installation by a certified technician is highly recommended for the Viper 5305V system. Incorrect installation can lead to vehicle damage or system malfunction.
3.1. Remote Control Battery Installation
- Locate the battery compartment on the back of the 2-Way LCD remote.
- Open the compartment cover.
- Insert one AAA battery, ensuring correct polarity (+/-).
- Close the compartment cover securely.
Video 1: EASYGUARD 2-Way Car Alarm with Remote Start EC201-M9. This video demonstrates the unboxing and battery installation for a similar 2-way remote control, showing the components included in a typical car alarm system. Note: While the video shows a different brand, the battery installation process for 2-way LCD remotes is generally similar.
3.2. Module Flashing and Configuration (for installers)
For installers, the Blade module and Compustar controller may require flashing and configuration. This process typically involves connecting the module to a computer and using specialized software.
Video 2: Idatalink BLADE Remote Start/Security Bypass Module Flashing. This video provides a step-by-step guide for flashing and updating a Blade module and Compustar controller, demonstrating the necessary hardware and software interface for configuration.
4. Operating Instructions
The Viper 5305V system utilizes a 2-Way LCD remote for command confirmation and vehicle status updates, and a 1-Way remote for basic functions.
4.1. Remote Control Functions (2-Way LCD Remote)
- Lock: Press the lock button once to arm the security system and lock the doors. The remote will confirm the command.
- Unlock: Press the unlock button once to disarm the security system and unlock the doors. The remote will confirm the command.
- Remote Start: Press and hold the remote start button (often indicated by a star or specific icon) for approximately 3 seconds to start the vehicle remotely. The remote will confirm the engine start.
- Trunk Release: Press and hold the trunk release button (often indicated by a trunk icon) for approximately 3 seconds to open the vehicle's trunk.
- Panic/Car Locator: Press the panic button (often indicated by a siren icon) to activate the siren and flash the parking lights, helping to locate your vehicle or deter potential threats.
- Auxiliary Functions: The AUX button can be programmed for various additional functions, such as controlling power windows or other accessories. Refer to your installer for specific programming.

Figure 4: Front view of the Viper 5305V 2-Way LCD Remote Control. The remote features an LCD screen displaying vehicle status, along with lock, unlock, and auxiliary function buttons.

Figure 5: Viper 5305V 1-Way 4-Button Remote Control. This remote provides basic functions such as lock, unlock, and auxiliary controls without an LCD display.
Video 3: Viper 5305V Remote Control Demonstration. This video shows a user demonstrating the lock, unlock, trunk release, and remote start functions of the Viper 5305V 2-Way LCD remote control on a vehicle. The remote's screen updates with the status of each command.
4.2. Driving Away After Remote Start
After remotely starting your vehicle, follow these steps to drive away:
- Unlock the vehicle using the remote control.
- Enter the vehicle.
- Insert the key into the ignition and turn it to the "ON" or "RUN" position (do not turn to "START").
- Press the brake pedal. The remote start system will disengage, and the vehicle will remain running under key control.
Note: If the brake pedal is pressed before the key is turned to "ON" or "RUN", the vehicle may shut off. Simply restart the vehicle with the key.
Video 4: Compustar Prime T9 Basic Operation. This video demonstrates the basic operation of a Compustar remote start system, including locking, unlocking, trunk release, and the procedure for driving away after a remote start. The principles shown are applicable to the Viper 5305V system.
5. Maintenance
5.1. Remote Control Battery Replacement
When the battery icon on your 2-Way LCD remote indicates low power, replace the AAA battery to ensure optimal performance and range.
5.2. System Care
- Keep remote controls dry and away from extreme temperatures.
- Avoid dropping or subjecting remote controls to severe impact.
- Periodically check all wiring connections for security (professional inspection recommended).
6. Troubleshooting
| Problem | Possible Cause | Solution |
|---|---|---|
| Remote control not responding. | Low or dead battery in remote. | Replace remote control battery. |
| Vehicle not remote starting. | Vehicle in Valet Mode; Hood pin switch open; Low battery voltage. | Exit Valet Mode; Ensure hood is closed; Check vehicle battery. |
| Alarm triggers unexpectedly. | Shock sensor sensitivity too high; Faulty door/hood/trunk pin switch. | Adjust shock sensor sensitivity; Inspect and repair pin switches. |
| Reduced remote range. | Low remote battery; Environmental interference; Antenna obstruction. | Replace remote battery; Move away from interference sources; Check antenna placement. |
7. Specifications
- Model: Viper 5305V
- Remote Control Type: 2-Way LCD, 1-Way 4-Button
- Maximum Range: Up to 0.4 Miles (approximately 700 yards)
- Siren Noise Level: 125 Decibels
- Remote Battery: 1 AAA battery required (for 2-Way LCD remote)
- Product Dimensions: 6 x 6 x 6 inches
- Item Weight: 2 pounds
- Compatible Devices: Viper SmartStart (optional module required)
8. Warranty and Support
8.1. Limited Lifetime Warranty
The Viper 5305V system comes with a Limited Lifetime Warranty. Please retain your proof of purchase for warranty claims. For full warranty details, refer to the documentation provided with your product or visit the official Viper website.
8.2. Technical Support
For technical assistance, troubleshooting, or professional installation inquiries, please contact your authorized Viper dealer or visit the official Viper website: www.viper.com
Related documents5305V


Ask a question about this manual
Ask about setup, troubleshooting, compatibility, parts, safety, or missing instructions. Manuals+ will review the question and use this page’s manual context to help answer it.