1. Introduction
This manual provides essential information for the setup, operation, and maintenance of your TFA 35.1136.02 Digital Wireless Weather Station. This device offers comprehensive weather monitoring with a color display, showing indoor and outdoor temperature and humidity, and a weather forecast based on animated symbols. It also features a radio-controlled clock, calendar, and alarm with snooze function.
The weather station is designed for both table-top placement and wall mounting. For continuous backlight illumination, the device requires a power adapter (not included). When operating on batteries, the backlight functions temporarily to conserve power.
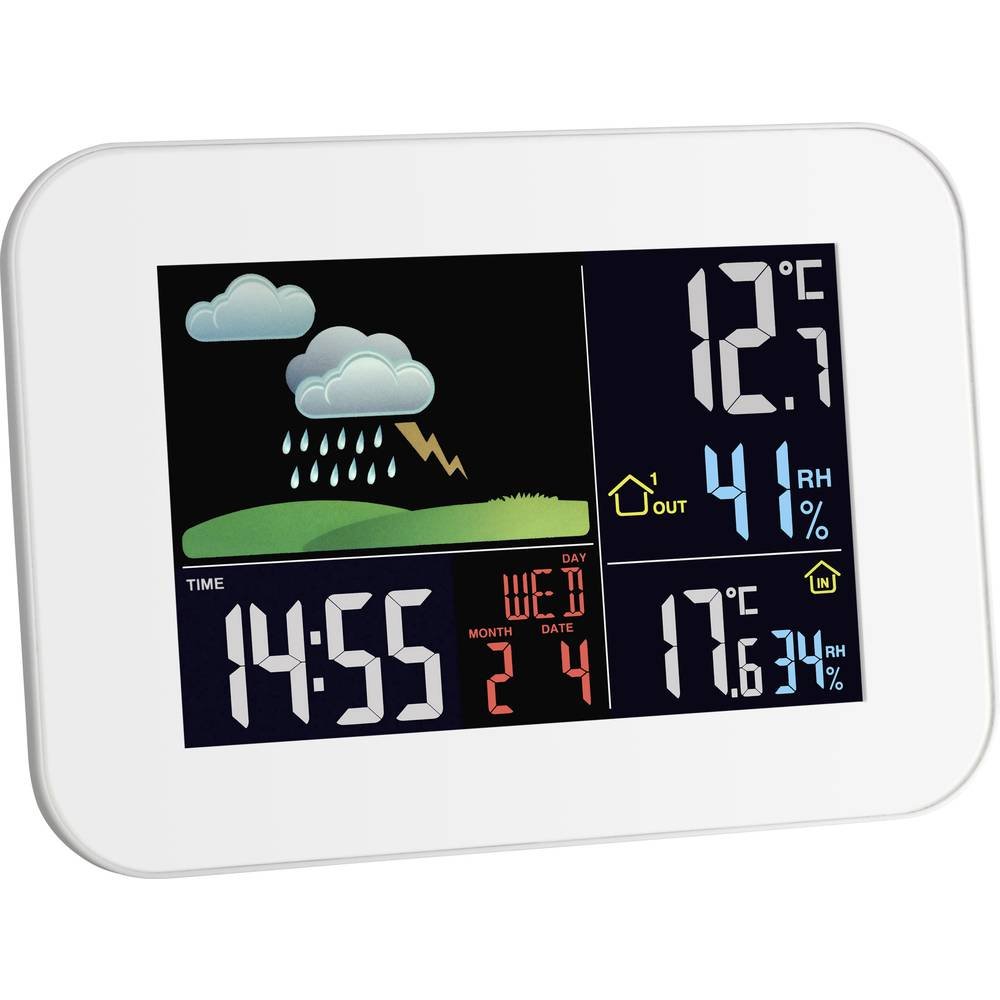
Image 1.1: Main unit of the TFA 35.1136.02 Digital Wireless Weather Station.
2. Setup
2.1. Battery Installation
The weather station main unit and the remote sensor both require batteries for operation. Ensure you use fresh batteries of the correct type.
- Main Unit: Requires 2 x 1.5 V AAA batteries (not included). Open the battery compartment cover on the back of the main unit, insert the batteries according to the polarity markings (+/-), and close the cover.
- Remote Sensor: Requires batteries (type not specified in product data, typically AAA or AA). Open the battery compartment, insert batteries, and close the cover.
For continuous backlight, connect the main unit to a power outlet using a compatible AC adapter (not included).
2.2. Remote Sensor Placement
Place the remote sensor in an outdoor location that is protected from direct sunlight and rain to ensure accurate temperature and humidity readings. Avoid placing it near large metal objects, electrical appliances, or other sources of interference that could disrupt the wireless signal. The effective range of the wireless signal can vary depending on environmental factors and obstacles.
2.3. Initial Synchronization
After inserting batteries into both the main unit and the remote sensor, the main unit will automatically attempt to establish a connection with the remote sensor and receive the radio-controlled time signal. This process may take several minutes.
- Ensure the main unit is not placed too close to electronic devices like televisions, which can interfere with signal reception.
- If the radio-controlled time signal is not received, the time can be set manually. Refer to the 'Operating' section for manual time setting instructions. The device will attempt to receive the time signal daily, typically between 2:00 AM and 6:00 AM.
3. Operating Instructions
3.1. Display Functions
The color display provides a clear overview of various data:
- Time and Date: Displays the current time, day of the week, month, and date. The time is typically synchronized via a radio signal.
- Indoor Temperature and Humidity: Shows the current temperature and relative humidity measured by the main unit.
- Outdoor Temperature and Humidity: Displays the current temperature and relative humidity received from the remote sensor.
- Weather Forecast: Animated symbols (e.g., sun, clouds, rain, lightning) indicate the predicted weather conditions.
- Max/Min Memory: The station records and can display the maximum and minimum temperature and humidity values.
- Dew Point & Comfort Index: Provides additional climate information.

Image 3.1: Detailed view of the weather station's color display.
3.2. Setting Time and Date
If the radio-controlled time signal is not received or if you need to adjust the time zone, you can manually set the time and date. Consult the specific button layout and instructions provided in the full product manual for precise steps. Generally, a 'SET' button is used to enter the setting mode, and 'UP'/'DOWN' buttons are used to adjust values.
3.3. Alarm Function
The weather station includes an alarm clock with a snooze function. To set the alarm, access the alarm settings via the appropriate button (refer to the full product manual). You can also manually adjust time zones.
3.4. Backlight Operation
When powered by an AC adapter, the display backlight will remain continuously illuminated. When operating on batteries, the backlight will enter a power-saving mode (dark display). Pressing the top button will temporarily illuminate the display, which will then dim again after a short period to conserve battery life.
4. Maintenance
4.1. Cleaning
To clean the weather station and remote sensor, use a soft, dry cloth. Do not use abrasive cleaners, solvents, or chemical agents, as these can damage the display or casing. Avoid exposing the devices to excessive dust or moisture.
4.2. Battery Replacement
Replace batteries in both the main unit and the remote sensor when the low battery indicator appears on the display, or when the display becomes dim (for the main unit on battery power) or readings become erratic. Always replace all batteries in a device at the same time with new ones of the same type. Dispose of used batteries responsibly according to local regulations.
5. Troubleshooting
- No Outdoor Sensor Reading:
Ensure the remote sensor is within range of the main unit and free from obstructions. Avoid placing the main unit near other electronic devices that may cause interference. Check and replace batteries in the remote sensor. - Incorrect Time Display:
Verify that the main unit is in a location where it can receive the radio-controlled time signal. If reception is consistently poor, manually set the time as described in the 'Operating' section. - Display is Dim or Blank (on battery power):
This is normal behavior for power saving. Press the top button to temporarily illuminate the display. If the display remains dim or blank even after pressing the button, replace the batteries. - Display is Dim or Blank (with AC adapter):
Check if the AC adapter is properly connected and functioning. If the adapter is faulty, the unit will rely on battery power, resulting in a dim display. - Inaccurate Readings:
Ensure both the main unit and remote sensor are placed in appropriate environments (e.g., remote sensor protected from direct sun/rain). Calibrate if the option is available (refer to full product manual).
6. Specifications
| Feature | Detail |
|---|---|
| Model Number | 35.1136.02 |
| Dimensions (Main Unit) | 2.6 x 17.5 x 12.5 cm |
| Weight (Main Unit) | 290 g |
| Power Source (Main Unit) | 2 x 1.5 V AAA batteries (not included) or AC adapter (not included) |
| Power Source (Remote Sensor) | Batteries (type not specified, typically AAA or AA) |
| Display Type | LCD with Color Backlight |
| Special Features | Wireless, Weather Forecast, Indoor/Outdoor Temp/Humidity, Radio-controlled clock, Alarm, Calendar, Dew Point, Max/Min Memory |
| Material | Plastic |

Image 6.1: Dimensions of the TFA 35.1136.02 Digital Wireless Weather Station.
7. Warranty and Support
For specific warranty information, please refer to the documentation provided with your purchase or contact your retailer. The availability of spare parts in the EU is guaranteed for 1 year from the date of purchase. For technical support or further inquiries, please contact TFA customer service or your local distributor.


